Introduction
Wave Copilot is a professional desktop application designed for broadcast WAV file management. Built specifically for production sound mixers, field recordists, and broadcast audio engineers, it provides comprehensive tools for:
- Metadata editing - Edit bEXT and iXML metadata in broadcast WAV files
- Audio playback - Multi-track playback with professional mixing controls, including real-time Automix
- File processing - Split polyphonic files, combine mono files, reorder tracks
- Sound reports - Generate professional PDF and CSV sound reports
- Format conversion - Convert sample rates, bit depths, and apply dithering
- Export Mix - Render a stereo mixdown of any file with your mixer settings applied, and optionally add it straight back into the poly WAV it came from
- Continuous Recording Conform - Trim secondary recordings to match primary takes, or replace individual tracks with secondary audio using timecode-based matching
Key Features
- Support for standard and Broadcast WAV files with full bEXT/iXML metadata, plus playback of MP3, AAC, M4A and AIFF
- Multi-mono file detection and automatic grouping
- Up to 64-channel polyphonic file support, with full per-channel mixer control on every channel
- Professional mixer with per-channel gain, pan, solo, mute, and phase invert (Ø)
- Automix with Gain Sharing and Intelligent Gate modes for automatic microphone level management
- Mixer lock to carry settings across files when browsing takes from the same scene
- Pre-fader and post-fader metering with clip indicators
- Waveform visualization with timecode ruler
- Batch processing for all operations
- Customizable column display with 20+ metadata fields
System Requirements
Windows
- Windows 10 or later (64-bit)
- 4 GB RAM minimum (8 GB recommended)
- 200 MB available disk space
- Audio output device
macOS
- macOS 12 (Monterey) or later
- Intel or Apple Silicon (M1/M2/M3)
- 4 GB RAM minimum (8 GB recommended)
- 200 MB available disk space
- Audio output device
Linux
- 64-bit distribution (Ubuntu 20.04+, Debian 11+, Fedora 36+, or equivalent)
- 4 GB RAM minimum (8 GB recommended)
- 200 MB available disk space
- Audio output device (PulseAudio or PipeWire)
Installation
Every build is downloaded from the Wave Copilot product page at 1khz.ca. Pick the file for your platform below.
Windows
- Download the installer ('Wave Copilot Setup.exe') or portable version ('Wave Copilot Portable.exe')
- For the installer:
- Run the setup file
- Follow the installation wizard
- Launch from the Start menu or desktop shortcut
- For the portable version:
- Run the executable directly (no installation required)
macOS
- Download the DMG file ('Wave Copilot.dmg')
- Open the DMG file
- Drag Wave Copilot to the Applications folder
- Launch from Applications or Spotlight
Linux
Three ways to install, in the order most people should prefer them:
APT repository (Debian / Ubuntu, recommended):
This is the easiest route, and the only one that updates itself. One command adds the repository and installs Wave Copilot:
'curl -fsSL https://1khz.ca/wave-copilot/apt/install.sh | sudo sh'
If you would rather not pipe a script into a shell, the same thing by hand:
- 'sudo curl -fsSL https://1khz.ca/wave-copilot/apt/wave-copilot-archive-keyring.gpg -o /usr/share/keyrings/wave-copilot-archive-keyring.gpg'
- 'sudo curl -fsSL https://1khz.ca/wave-copilot/apt/wave-copilot.sources -o /etc/apt/sources.list.d/wave-copilot.sources'
- 'sudo apt update'
- 'sudo apt install wave-copilot'
From then on Wave Copilot updates with everything else on the machine, through 'sudo apt upgrade'. The repository is signed, and apt refuses to install from it if the signature does not check out.
DEB package (Debian / Ubuntu, manual):
- Download 'wave-copilot_x.x.x_amd64.deb'
- Install it: 'sudo dpkg -i wave-copilot_*.deb'
- Launch from your application menu or by running 'wave-copilot'
AppImage (portable: works on any distribution, no installation required):
- Download 'Wave-Copilot-x.x.x.AppImage'
- Make it executable: 'chmod +x Wave-Copilot-*.AppImage'
- Run it: './Wave-Copilot-*.AppImage'
Note: How you install decides how you update. Install from the APT repository and 'sudo apt upgrade' brings you new versions. Install a DEB by hand and nothing updates it: download the new DEB and reinstall, or add the repository above, which takes over from a hand-installed copy in place because it is the same package. The AppImage updates itself from inside the app. In-app downloads are not offered for either Debian package, since both belong to the system package manager, but Help > Check for Updates still works: it looks at the APT repository and, when a newer version is there, tells you which and shows the command to run.
Automatic Updates
Wave Copilot checks for updates automatically on Windows, macOS and the Linux AppImage. When an update is available:
- A notification will appear
- Click "Download Update" to download
- Click "Install and Restart" to apply the update
On Debian and Ubuntu the system package manager owns the app instead, so updates arrive through 'sudo apt upgrade' if you installed from the APT repository, and by downloading a new DEB if you installed one by hand. Help > Check for Updates checks the APT repository on those installs. When a newer version is published it names the version and shows 'sudo apt update && sudo apt upgrade' to copy into a terminal; Wave Copilot does not download or install it itself. See the Linux part of Installation above.
Getting Started
First Launch
When you first launch Wave Copilot, you'll start with a 14-day free trial. The trial banner at the top of the window shows your remaining trial days.
Loading Files
- Go to File > Add Files (or press 'Ctrl+O' / 'Cmd+O')
- Select one or more audio files (WAV, MP3, AAC, M4A or AIFF), or select a folder to load all of them it contains (non-recursive, top-level files only)
- Files will appear in the file list with their metadata displayed
Or drag and drop. Dropping audio files, or a folder of them, straight onto the file list loads them the same way the dialog does. Dropping onto a list that already has files adds to it rather than replacing what is there, so you can build a session up from several folders.
MP3, AAC, M4A and AIFF play and behave like WAV everywhere in the app, with a few things their containers cannot hold. See Non-WAV Audio Files for what differs.
Release Notes
Help > Release Notes opens a summary of what changed in each version, newest first. It is the quickest way to see whether a feature you are looking for arrived in the version you are running.
Interface Overview
The main window consists of:
- Title Bar - Application name and window controls
- Menu Bar - File, Window, and Help menus
- Trial/License Banner - Shows trial status or license information
- Tab Bar - Switch between the six main sections:
- Files & Metadata - Browse files and edit metadata
- Playback - Audio playback with mixer
- Split/Combine - File splitting and combining tools
- Sync - Align recordings by audio content and write timecode
- Audio TC - Read timecode recorded as audio and write it into the file
- Reports - Sound report generation
The chapters that follow describe each tab in turn. If you would rather start from the job than from the tool, see Workflows and Recipes, which answers the questions that come up most often on set and names the tab to reach for in each case.
Preferences
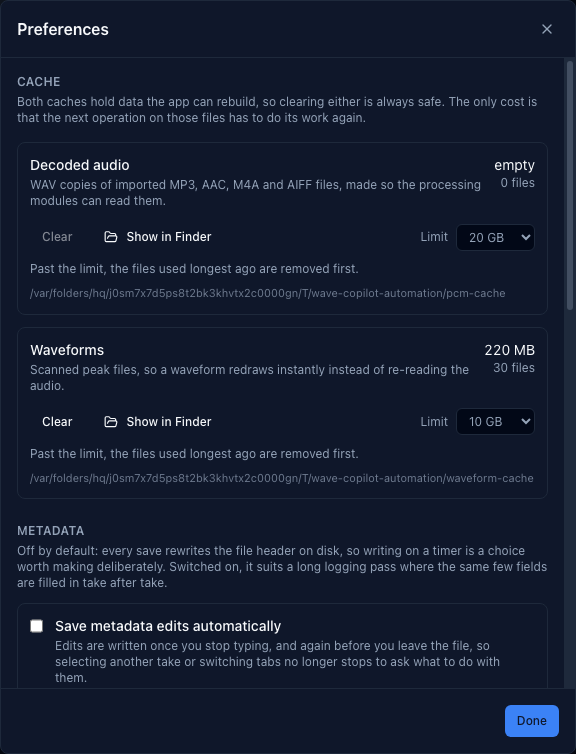
Open Preferences from Help > Preferences, or 'Cmd+,' on a Mac. It is the home for settings that apply across every file rather than to one at a time:
- Cache - Wave Copilot keeps two caches on disk: the decoded-audio cache, which holds the WAV proxy built from each MP3, AAC, M4A or AIFF file you have opened (see Non-WAV Audio Files), and the waveform cache, which holds scanned peak data. Preferences shows how many entries each one holds and how much space it takes, and lets you clear either one or reveal it in Finder. Both have an adjustable size limit, from 5 to 100 GiB; the files used longest ago are dropped first once it is reached.
- Channel Colours - the sets and rules that colour mixer strips and waveform lanes by track name. See Channel Colours.
- Metadata - turns on auto-save for metadata edits, and sets its delay. See Saving Changes.
- Show waveform timeline under file list - turns the compact scrub waveform under the file list on or off. See Waveform Strip.
More settings will move in here as they are added.
Files & Metadata
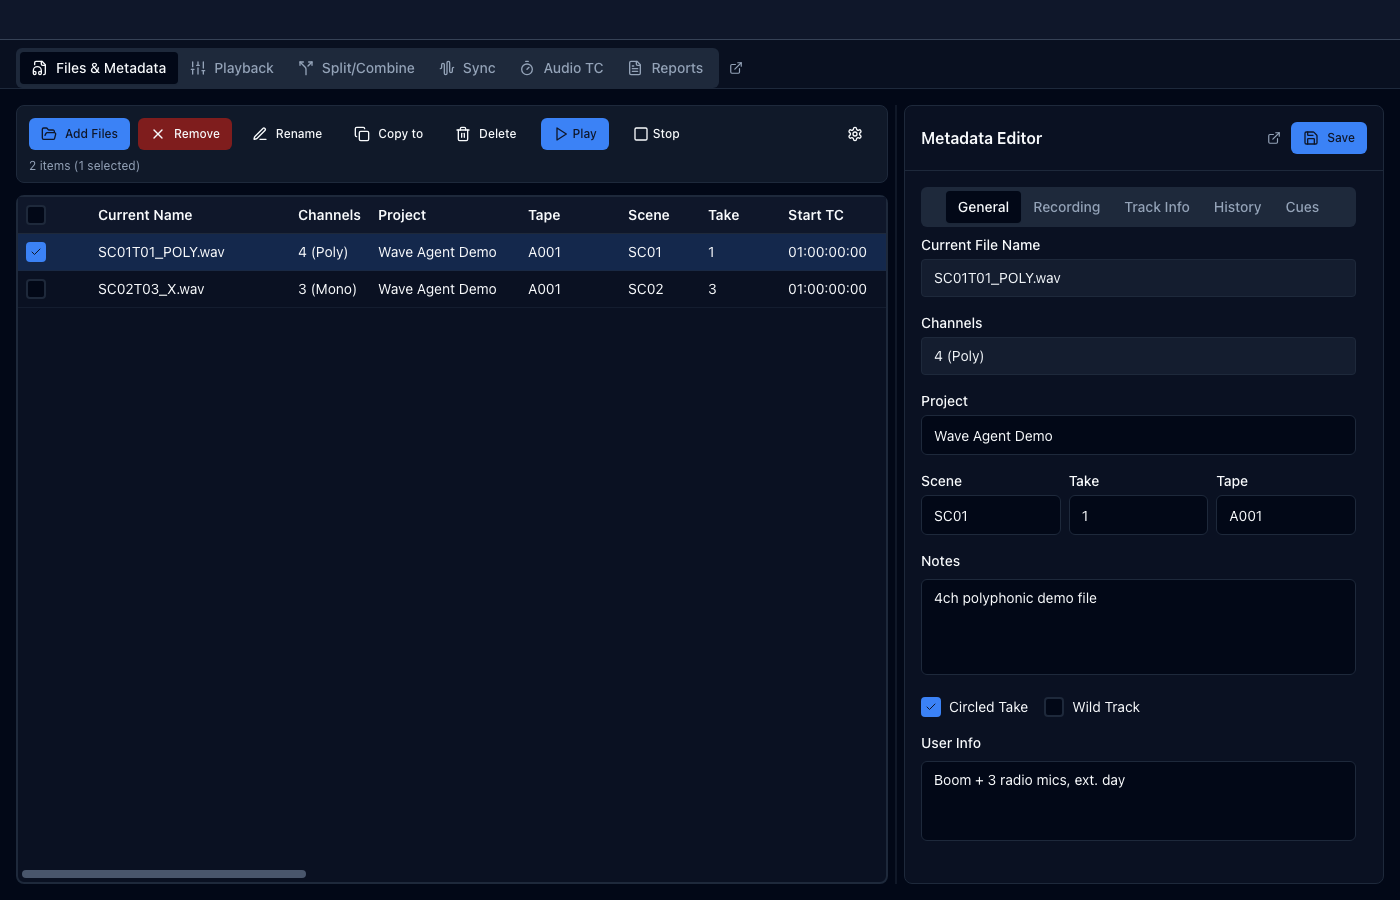
The Files & Metadata tab is the primary workspace for managing your audio files.
File List
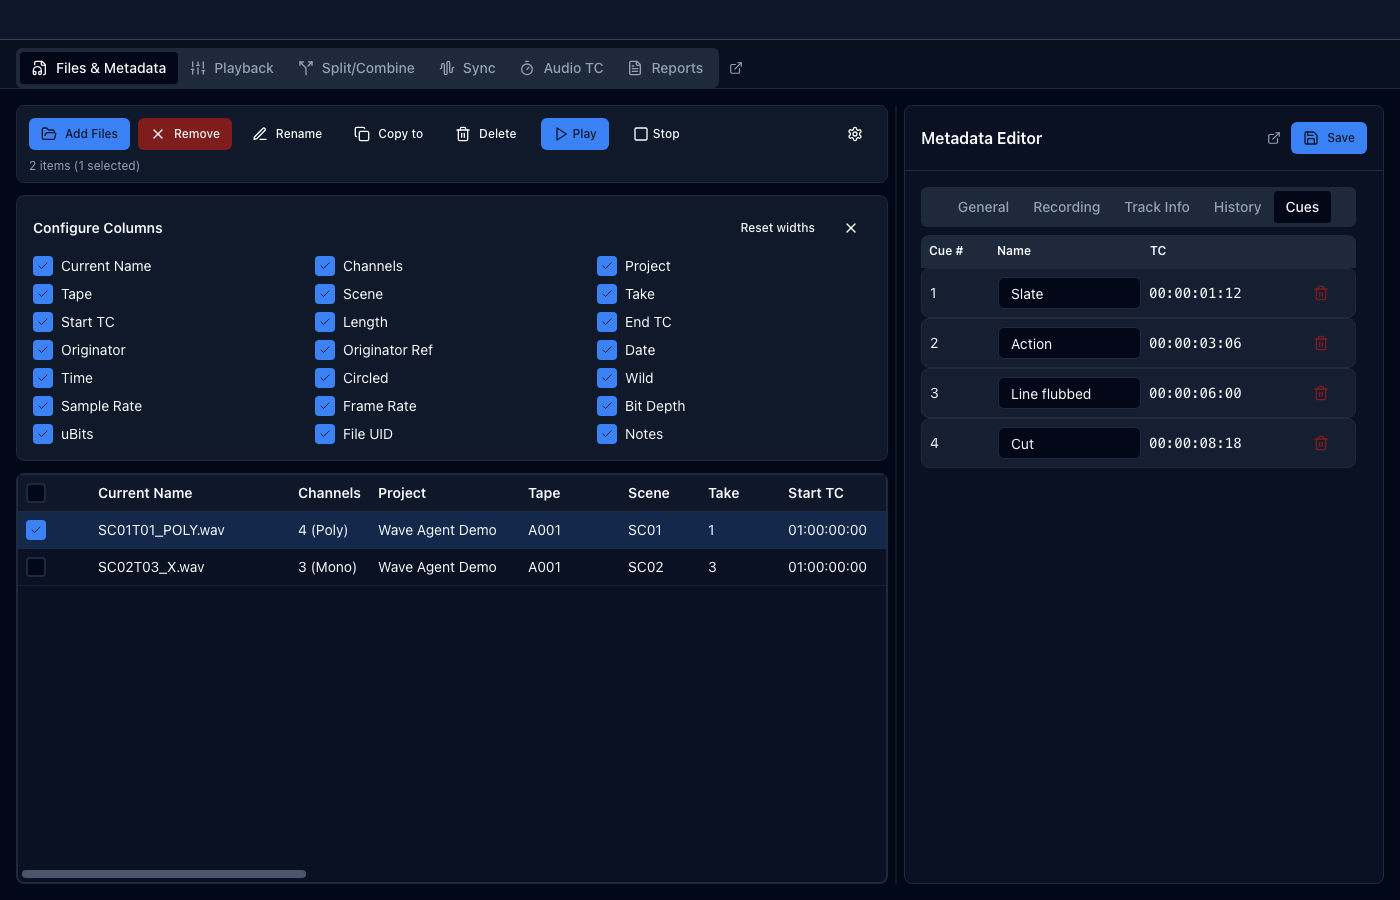
The left panel displays all loaded files in a sortable table with customizable columns:
| Column | Description |
|---|---|
| Current Name | File name |
| Channels | Number of audio channels |
| Project | Project name from metadata |
| Tape | Tape/Roll number |
| Scene | Scene identifier |
| Take | Take number |
| Start TC | Start timecode |
| Length | Duration |
| End TC | End timecode |
| Originator | Recording device/software |
| Date | Recording date |
| Sample Rate | Audio sample rate |
| Frame Rate | Timecode frame rate |
| Bit Depth | Audio bit depth |
| Originator Ref | The originator's unique reference string, written by the recorder |
| Time | Time of day the recording started, from the bEXT time reference |
| Circled | Whether the take is marked as circled |
| Wild | Whether the take is marked as a wild track |
| uBits | User bits, shown as a hexadecimal value |
| File UID | The file's unique identifier from iXML |
| Notes | The free-form note stored in the file |
To sort the file list:
- Click any column header to sort ascending; click again for descending; click a third time to clear the sort.
- The active sort column and direction are preserved when switching tabs and restored when you return to Files & Metadata.
- The Previous/Next buttons in the Playback tab follow the same sort order, so if you sort by Scene, navigation moves through files in scene order.
To customize columns:
- Click the Settings button (gear icon) to show/hide individual columns
- Drag column headers left or right to reorder them
- Resize a column by dragging the divider on the right edge of its header. The column takes exactly the width you drag it to; when the columns together are wider than the list, the list scrolls horizontally. Values that no longer fit are shortened with an ellipsis. Hover to see the full text.
- Double-click a column divider to size that column to its contents, the same "best fit" as Excel or Numbers: the narrowest width that still shows every value in full. This shrinks an over-wide column as readily as it widens a cramped one.
- Fit widths in the Configure Columns panel best-fits every visible column at once, giving the same result as double-clicking each divider in turn.
- Reset widths in the Configure Columns panel puts every column back to its default width, leaving your visibility and order choices alone.
- Column visibility, order and width are saved automatically and restored the next time you open the app
Waveform Strip
A compact waveform can be shown under the file list, so a take can be scrubbed through while its metadata is open beside it, without switching to the Playback tab. Click anywhere in the strip to seek; it follows the same file the Metadata Editor is showing. A multi-mono or poly file shows one real mixed-down lane rather than a lane per channel.
Turn it on or off with Show waveform timeline under file list in Preferences (see Preferences).
Non-WAV Audio Files
MP3, AAC, M4A and AIFF load, play and appear in the file list alongside WAV. Behind the scenes, Wave Copilot decodes each one through FFmpeg into a cached copy the rest of the app reads exactly like a WAV, so playback, the waveform, Split, Combine, Conform and every other panel work the same regardless of the source format.
What differs is only what the container itself cannot hold:
- No start timecode where the source recorded none. A decoded file with no bEXT time reference shows a dash in the Start TC column instead of a false '00:00:00:00'.
- No metadata can be written. iXML, bEXT, track names, cues and every other field that lives in a WAV's chunks have nowhere to go in these containers. The relevant fields are shown but disabled, and Save is unavailable. See Saving Changes.
- No cue points. The Add Cue button in the transport bar and the Cues tab are disabled for these files, for the same reason.
- LTC Extract reads but cannot write timecode back. The burst is still read from a decoded file and its recovered timecode still reaches a poly WAV built from it, but the recovered value cannot be written back into the source itself. Wave Copilot counts these files separately from the ones it stamped. See Audio TC.
Everything else, playback, waveform display, Split, Combine, Conform, Sync by Audio, works exactly as it does for a WAV.
Resizing the Metadata Editor
The divider between the file list and the Metadata Editor can be dragged left or right to trade space between them. The width is remembered between sessions.
- Drag the divider to resize. It stops before either side becomes too narrow to use.
- Double-click the divider to return the editor to its default width.
- Click the chevron on the divider to hide the editor entirely and give the file list the full window; click it again to bring the editor back at its previous width.
Detachable Metadata Editor Window
The Metadata Editor can be detached into its own floating window, so the file list gets the full width of the main window, which is useful on a second display, or when you have many columns visible.
To detach: click the small ⇱ (external link) icon next to the Save button in the Metadata Editor header. The editor and its divider disappear from the main window and the file list expands to fill it.
The detached editor follows your selection from either window. Selecting a file in the main list updates it immediately, and so does pressing Previous / Next in the detached Playback window. All three windows can be open at once and stay in step.
Two layouts. The window opens with the familiar tabs. The Columns button in the editor header switches to a five-column view showing General, Recording, Track Info, History and Cues side by side, so nothing is hidden behind a tab. Click Tabs to switch back. Your choice is remembered.
Sizing. The window opens at about the width the editor had while docked. Resize it however you like. The size is remembered and used the next time you detach.
Saving works exactly as it does docked: the file is written to disk and the main window's file list updates to match, without marking the main window as having unsaved changes.
To reattach: close the Metadata Editor window. The editor returns to the main window at its previous width. The Playback window, if open, is unaffected.
File Operations:
- Open files - Click anywhere in the empty file list area to open a file dialog
- Select files - Click to select, Ctrl+Click for multiple selection
- Right-click menu - Access Rename, Copy, Delete, and Convert options
- Double-click - Load file for playback
Metadata Editor
The right panel provides detailed metadata editing through five tabs:
General Tab
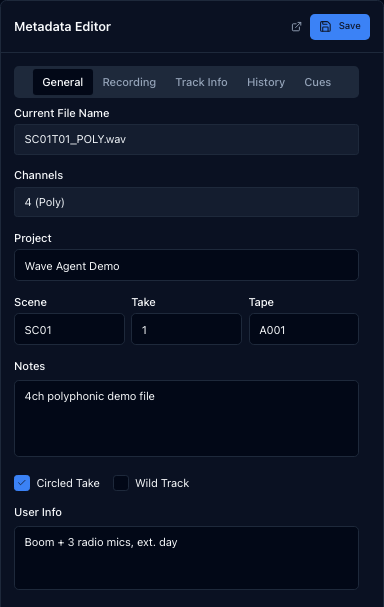
- Current File Name - The name of the file being edited, shown for reference; rename from the file list rather than here
- Project - Project name
- Tape - Tape/Roll identifier
- Scene - Scene name or number
- Take - Take number
- Notes - Free-form notes field
- User Info - A second free-text field, separate from Notes. Recorders use it for whatever the mixer wants carried with the take, such as a sound report line or a naming convention of your own. It is written to the file's metadata alongside Notes, and appears in sound reports as the User Info column
- Circled - Mark as a circled (selected) take
- Wild - Mark as wild track (non-sync audio)
If you set a Scene and Take that another loaded file already uses, a Duplicate Scene/Take Detected warning appears when you save. Continuing anyway is allowed: a '+' is added to the front of the scene so the two takes stay distinguishable rather than silently colliding.
Recording Tab
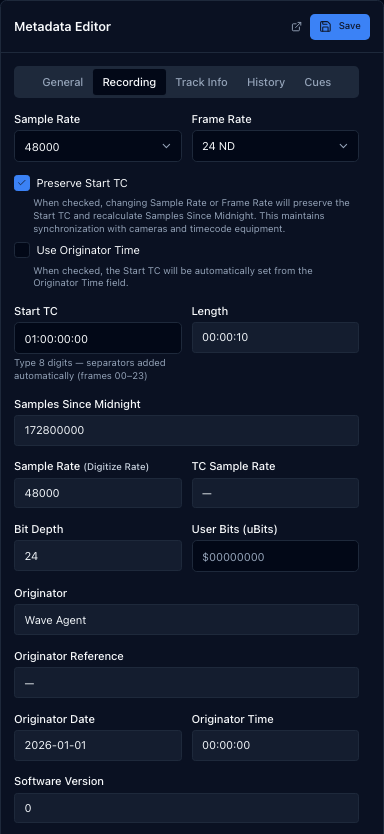
- Sample Rate - The file's audio sample rate. Changing it here rewrites the metadata; use Format Conversion if you want to actually resample the audio
- Frame Rate - Timecode frame rate: 23.97, 24, 25, 29.97 and 30, with drop-frame available at 29.97 and 30
- Start TC - Beginning timecode of the recording. Type 8 digits and the separators are added for you
- Length - The file's duration, calculated from the audio itself
- Samples Since Midnight - The timecode expressed the way it is actually stored in the file: a count of samples elapsed since midnight. Start TC is the human-readable view of this number, and the two are always kept consistent with each other
- Sample Rate (Digitize Rate) and TC Sample Rate - Read-only values reported by the recorder, describing the rate the audio was digitised at and the rate its timecode was counted against. They normally match the file's Sample Rate; when they do not, the file was recorded with a pull-up or pull-down
- Bit Depth - The file's audio bit depth
- User Bits (uBits) - User bits, an eight-character hexadecimal field recorders use to carry a date, a camera roll, or a custom code alongside the timecode
- Originator - The device or software that made the recording
- Originator Reference - The recorder's unique reference string for the take
- Originator Date and Originator Time - The date and time of day the recorder started the file
- Software Version - The recorder's firmware or software version, where it wrote one
Two checkboxes govern how timecode reacts when you change the format fields:
Preserve Start TC (on by default) keeps the Start TC fixed when you change Sample Rate or Frame Rate, and recalculates Samples Since Midnight to match. This is what you want almost always, because it keeps the take in sync with the camera and any other timecode equipment on the shoot. Turn it off only when you intend the opposite: to hold the stored sample count and let the displayed timecode move instead.
Use Originator Time sets Start TC automatically from the Originator Time field, for files whose recorder wrote a time of day but no usable timecode.
Track Info Tab
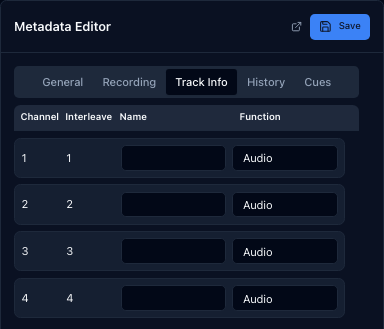
- Track Names - Name for each channel
- Track Functions - Role of each track (Boom, Lav, etc.)
History Tab
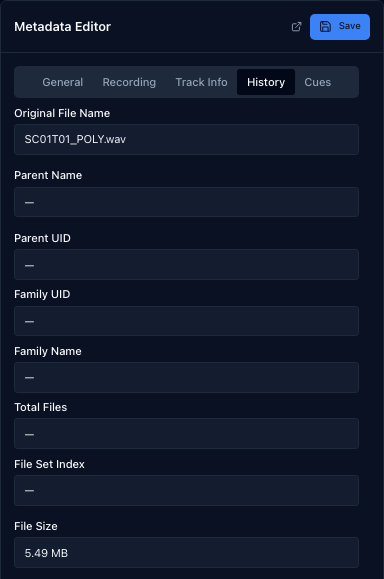
- Original File Name - File name when first recorded, preserved even after the file is renamed
- Originator - Recording device or software
- Originator Reference - Unique reference ID
- Originator Date and Originator Time - When the recorder started the file
- Software Version - The recorder's firmware or software version
File set fields. The rest of the tab describes the file's place in a multi-mono family, and is read from the recorder's iXML. It is what lets Wave Copilot group separate mono files back into one take:
- Family Name and Family UID - The name and unique identifier shared by every file in the set
- Total Files - How many files the recorder wrote for this take
- File Set Index - Which member of the set this file is
- Parent Name and Parent UID - The recording the set was derived from, where the recorder wrote one
These are shown for reference and are not editable: they describe how the recorder wrote the take, and changing them would break the grouping.
Cues Tab
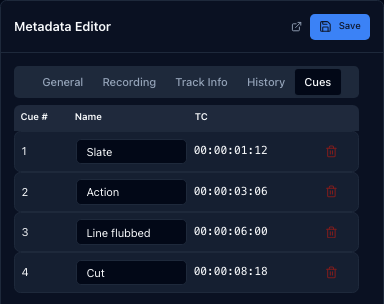
- Sync Points - List of cue markers in the file
- Add Cue - Create new cue at current position
- Remove Cue - Delete selected cue
- Edit - Modify cue name or position
Multi-Mono Detection
Wave Copilot automatically detects related mono files (e.g., files with matching names ending in channel indicators like '_1', '_2', '_L', '_R') and groups them together for easier management.
Candidates that share a name are grouped by checking which of them actually agree with each other, not by demoting the whole set the moment one file does not match. This matters when the same take also exists in more than one format, for example a folder holding 'TK01_Boom_1.wav', 'TK01_Boom_2.wav' and the same take exported as 'TK01_Boom.mp3': the WAV pair still groups correctly as a multi-mono set, even though the MP3 shares its prefix but is not part of the group.
Saving Changes
Metadata changes are held as a draft until they are written to the file. Click Save (or press 'Cmd+S' / 'Ctrl+S') to write them. Until you do, selecting another file, switching tabs, renaming or copying stops and asks what to do with the changes, and closing the app prompts as well.
Automatic saving. If you would rather not press Save on every take, turn on 'Save metadata edits automatically' in Preferences > Metadata. It is off by default, because every save rewrites the file header on disk. With it on, a draft is written twice over:
- a short wait after your last edit, chosen in Preferences (1, 2, 5 or 10 seconds)
- immediately before you leave the file, so an edit made a moment before clicking the next take is never the one that gets lost
The prompts above stop appearing, since there is nothing unsaved to ask about. A line beside the Save button shows the state: 'Auto-save pending' while a write is due, and the time of the last one once it has been written.
Three things are still handed back to you rather than decided by a timer, and they wait for the Save button:
- files that cannot store metadata at all, such as MP3, AAC, M4A and AIFF
- a timecode or originator time that does not parse
- a scene and take that would collide with another file, since continuing prefixes the scene with '+'
Copying Files
Copy to copies the selected files to another folder, leaving the originals where they are. Multi-mono groups are expanded automatically, so selecting one group copies every member file in it rather than just the one row you clicked. Nothing about the files is changed on the way: this is a copy, not a convert or a rename.
Renaming Files
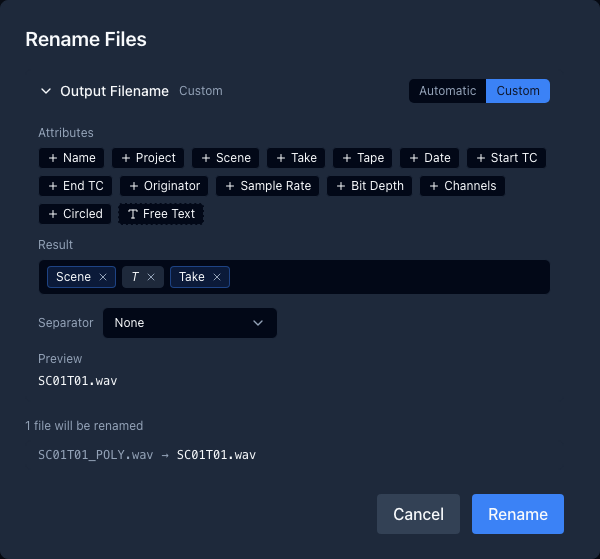
Select one or more files and choose Rename (toolbar button, right-click menu, File > Rename, or 'F2'). A dialog opens showing exactly what each file will be renamed to before anything happens:
- Automatic (default): files are renamed to 'SceneT{Take}.wav' (e.g. '12AT03.wav'); files without scene/take metadata are listed with an error and skipped
- Custom: build your own naming scheme from metadata chips; see Custom Output Filenames
The preview lists every selected file as 'old name → new name'. Multi-mono groups are renamed together, preserving each member's channel-number suffix ('_01', '_02', …). Click Rename to apply or Cancel to leave everything untouched. If a target name already exists on disk, that file is skipped and reported.
The whole batch is planned as one operation before anything touches disk, so a rename that shifts every name along by one, where each new name is briefly owned by a neighbour that is itself about to move, resolves correctly rather than reporting a false conflict or renaming only part of the selection.
Renumbering Takes
Select two or more files and click Renumber takes in the Metadata Editor to renumber the Take field across the whole selection in one pass.
- Start - the take number the first file gets
- Step - added for each file after the first; a negative step counts down
- Digits - how many digits the written take is padded to, e.g. '01' vs '001'
- Order - renumber the files by their timecode or by their current order in the file list
A preview shows every file's current take next to the one it will get. If a resulting scene and take would collide with a file outside the selection, Wave Copilot lists the conflicts and asks before writing; choose Renumber anyway to proceed or adjust the settings first.
Audio Playback
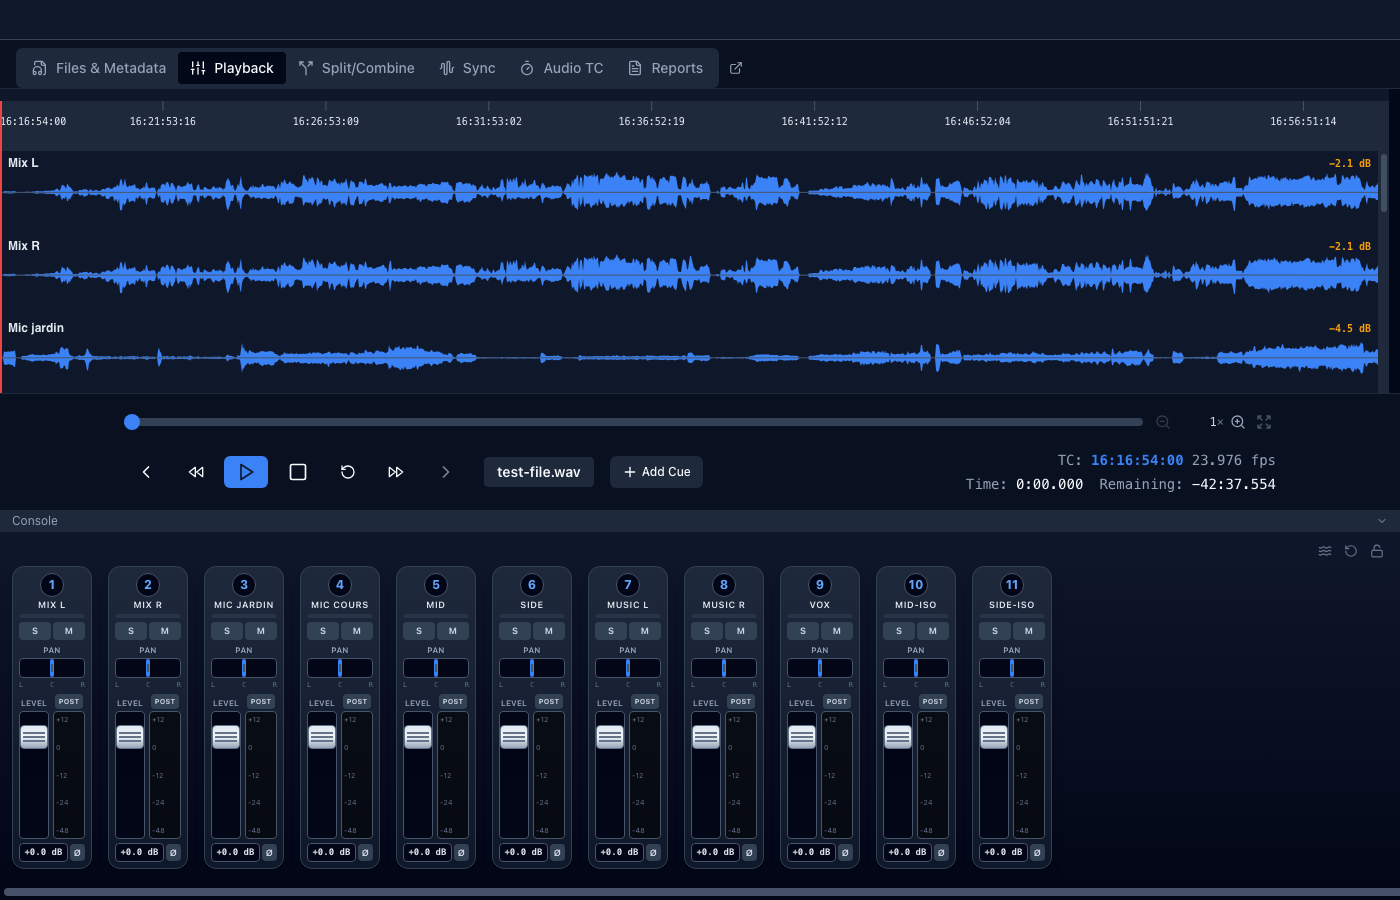
The Playback tab provides professional audio playback with a full-featured mixer.
Transport Controls
| Control | Function |
|---|---|
| Play/Pause | Start playback from current position (Space or K when stopped). K always pauses in place when playing. Space and the Pause button pause in place when Return to Start is off; when on, they stop and return to the play-in point instead. |
| Stop | Stop playback (F3). If Return to Start is on, returns to the play-in point; otherwise 00:00 |
| Rewind (⏪) | Seek back 5 seconds (J when stopped) |
| Fast Forward (⏩) | Seek forward 5 seconds (L when stopped) |
| Return to Start (↺) | Toggle: when lit (blue), Stop, end-of-file, and Space all return to where Play was last pressed |
| Shuttle speed badge | Shows current speed (2×, 4×, 8×) next to the play button; all speeds play audio with pitch preserved |
| Previous/Next | Navigate between files in the current sort order (← / →) |
| Time Display | Shows current position, timecode, and remaining duration |
| Seek Slider | Click or drag to jump to any position |
Waveform Viewer
The waveform viewer shows the audio content of the loaded file with a timecode ruler across the top. All channels are stacked vertically. Click anywhere on the waveform or ruler to seek to that position.
The ruler uses adaptive tick spacing: the interval between marks is chosen automatically from a set of clean values (single frames, 2f, 5f, 10f, 0.5 s, 1 s, 2 s, 5 s, 10 s, 15 s, 30 s, 1 min … 2 h) so that labels are always legible and never duplicated, regardless of the current zoom level.
Each channel strip shows its peak dB level in the top-right corner (green ≤ −6 dB, amber −6 to −0.5 dB, red above −0.5 dB). The value always reflects the peak of the entire file regardless of zoom level.
A muted channel, or one silenced because another channel is soloed, draws its lane dimmed to a shade of its own colour rather than at full brightness, matching what you actually hear.
Display gain. The slider next to the waveform icon in the toolbar boosts a quiet recording so it is visible, from unity up to 20×. It also goes below 1×, down to 0.25×, which is not for shrinking the view: it lowers the lane's amplitude ceiling instead of its height, which is the only way to see how far over 0 dBFS a hot 32-bit float recording actually reaches. Double-click the slider to reset it to unity. This affects the drawing only, never the audio or the exported file. The same control, with the same range, is on the Sync by Audio timeline and the Custom TC Range audition strip.
Zoom Controls
The waveform supports horizontal zoom from 1× (full overview) up to 1000×.
| Action | Effect |
|---|---|
| 'Ctrl'+scroll wheel (Windows / Linux) | Zoom in / out, centred on mouse position |
| 'Cmd'+scroll wheel (macOS) | Zoom in / out, centred on mouse position |
| Trackpad pinch (macOS) | Zoom in / out, centred on mouse position |
| − / + buttons next to the seek slider | Step zoom out / in by 1.5× per click, centred on the playhead |
| 'Ctrl/Cmd' + '-' | Zoom out by 1.5×, centred on the playhead |
| 'Ctrl/Cmd' + '=' | Zoom in by 1.5×, centred on the playhead |
| 'Ctrl/Cmd' + '0' | Reset zoom to 1× (full file overview) |
| Click the zoom level (e.g. 4×) between the buttons | Type an integer 1–1000 and press Enter (or click away) to jump directly to that zoom level, centred on the playhead |
At 1× the entire file is visible. Zoom in to inspect transients, room tone texture, or the shape of individual audio cycles.
The playhead is always kept in the visible window when zooming. When using scroll-to-zoom, if the mouse-centred zoom would push the playhead off-screen, the view automatically shifts to bring it back near the edge. The − / + buttons always centre the zoom on the playhead position.
Scrolling and Panning
| Action | Effect |
|---|---|
| Plain scroll wheel | Scroll the waveform panel up / down (normal behaviour for many-channel files) |
| 'Shift'+scroll wheel | Pan the waveform left / right when zoomed in |
| Two-finger horizontal swipe (macOS trackpad) | Pan left / right when zoomed in |
| Drag the scrollbar thumb below the timeline | Jump to any horizontal position |
| Click on the scrollbar track | Jump the view to that point in time |
The horizontal scrollbar appears below the timeline ruler whenever the zoom level is above 1×. Its thumb width is proportional to the fraction of the file currently visible.
Auto-scroll and Playhead Tracking
The waveform keeps the playhead visible in two complementary ways:
- While playing: when the playhead reaches the edge of the visible window, the view automatically jumps so the playhead reappears roughly one-quarter from the left edge, matching the paging behaviour of professional DAWs.
- While zooming: any zoom action (Ctrl+scroll, pinch, or the ± buttons) ensures the playhead cannot be pushed off-screen. If zooming centred on the mouse position would hide the playhead, the view shifts to keep it near the nearest edge.
If you manually pan away from the playhead while paused, the view will re-centre on it the next time the playhead moves outside the visible area.
Peak Resolution and Background Loading
When a file is opened, the waveform appears quickly using a low-resolution scan (~20 000 peaks). A background scan at full resolution (up to 256 000 peaks) then runs silently, with no spinner and no interruption to playback. Once the background scan completes (typically within a few seconds for most files), every zoom level from 1× to 256× renders crisp, detailed waveforms.
For zoom levels above 256×, the app performs an on-demand windowed scan that reads only the currently visible portion of the file. Even for very long recordings this is near-instant because only a tiny slice of audio data is read. The visible area is buffered slightly so small scrolls do not trigger a rescan.
All peak data is cached on disk so a file only needs to be fully scanned once; subsequent loads use the cached peaks instantly.
Console Toggle
A Console toggle bar sits between the transport controls and the mixer. Clicking it collapses or expands the mixer panel. When the mixer is hidden, the waveform zone expands to fill the freed space, which helps when working with many-channel files and you want more track height visible. Click the bar again (or use the chevron arrow on the right) to restore the mixer.
Detachable Playback Window
The Playback tab can be detached into its own floating window, leaving the main window free to stay on the Files & Metadata tab while you monitor playback on a second display or in a separate spot on the same screen.
To detach: click the small ⇱ (external link) icon to the right of the Playback tab label. A separate Playback window opens and the tab disappears from the main tab bar.
Navigation stays in sync in both directions:
- Loading or double-clicking a file in the main window loads it in the detached Playback window immediately.
- Pressing Previous / Next in the detached window navigates the file list in the main window and updates both windows.
Mixer and transport controls are fully functional in the detached window: faders, pan, solo, mute, phase, automix, shuttle, and seek all work the same as in the embedded tab. All changes are reflected in the main window's audio engine in real time.
To reattach: close the Playback window (click the × button or use the native close control on macOS). The Playback tab reappears in the main tab bar exactly as it was before.
Mixer
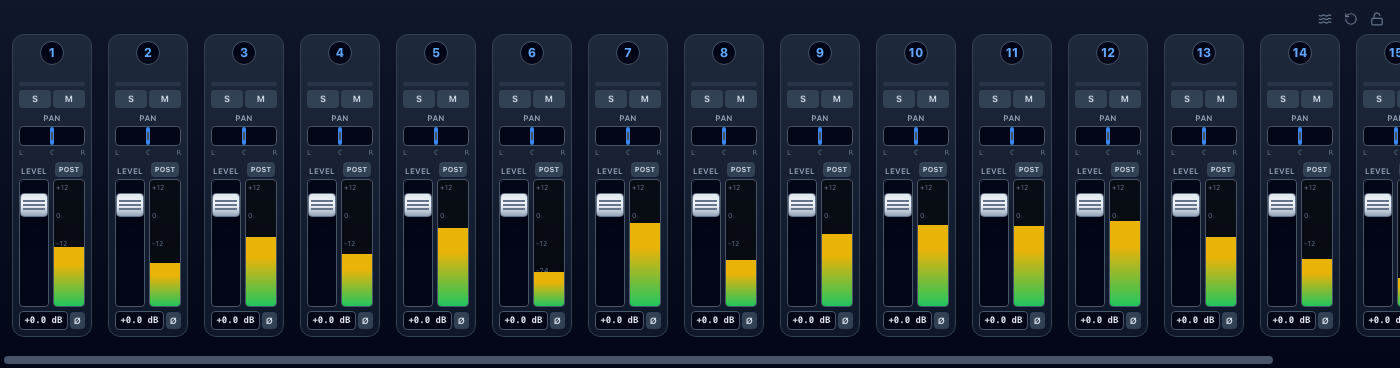
The mixer provides per-channel controls:
| Control | Range | Description |
|---|---|---|
| Gain Slider | -∞ to +12 dB | Adjust channel volume. Fully down = silence (-∞ dB) |
| Pan | L to R | Position in stereo field. Double-click to reset to center. |
| Solo (S) | On/Off | Hear only this channel. Ctrl/Cmd+click to solo exclusively (unsolos all others). |
| Mute (M) | On/Off | Silence this channel |
| Mid/Side (MS) | On/Off | Pair this channel with another to decode a Mid/Side recording |
| Stereo Link (LR) | On/Off | Gang this channel with its neighbour as a left/right pair. See 'Stereo Link' |
| Phase Invert (Ø) | On/Off | Flip the polarity of the channel (180° phase inversion) |
| Meter | - | Real-time level display |
| Clip Indicator | Red | Shows when audio is clipping |
| Channel Colour | - | Click the channel number to colour the strip and its waveform lane |
Mixer Features:
- Pre-fader metering (PRE): The meter shows the signal level before the fader and mute are applied. Useful for confirming a signal is present on a channel regardless of its fader position or mute state.
- Post-fader metering (POST): The meter reflects the level after gain and mute, showing exactly what is sent to the output.
- Phase Invert (Ø): Flips the polarity of the channel by 180°. Use this to correct a microphone that is wired out of phase with the others, or to fix comb filtering when blending two mics on the same source. An active phase invert is shown in purple. Phase state is saved and restored per file along with all other mixer settings.
- Pre/post for the whole console: The PRE/POST button at the top right of the mixer switches every channel at once, instead of clicking each strip in turn. It shows the console's current state, and reads POST while the channels are mixed.
- Mute all channels: The mute icon at the top right of the mixer silences every channel in one click, and unmutes them all again on a second click. Solo state and fader positions are untouched, so soloing a channel afterwards still isolates it as it normally would.
- Set up from track names: The wand icon at the top right reads the track names and configures the console in one click. Channels named as a Mid/Side rig are paired, and channels named as a stereo pair are panned hard left and right. Hover the button first: it tells you exactly what it found before you press it, or says that it found nothing. Names are only recognised as whole words, so 'MID' and 'SIDE' are matched but 'MIC' and 'CROWD' are left alone, and any channel it does not recognise is untouched.
- Master gain - Overall output level control
- Settings are saved per file: Mix settings (gain, pan, solo, mute, phase, meter mode, Mid/Side pairing) persist per file while the session is open
- Reset: Click the reset icon (↺, top-right of the mixer) to instantly return all channels of the current file to defaults (0 dB gain, center pan, no solo or mute, and no Mid/Side pairing)
- Channel colours: Strips and their waveform lanes can be coloured from the track names, so the boom is the same colour in every file you open. See 'Channel Colours' below.
- Lock Mixer: Click the lock icon (top-right of the mixer) to carry settings to every file you navigate to. When locked (amber icon), your current mix settings, including Automix enabled/mode and per-channel Automix selection, are always applied when switching files. Channels are matched by position; extra channels in the new file are set to defaults. When unlocked, each file restores its own last-saved settings (or defaults if never visited).
Lock Mixer examples:
Example 1: carrying a mix across takes from the same scene
- Open Scene 5 Take 1. Adjust the boom to –3 dB and mute track 4.
- Click the lock icon (turns amber).
- Press Next. Scene 5 Take 2 loads with the same boom level and muted track 4.
- Press Next again. Scene 5 Take 3 also gets those settings.
Example 2: adjusting settings on one file, then locking
- Open Take 1. Dial in your mix, then click the lock icon.
- Press Next. Take 2 inherits Take 1's settings regardless of whether you locked before or after adjusting.
Example 3: stopping the carry-over midway
- Navigate through Takes 1–3 with lock on. All three receive the same settings.
- On Take 3, click the lock icon to deactivate it (icon turns grey).
- Press Next. Take 4 loads with its own previously-saved settings, or defaults if never visited.
Example 4: overwriting a previously-visited file
- Browse Takes 1–4 with lock off (each loads with defaults).
- Go back to Take 2, dial in a new mix, and turn the lock on.
- Navigate to Take 4. Even though Take 4 was already visited, the lock overwrites it with Take 2's settings.
Channel Colours
On a 32 or 64 channel recording, finding the boom among the isos means reading small track names across narrow strips. Colour makes it a glance instead.
Colours are worked out from the track names, so they arrive without any per-file setup and stay consistent across a whole shoot. Define 'boom' as red once and the boom is red in every file you open, whichever input it happens to be on that day.
Turning it on and off
Channel colour is on by default, and can be switched off entirely with 'Colour channels' in Preferences under Channel Colours. Off is not the same as an empty rule list: the console goes back to exactly how it looked before colour existed, with plain strips, blue waveform lanes, and no colour set menu in the mixer header.
Your sets and rules are kept while it is off, so switching it back on restores the scheme rather than asking you to build it again.
Where the colour shows
A coloured channel tints three things: the strip's background, its border, and the channel number at the top of the strip. The waveform lane matches, and gets a small coloured plate behind its track name. That plate is there because a lane is mostly empty space, so a quiet channel, a radio mic that only speaks twice in the take, would otherwise show almost no colour at all, and those are exactly the channels worth finding quickly.
Muting a channel, or soloing a different one, fades its lane to a darker shade of its own colour rather than to grey, so a silenced track is still recognisable.
Colour sets
Colours live in named sets, because the names that matter change from one production to the next. A character who is blue on one show is free to be red on the next. Pick the active set from the palette menu at the top left of the console, or manage them in Preferences under Channel Colours.
Use Duplicate to start a new show from an existing scheme rather than building it again.
Rules
In Preferences, each rule pairs a word with a colour. A word is matched as a whole word only, so 'boom' colours BOOM, Boom L and BOOM-MS, but leaves BOOMBOX and ZOOM alone. Matching ignores case and treats spaces, hyphens, underscores and dots alike.
The first rule that matches wins, so put specific words above general ones. Use the arrows beside a rule to move it.
Wave Copilot ships with rules for the common names, including boom, perche, mix, lav, radio, hf, plant, ambience and ambiance. Edit or delete any of them.
A preview at the bottom of the section shows exactly what the rules would do to the file you have open, so a word that matches nothing is obvious before you rely on it.
Colour by role
Instead of matching names, a set can colour by what a channel is: mix tracks one colour, Mid/Side pairs another, stereo pairs another, and ordinary isos left plain. This is the quicker way in on a card whose track names mean nothing to you yet. Switch a set between the two with the 'Colour by' buttons.
Setting a colour by hand
Click a channel number to open the palette. Pick one of the named colours, or choose any colour you like.
A colour set by hand follows the track name, not the channel number. Colour BOOM green and it stays green for the rest of the session, including on takes where the boom sits on a different input. It applies to every channel with that name, on every file.
The palette also offers:
- 'Use rule colour' to drop the hand-picked colour and hand the channel back to the set's rules.
- 'No colour' to leave the channel plain even when a rule would colour it.
- 'Save to set' to turn the hand-picked colour into a real rule in the active set. This is how a colour becomes permanent. Hand-picked colours last only for the session, while sets are saved.
A channel with no track name cannot be coloured, because there is no name for the colour to follow. Name the track in the metadata editor first.
Colour and the mixer lock
The mixer lock does not carry colour. Every file works its colours out from its own track names, which is what keeps the boom red rather than keeping input 1 red. If channel 1 is the boom in one take and the mix in the next, it is red and then blue, as it should be.
Renaming a track in the metadata editor re-colours it immediately. Reset returns hand-picked colours to whatever the rules say.
Colours are shown in the detached playback window too.
Mid/Side Decoding
A Mid/Side rig records two channels that are not left and right: a mid microphone carrying the centre of the image, and a figure-of-eight side microphone carrying the difference between the two sides. Played as they are, the pair is unusable. Wave Copilot can decode it to ordinary stereo while you monitor, and carry the same decode into everything you export.
There is no limit of one pair per file. A poly can hold several Mid/Side rigs, and each is paired and decoded independently.
Pairing two channels
Click the MS button on the strip carrying the mid microphone. It pairs with the channel next to it, and both strips show which half they are and who they are paired with, for example 'MID w/ 6' and 'SIDE w/ 5'.
A Mid/Side rig is almost always wired to two neighbouring inputs, so pairing only ever offers an adjacent channel. If the channel to the right is free it is used, otherwise the one to the left. If neither is free, a small menu opens so you can choose the other half yourself. You can also right-click MS at any time to pick a partner directly, which is how you pair a rig that is split across non-adjacent inputs.
Right-click a strip that is already paired to swap which half is the mid, or to unpair. Clicking MS again also unpairs.
If your tracks are named, the wand icon at the top right of the mixer does all of this for you. See 'Set up from track names' above.
The controls change on a paired strip
| Strip | Fader | Pan |
|---|---|---|
| Mid | Level of the pair | Disabled |
| Side | Width of the pair | Disabled |
The mid fader is the pair's level control, and it carries the side channel with it, so pulling it down takes the whole rig down. The side fader sets the width: fully down collapses the pair to mono, 0 dB is the recording as it was made, and pushing it up widens the image. Pan is switched off on both strips, because the decode itself decides where the two halves sit.
Phase is not shared between the halves. Inverting the side channel alone mirrors the stereo image, which is a normal thing to want, so each half keeps its own polarity button.
Mid/Side and Automix
Pairing two channels takes both of them out of the automix. A side channel is a difference signal rather than a source, so letting the automix move the two halves by different amounts would make the stereo image wander rather than simply changing its level. The pair sits at its own faders instead, which is usually what you want from an ambience or music rig.
You can put a pair back into the automix using the toggle on its mid strip, and the two halves then move together as though they were one microphone. The side strip shows the automix indicator greyed out, because it follows the mid rather than being set on its own.
Levels
Decoding is unity: left is mid plus side, right is mid minus side, with no attenuation, which matches how a hardware decoder behaves. That means a decoded pair can be up to 6 dB louder than either microphone on its own, so it can go past full scale even when neither original channel was close. Wave Copilot handles this for you when exporting. See 'Export Mix'.
Stereo Link
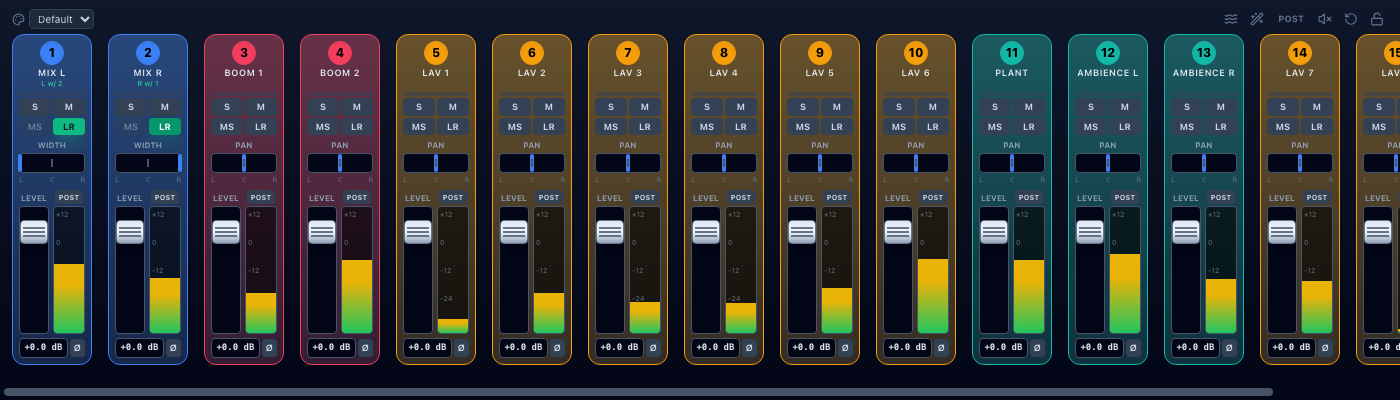
Gang two channels together as a left/right pair, so a genuine stereo pair, ordinary stereo mics, a stereo boom, or a stereo mix track, is worked as one instead of as two channels that happen to sit side by side.
Pairing two channels
Click the LR button on either strip. It pairs with the channel next to it, the same adjacent-channel logic Mid/Side pairing uses: the channel to the right is used if it is free, otherwise the one to the left, or right-click LR to choose a partner directly.
Right-click a linked strip to swap which channel is left and which is right, or to unlink. Clicking LR again also unlinks. A channel already paired as Mid/Side cannot also be stereo-linked, and the reverse; engaging one blocks the other until it is released.
What links together
- Fader - moving either channel's fader moves both, keeping the pair's balance
- Pan - stays live on both strips, but mirrors: dragging one pan control narrows or widens the stereo image instead of moving one channel independently. The label above it reads WIDTH in place of PAN while linked
- Mute, solo, phase and metering - apply to the pair; muting either channel mutes both
- Automix participation - a linked pair counts as one vote in the automix, the same way a Mid/Side pair does, so the automix does not pull the image apart by moving the two halves by different amounts
Unlike Mid/Side, a stereo link is a control relationship only, not a decode: it changes nothing about how the pair is summed, so it has no effect on export beyond whatever gain and pan values you set through it.
Playback Notes
- Every WAV is streamed and decoded as it plays, so file size, channel count and bit depth make no difference to how playback behaves and nothing has to be loaded into memory first
- Supports sample rates from 44.1 kHz to 192 kHz, any bit depth, and up to 64 channels
- Shuttle audio quality: all shuttle speeds (2×, 4×, 8×) use pitch-preserving time-stretch so the audio remains intelligible at any speed. Pitch is held constant while only the tempo changes.
Automix
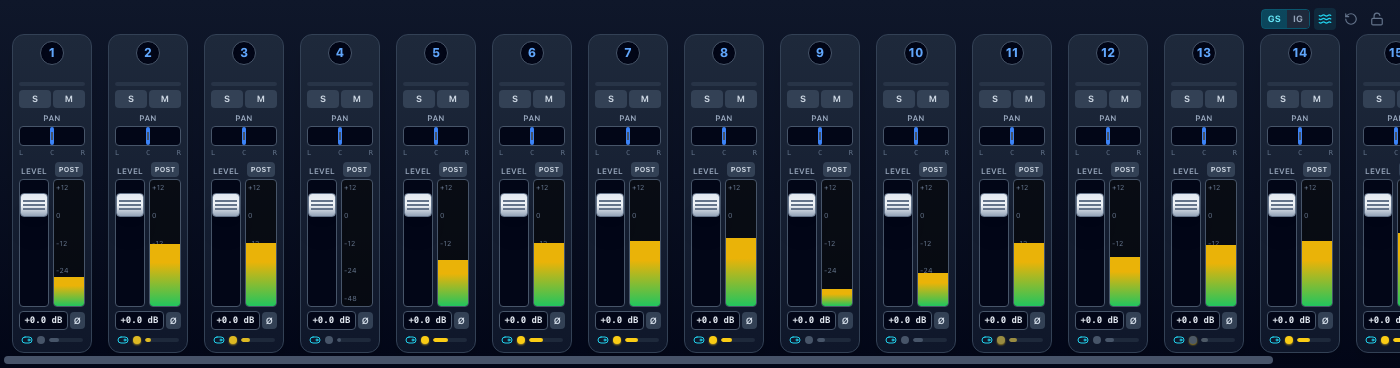
Automix automatically manages per-channel gain in real time based on signal activity, so the dominant microphone is always at full level while inactive channels are attenuated, without riding faders manually. It is designed for reviewing multi-microphone recordings where you want the audio to feel naturally mixed without manual intervention.
Automix is disabled by default. Enable it by clicking the wave icon (∿) in the top-right toolbar of the mixer. The icon glows cyan when active.
Modes
Two modes are available, selectable via the GS / IG pill that appears when Automix is on:
GS: Gain Sharing
A smooth, continuous algorithm. Each channel's gain is set proportional to its level relative to the group:
'gain = channel_level / √(sum of all channel levels²)'
The total system gain (measured as the RMS of all channels) is always conserved. When one mic is much louder than the others it rises toward full gain; the others fall proportionally. There are no threshold crossings or binary decisions. Gain is always moving, always proportional. This mode is natural-sounding and works well for typical multi-mic dialogue review.
IG: Intelligent Gate
A more decisive mode that makes on/off gating decisions per channel. A channel gates on only when two conditions are met simultaneously:
- Its signal envelope is within 5% of the loudest active channel (Maxbus test)
- Its signal is at least 2× its own estimated noise floor (NAT, Noise-Adaptive Threshold)
Channels that don't meet both conditions are attenuated by −10 dB (not silenced). The last active channel is held on if nothing else qualifies, preventing dead air. NOMA (Number of Open Microphone Attenuation) reduces the gain by −3 dB for each doubling of open channels to keep the mix level consistent.
Use Intelligent Gate when you want decisive switching between speakers rather than a gradual blend.
How Automix Interacts with Other Controls
- Faders: Automix reads each channel's true, pre-fader signal to make its gain-sharing/gating decisions, so moving a fader up or down does not influence which channels Automix favors, the same way a hardware automixer works. Your fader position is applied afterward, on top of whatever gain Automix has already decided. To leave a specific channel out of the Automix calculation regardless of its fader level, use channel selection instead (below).
- Mute: Muted channels are excluded from the Automix calculation entirely.
- Solo: When any channel is soloed, only soloed channels participate in Automix.
- Pan: Pan does not affect Automix decisions; the algorithm reads each channel's mono level signal before panning.
Choosing Which Channels Participate
Each channel strip has a small toggle next to its Automix indicator, visible whenever Automix is enabled, that includes or excludes that channel from the Automix calculation:
- Included (cyan toggle): the default for every channel. Its signal counts toward Automix's gain-sharing/gating decisions, and its own gain is modulated by Automix like any other participating channel.
- Excluded (grey toggle): the channel is left out of the calculation entirely. It is not muted. It keeps playing at whatever level you've set on its fader, blending in underneath whatever Automix decides for the rest of the channels.
Use this for a channel you always want present at a fixed level without it swaying, or being swayed by, the automix decision for the others, for example a boom that's mostly picking up room tone, or a fixed ambience/reference track.
Per-File Settings
Automix enabled/mode and per-channel selection are all saved per file. Loading file A (GS on, one channel excluded) and switching to file B restores whatever was last set for file B (or defaults, meaning Automix off with every channel included, if never configured). This lets different takes in a session have independent Automix setups.
When the Mixer Lock is active, the current Automix state, including channel selection, carries over to every file you navigate to, the same as gain, pan, and mute.
Automix Indicator
When Automix is active, each channel strip shows the channel-selection toggle described above alongside a small bar showing that channel's real-time automix gain:
| Colour | Automix gain |
|---|---|
| Green | > 70%, channel is dominant |
| Yellow | 30–70%, channel is partial |
| Dim | < 30%, channel is attenuated |
Hover the bar to see the exact gain value in % and dB. Excluded channels show a dimmed, static bar since their gain isn't being modulated.
Export with Automix
When you export a mix with Automix enabled for a file, the export engine applies the same algorithm offline, reading the same pre-fader signal and respecting the same per-channel selection, processing the full file faster than real time in a streaming render. The rendered output reflects the dynamic gain decisions exactly as they would sound during playback.
See Automix Option under Export Mix for batch export controls.
Split & Combine
The Split/Combine tab provides tools for splitting polyphonic files into separate mono files, combining mono files into polyphonic files, merging two poly WAV files into a single combined poly WAV, and merging any number of files (mono, stereo, or a mix of channel counts) into one polyphonic WAV with the Combine Group tool.
Split Polyphonic Files
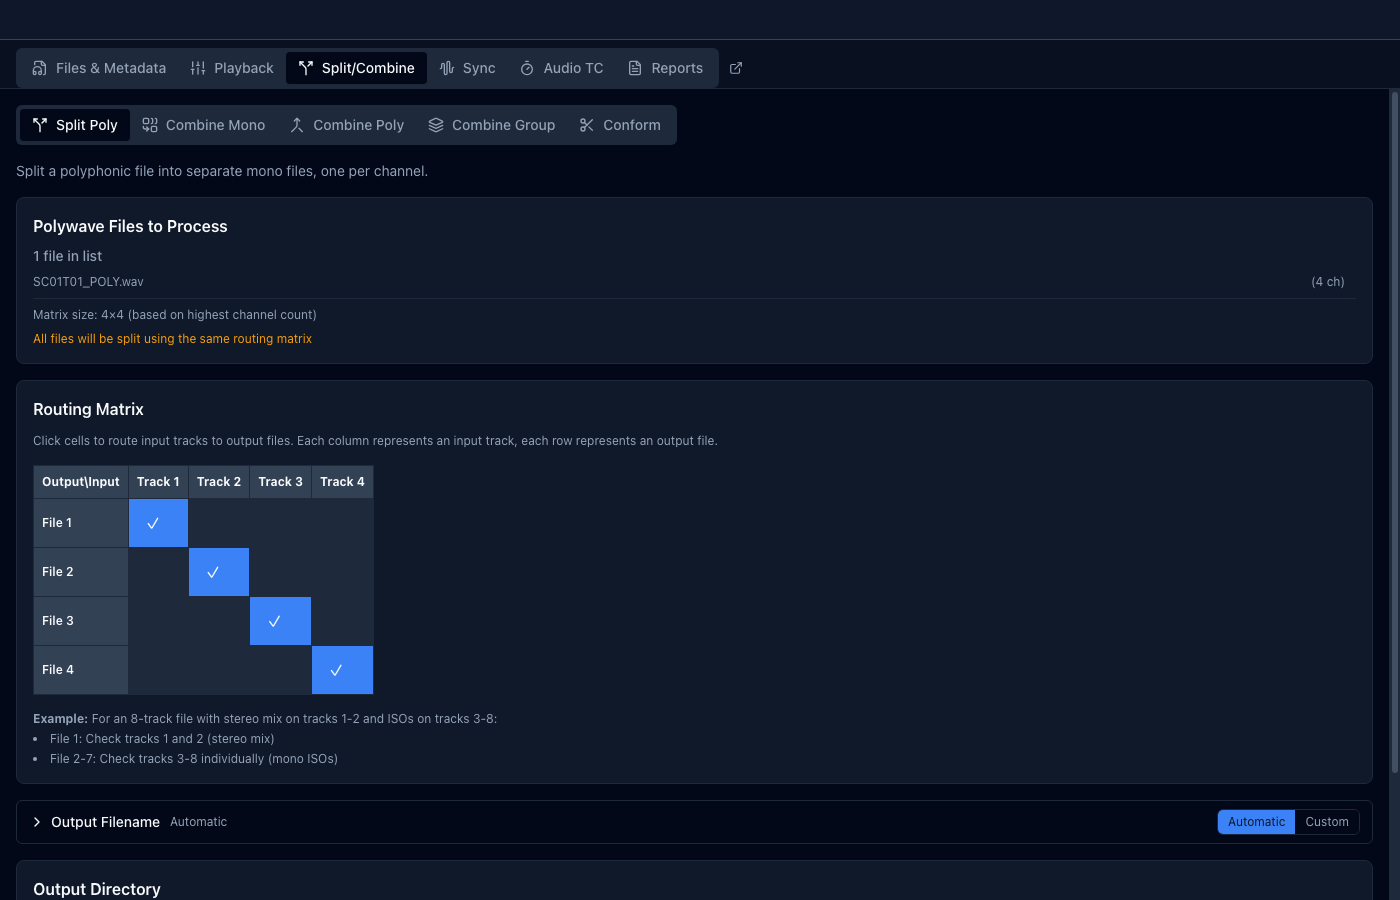
Break a multi-channel WAV into separate files:
- Select polyphonic files from the file list
- Switch to the Split Poly sub-tab
- Configure the routing matrix:
- Each row is one output file, each column is one input channel
- Click cells to assign channels to output files
- A row with one channel selected produces a mono file, which is the default layout and the usual reason to split. A row with several channels selected produces one multi-channel file containing just those channels, which is how you export a poly with unwanted channels left out
- A row with nothing selected is skipped entirely, so clearing the rows you don't want is how you reduce the number of output files
- Channels always appear in the output in their original order. Split Poly can drop channels and regroup them, but it cannot reorder them. See Change the track order of a poly WAV
- Optionally define a naming scheme in the Output Filename section (see Custom Output Filenames). Automatic naming is '{name}_{channel}.wav'; to include track names in the output filenames, switch to Custom and use the Track Name chip
- Select the output directory
- Click Split
Metadata (iXML, bext, track names) is carried into every split file.
Combine Mono Files
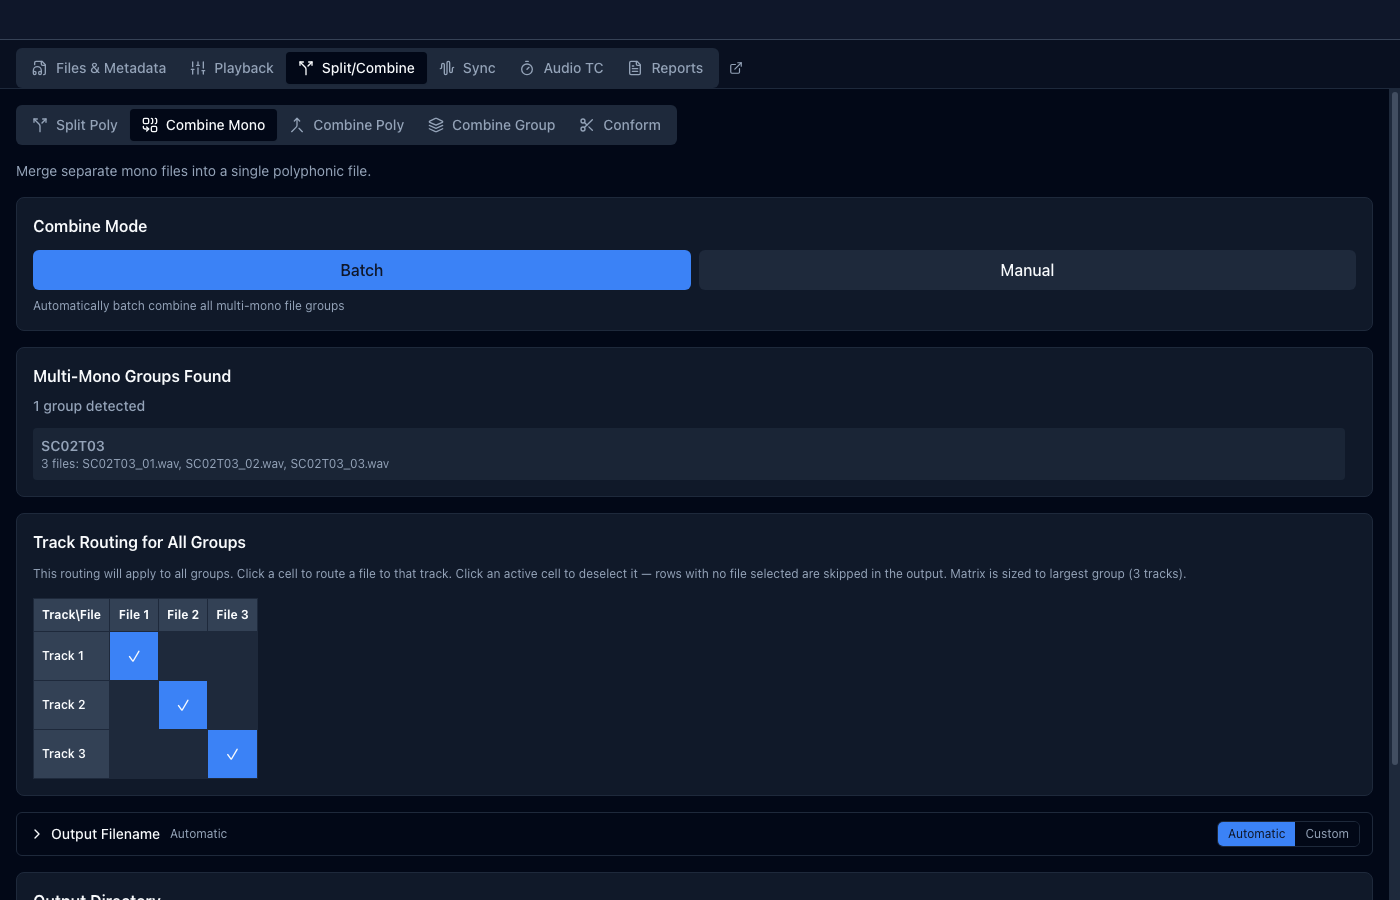
Merge separate mono files into a single polyphonic file:
- Add mono files to the file list
- Switch to the Combine Mono sub-tab
- Choose Batch mode (auto-detects groups by filename) or Manual mode (pick files explicitly)
- Configure the routing matrix. Each row is an output track, each column is an input file. Click a cell to assign a file to a track. Click an active cell to deselect it; rows with no file selected are skipped from the output entirely, allowing you to combine only a subset of channels (e.g. ISO tracks only from a 6-track split).
- Set the output directory (batch) or output file path (manual)
- Click Combine / Batch Combine
Requirements:
- All files must have the same sample rate
- All files must have the same bit depth
- All files must have compatible duration
What Batch mode groups. Batch mode offers exactly the multi-mono groups shown in Files & Metadata: files in the same folder that share everything before the first underscore, at the same sample rate, with matching frame rate and start timecode wherever both files carry them. A group named with a word rather than a channel number after the underscore, such as '01T01_Boom.wav', groups like any other, and a member that carries no timecode does not remove its group from the tab. If a group is listed in Files & Metadata, it is offered here.
Combine Poly Files
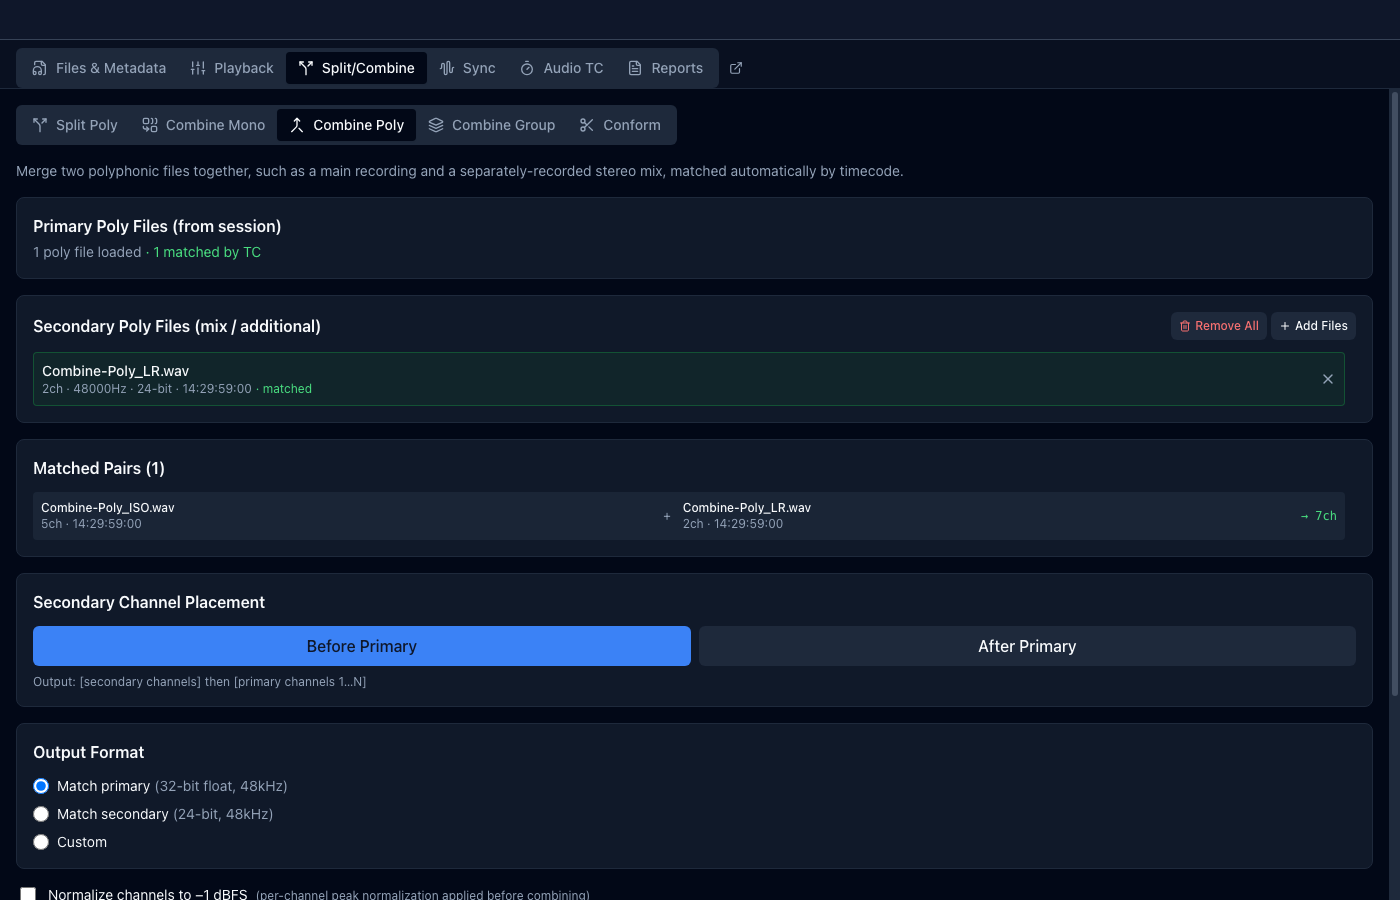
Merge two poly WAV files, for example a main multi-channel recording and a separate stereo mix file, into a single combined poly WAV. This is common when recording on devices at 32-bit float where the stereo mix output cannot be embedded in the same poly WAV and is recorded in a separate file.
How to use:
- Load your primary poly WAV files (the main recordings) into the Wave Copilot file list
- Switch to the Split/Combine panel → Combine Poly tab
- Add your secondary poly WAV files (e.g. the mix files) using + Add Files or by dragging them into the secondary file list
- Wave Copilot automatically matches each primary file to a secondary file by timecode. Matched pairs are highlighted in green
- Choose the secondary channel placement: Before Primary puts secondary channels first, After Primary appends them at the end. Your selection is saved automatically and restored the next time you open the app.
- Select the output format: Match primary (uses each primary file's own format, so no conversion is needed), Match secondary, or Custom (choose sample rate and bit depth)
- Optionally enable Normalize channels to –1 dBFS to apply per-channel peak normalization to all channels before combining. This setting is saved automatically and restored between sessions.
- Choose an output directory
- Click Combine N Pairs
Output files:
Each combined output file is named '{primary_filename}_combined.wav' by default; use the Output Filename section to define your own scheme (see Custom Output Filenames). Track names from both files are preserved in the iXML 'TRACK_LIST' and bext description of the combined file.
Notes:
- Files with no timecode or no matching partner are shown with a warning badge and are not combined
- If primary and secondary files have different formats, they are automatically converted via FFmpeg before combining (unless you choose "Match primary" or "Match secondary" which avoids unnecessary conversion)
- If the two files have different lengths, the output matches the longer file's duration, and the shorter file's channels are padded with silence
- Output files exceeding 4 GB are automatically written in RF64 format
The grid of file-to-track assignments is called the Track Routing matrix throughout this tab. When several multi-mono groups are loaded at once, Wave Copilot reports Multi-Mono Groups Found and offers Track Routing for All Groups, which applies one routing layout to every group rather than making you configure them one at a time. Batch operations show an Overall Progress bar alongside the per-file one.
Combine Group
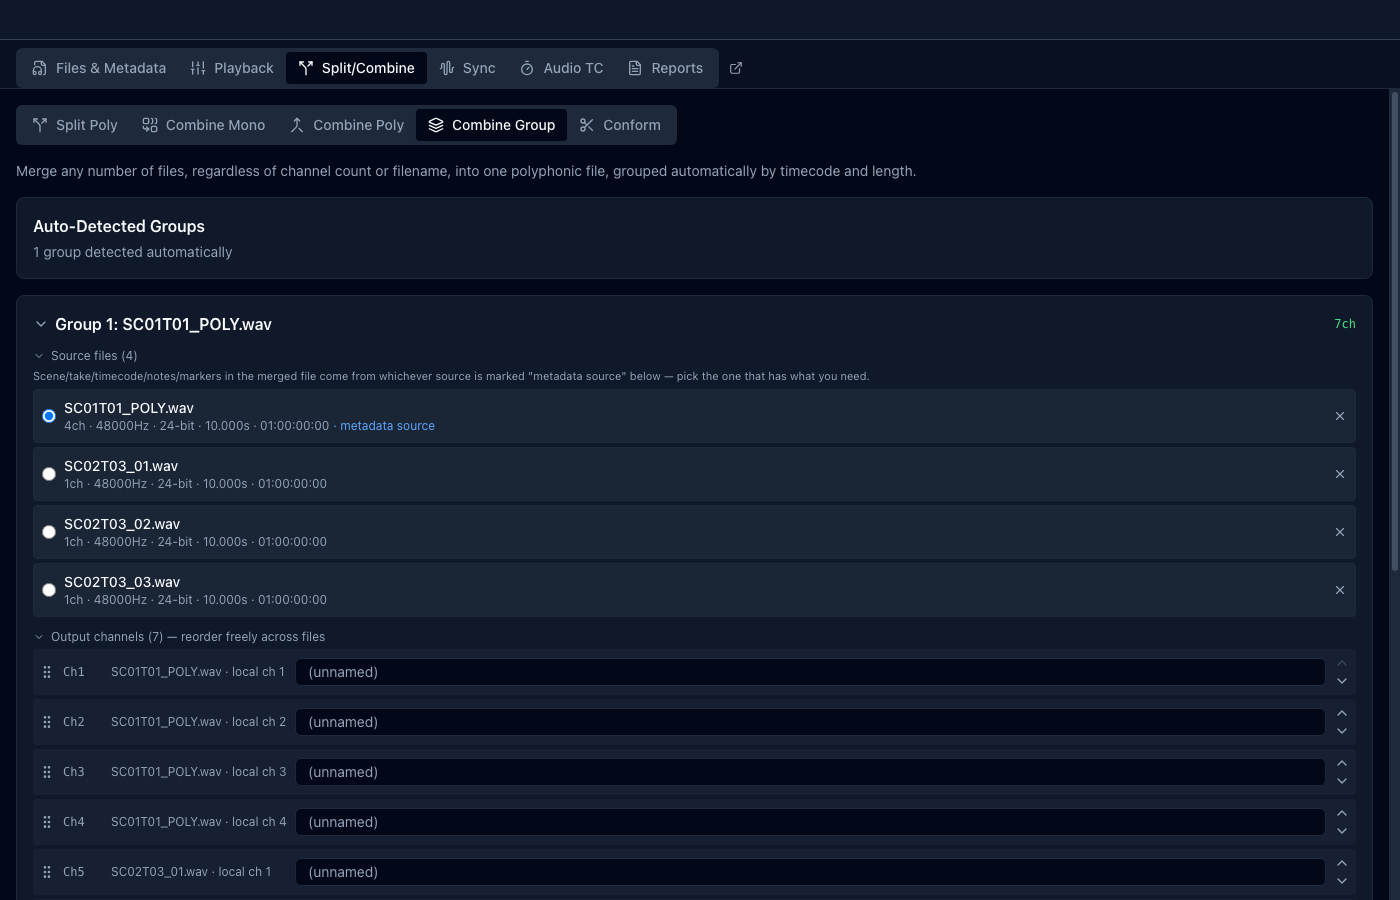
Merge any number of files (mono, stereo, or a mix of channel counts, and regardless of filename) into a single polyphonic WAV. This is the tool for mixed-mic sessions, such as an LCR setup recorded as one mono file plus one stereo file, or several mics of different channel counts recorded together.
How grouping works:
- Files are grouped automatically by matching start timecode, sample rate, frame rate, and length
- Files with no embedded timecode at all can also auto-group with each other by matching sample rate and exact length alone, since they have no timecode to contradict a match. A file that does have timecode but doesn't match anything is never pulled into a group this way, since its own timecode is treated as a genuine signal it belongs elsewhere
- Files that don't auto-match land in the Unmatched Files list
How to use:
- Load your files into the Wave Copilot file list
- Switch to the Split/Combine panel → Combine Group tab
- Review the auto-detected groups. Each group card lists its members under Source files and every output channel under Output channels
- Reorder output channels by dragging their grip handle, or with the up/down buttons. Channels from different files can be freely interleaved, not just kept as whole-file blocks
- Edit any channel's name directly in the Output channels list; names default to the source file's own bext/iXML track name where one exists
- Choose which file's other metadata (scene, take, timecode, notes, markers) is used for the merged output with the radio button next to each file in Source files. This also drives the values shown by Scene/Take/Tape/etc. chips in the Output Filename section
- Select the output format: Match first file or Custom (choose sample rate and bit depth)
- Optionally enable Normalize channels to –1 dBFS, and under it Spike Reduction if clicks or claps are holding the level down (see Spike Reduction under Normalize Audio in the Conform chapter)
- Choose an output directory
- Click Combine N Groups
Each output channel row shows which source file and local channel it came from. That column can be dragged wider or narrower from the divider beside it, since a source label can run long (a scene;take plus a multi-mono suffix); double-click the divider to size it to the narrowest width that still shows every label in full. The width is shared across every group and remembered between sessions.
Manual grouping:
Files in Unmatched Files aren't stuck there:
- Select two or more and click Create Group to merge them anyway, even without a shared timecode or length
- Use the + Add unmatched file control on any group card to fold an unmatched file directly into that group
- Click × next to any file in a group's Source files list to take it back out. The file is marked excluded from auto-matching so it won't silently reappear on the next scan; click Re-enable auto-match in Unmatched Files to undo this
Groups changed this way are labelled Modified (started as an auto-detected group) or Manual (built entirely from scratch), with a warning on the group card noting anything that doesn't match: different sample rates or different lengths. Both warnings are informational and never block the merge. A start timecode that doesn't match is not a warning, because it is a choice you can make: see Timecode Alignment below.
Timecode Alignment:
Files in a group don't have to have rolled at the same moment. When a group's members carry start timecodes that disagree by more than a frame, a Timecode spread section appears on the group card, reading how many files are aligned, how many start at the head, and how long the merged file will come out. It starts collapsed. Click it to open the controls.
This matters because every source is otherwise laid out from its own first sample, so files that started at different times end up offset by exactly that difference, with nothing in the finished file to record that it happened. Placing each file at its own timecode puts them back where they belong.
Three choices, set for the whole group:
- By timecode: every file that carries timecode is placed where its stamp says, relative to the earliest of them
- From file start: every file begins at the head of the merged file and its own timecode is ignored
- Per file: the layout Wave Copilot suggests, and what the group reads as once you have set any file individually
Below the three buttons, each file in the group gets its own row showing its start timecode, where it will sit on the merged timeline, and a TC / Start pair that overrides the group setting for that file alone. Setting a file individually is what puts the group on Per file; clicking Per file again returns the whole group to the suggestion.
Nothing is ever trimmed. The merged timeline starts at the earliest aligned file, so the difference is added as leading silence and no source loses audio.
How the suggestion is worked out: files whose timecode spans overlap each other are clustered, and the largest cluster is placed on timecode while everything else starts at the head. This is deliberately not a fixed threshold. Files that genuinely rolled together overlap, so they are aligned; a file stamped hours away from the rest was not recorded alongside them, so aligning it would only bury the take under hours of silence. You can still choose to do exactly that, file by file. Where two clusters are the same size, the one with more channels wins, then the earlier one, so the suggestion never depends on the order the files happened to load in.
Files with no embedded timecode can only ever start at the head, whatever else is selected, so their TC button is greyed out. The section is not shown at all for a group whose members share a start timecode, since both settings would produce identical files.
If the output runs much longer than its sources, Wave Copilot asks before writing, naming each group and its finished length. That extra length is leading silence, and it usually means one outlying file wants From file start rather than the timecode it is carrying.
If your sources have no usable timecode to align on, several recorders that were never jammed to the same clock for instance, Combine is the wrong tool for lining them up. Use Sync by Audio to align them by their audio content, or Continuous Recording Conform to align them by timecode, and combine the result if you still need a single file.
Output files:
Output files are named '{name}_group.wav' by default, where '{name}' is the metadata-source file's name; use the Output Filename section to define your own scheme (see Custom Output Filenames).
Notes:
- Groups, and each group's Source files / Output channels lists, can be collapsed independently to save space when working with many files
- Files with different sample rates or bit depths are automatically converted via FFmpeg before combining
- If files in a group have different lengths, the output matches the longest file's duration, and shorter files' channels are padded with silence
- Groups are capped at 64 channels (the app's playback channel limit); files beyond the cap are excluded, with a warning shown on the group
- Output files exceeding 4 GB are automatically written in RF64 format
Continuous Recording Conform
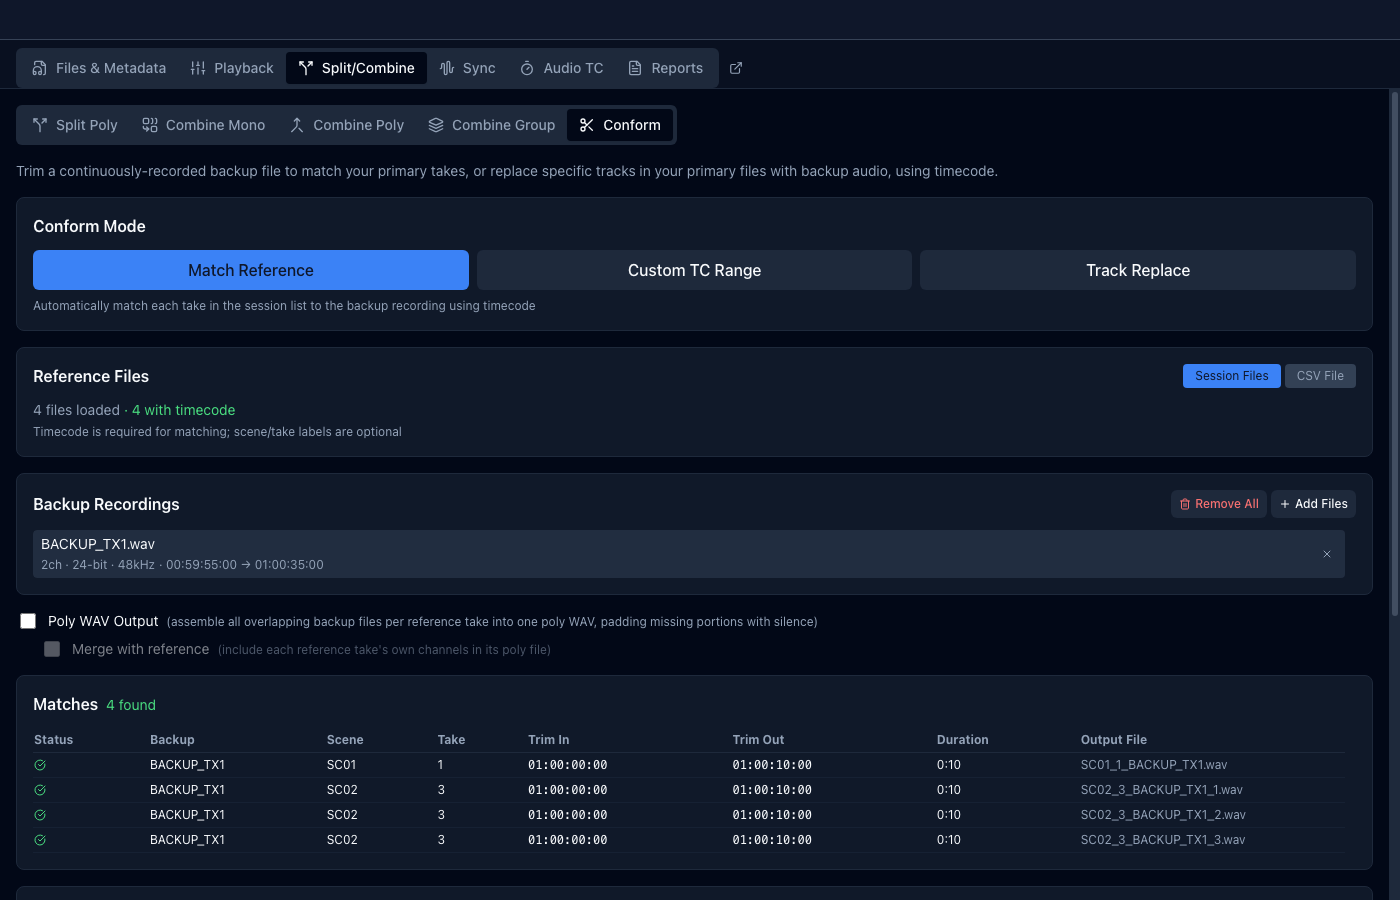
Use this when a second recorder captured audio on its own timecode rather than cutting between takes, and you need to trim it to match the takes from your primary recorder, or replace specific tracks inside your primary files with its audio. That covers a backup recorder left running all day, a body-pack transmitter, a plant mic in a car or a prop, or any other device that rolled independently of the main rig.
Conform Modes
Select the mode at the top of the Conform tab. The three buttons read Match Reference, Custom TC Range and Track Replace.
Match Reference Files (default, shown on the button as Match Reference): automatically trims the secondary recording to match each take using timecode overlap. One output file is produced per matched take. The reference take list can come from the session file list (default) or from a CSV sound report file (see CSV Reference File below). Enable Poly WAV Output to instead combine all overlapping secondary files into a single polyphonic WAV per take (see below).
Custom TC Range: trims all loaded secondary recordings to a single manually-specified timecode window. Use this when the primary recorder missed a take but the secondary recorder still captured it. Enable Poly WAV Output to assemble all overlapping secondary channels into a single polyphonic WAV for the specified range instead of individual trimmed files (see below).
Track Replace: replaces individual tracks inside your primary polyphonic files with audio from a secondary recording. Use this when a wireless receiver or other channel in your primary file recorded unusable audio (noise, dropout, interference) and the secondary recorder captured a clean version of the same source. Channels can also be left out of the output entirely, which strips a ruined mix pair in the same pass rather than needing a Split Poly run afterwards.
Secondary Recordings
The Secondary Recordings list holds the recordings being conformed: backup recorders, transmitters, plant mics, or any recorder that ran on its own timecode. They do not have to be backups, and they do not have to be continuous. It is shared by all three modes: add files with + Add Files (individual files or a folder) or by dragging them onto the list.
With Poly WAV Output enabled, the order of this list is the default channel order of the output. See Channel Order.
A file already in the session file list cannot be added here. Files in the main list are reference takes, and one file cannot be both the take and a secondary recording of itself: it would either be counted twice in the output, or leak into a different take's output as a stray channel. Adding one names the files and offers Remove & Add, which takes them out of the session list and adds them here in one step; where a multi-mono take has to leave whole, its siblings are named too, since the session list holds such a group as one entry. Decline and the list is left unchanged. To include a reference take's audio in a poly output, use Merge with reference instead. If a file is already in the list when it is loaded into the session, it is removed from Secondary Recordings and a note tells you which file and why.
Moving files here from the file list. Selecting takes in Files & Metadata and sending them to Secondary Recordings takes them out of the session list, since they cannot be in both. The view stays where it is, so a long pass over the file list is not interrupted, and a short line beside the file list's item count confirms how many files moved. Only the Split/Combine sub-tab is pointed at Conform, so going there next lands on the files you just moved.
How to Use: Match Reference Files
- Load your primary recorder files into the Wave Copilot session list
- Open the Split/Combine panel → Conform tab
- Confirm Match Reference Files is selected
- Add your secondary recording(s) using + Add Files (select files or a folder) or drag and drop
- Review the match table. Each row is one trimmed output file matched to a primary take
- Choose an output format and select an output directory
- Click Trim & Export
CSV Reference File (Match Reference)
Instead of loading primary recorder files into the session list, you can use a CSV sound report as the reference source. This is useful when you have the session's sound report on hand but not the original WAV files, or when working from a pull list.
How to use:
- Open the Split/Combine panel → Conform tab with Match Reference Files selected
- In the Reference Files panel, click CSV File
- Click Load CSV and select your sound report CSV file
- The CSV is parsed automatically. A preview table shows the loaded takes (start TC, end TC, scene, take)
- Optionally tick Add handles to keep extra audio around every take (see below)
- Add your secondary recording(s) using + Add Files or drag and drop
- Review the match table, choose an output format, and select an output directory
- Click Trim & Export (or Combine & Export with Poly WAV Output enabled)
Handles (pre-roll and post-roll):
A sound report states the take, not the extra audio an editor wants on either side of it. Add handles widens every take's range before it is matched against the secondary recording: the Pre-roll value is taken off each start timecode and the Post-roll value is added to each end timecode. Both accept 1 to 10 seconds and can differ from each other.
Handles are off by default, so a report conforms to exactly the ranges it states until you turn them on. When they are on, the preview table shows the widened range each take will be trimmed to, and its column headers say so. A handle only reaches as far as the secondary recording does: where the widened range runs past the start or end of the secondary file, the export stops at the audio that exists (or is padded with silence in Poly WAV Output, as any partial overlap is). A pre-roll is never taken past midnight on the timecode clock.
The two values are remembered between sessions.
Supported column names (case-insensitive, spaces or underscores both accepted):
| Column | Required | Example values |
|---|---|---|
| 'Start TC' or 'TC Start' | Yes | '12:10:59:00' |
| 'End TC' or 'TC End' | See note | '12:11:52:00' |
| 'Length' or 'Duration' | See note | '00:00:53', '00:53' |
| 'Scene' | No | '12A' |
| 'Take' | No | 'T1' |
| 'Tape' | No | 'A002' |
| 'Frame Rate' / 'TC Fps' | No | '23.976', '25', '24Fps' |
| 'Sample Rate' / 'SR/Hz' / 'Frequency' | No | '48000', '48K' |
| 'Bit Depth' / 'Bits' | No | '24', '24 b' |
Each take needs an end point, but the report can express it either way: an 'End TC' column, or a 'Length' / 'Duration' column that Wave Copilot adds to the start timecode. Sound Devices 8-series sound reports carry 'Length' and no end column, and load without any editing. If a report has both, 'End TC' is used, and 'Length' fills in for any row where the end cell is empty.
Length cells are read as 'HH:MM:SS' (the Sound Devices format), 'HH:MM:SS:FF', 'MM:SS', or plain seconds. Three fields are always read as hours, minutes and seconds, never as minutes, seconds and frames.
The 'TC Start' / 'TC End' / 'Frequency' / 'Bits' / 'TC Fps' aliases match the column names used in Cantar poly reports. Sample rate values with a 'K' suffix (e.g. '48K') are interpreted as kHz automatically.
Compatible formats:
- Sound report CSV exported from Wave Agent
- Cantar poly report ('.csv', tab-delimited)
- Sound reports from 788T, 833, 888, and other recorders that export a take list
- Sound Devices 8-series sound report CSV ('Length' column, no end timecode column)
- Any comma- or tab-delimited file with at least a 'Start TC' / 'TC Start' column plus either 'End TC' / 'TC End' or 'Length' / 'Duration'
- Files with preamble rows (project name, date, recorder info) above the column header are handled automatically
- Delimiter is detected automatically. Comma and tab are both supported
- Line endings: LF, CRLF, and CR-only (legacy Mac) are all supported
Note: If 'Frame Rate' is not present in the take table, it is read from the report's preamble block (the key and value rows above the column header, as written by Sound Devices reports), and failing that inherited from the loaded secondary files, the same fallback used in Custom TC Range mode. Sample rate and bit depth are read from the preamble the same way. The frame rate matters for lengths given in frames and for pull-down rates such as 23.98, where 112 timecode seconds are 112.112 real seconds.
Poly WAV Output (Match Reference Files)
Enable the Poly WAV Output checkbox in Match Reference mode to assemble all secondary files that overlap a reference take into a single polyphonic WAV per take, rather than exporting individual trimmed files.
Use this when a secondary recorder delivered separate mono or polyphonic files that need to be combined back into one poly file alongside your primary recording, for example a client delivering a multi-mic secondary as individual mono tracks.
How it works:
- Every secondary channel (from mono or poly secondary files) that overlaps the reference take's timecode window becomes one channel in the output poly WAV
- Channels are grouped by track name (from iXML metadata). If two secondary files share the same track name (for example a recording that was split mid-take), their audio is stitched into one channel automatically, with silence filling any gap between them
- Where a secondary does not cover the full reference TC window (starts late or ends early), the missing portion is filled with silence
- Output channel order follows the Secondary Recordings list order, each file contributing its channels in their own order. You can change it per output file in the Poly Output Preview (see Channel Order below)
- Metadata in the output (timecode, scene, take, originator, frame rate, iXML) is taken from the reference file; track names come from the secondary files
- Output files are named '
_poly_backup.wav'
How to use:
- Load primary recorder files into the session list
- Open the Split/Combine panel → Conform tab, with Match Reference Files selected
- Add your secondary file(s) using + Add Files (select files or a folder) or drag and drop
- Check Poly WAV Output. This setting is saved automatically and restored the next time you open the app
- Review the Poly Output Preview. Each row is one output file; expand it to see and reorder its channels
- Choose an output format (Match reference or Custom) and select an output directory
- Click Combine & Export
Note: The "Keep original" format option is not available in Poly WAV Output mode because the output combines multiple sources that may have different formats. Use "Match reference" (default) to target the primary file's sample rate and bit depth, or "Custom" to specify manually.
Merge With Reference (Match Reference Files)
Merge with reference, below the Poly WAV Output checkbox, adds each reference take's own channels to its poly file, so the primary recording and the secondary files end up in one file.
Use this when you want the recorder's take and the secondary sources side by side for comparison or for handing on a single file, for example a 5-channel ISO take plus four radio-mic secondary files, giving a 9-channel output.
- Reference channels are placed at the front by default, and can be moved anywhere in the order like any other channel
- They are always separate channels, even when a reference track name matches a secondary's. A reference and a secondary both named 'Lav1' produce two channels, not one. The reference is a different source, not a continuation of the secondary. In the expanded channel list each is labelled with where it came from, so identical names remain distinguishable
- Reference channel counts vary per take, so each output file has its own channel count
- Not available when the reference source is a CSV file, since a CSV take list carries no audio
Note: A file that is already in the session file list is a reference take, so it cannot also be added to Secondary Recordings. Use Merge with reference to include it rather than loading it twice. See Secondary Recordings below.
Channel Order (Poly WAV Output)
Channel order in a poly output follows the Secondary Recordings list order, the order you added the files, with each file contributing its channels in their own order. This applies to both Match Reference and Custom TC Range, and to mono and polyphonic secondary files alike.
To change it, expand an output file in the Poly Output Preview:
- Each row shows the output channel number, the track name, and the source it comes from: 'File.wav ch2', or '◆ from reference' for a channel supplied by Merge with reference. A channel stitched from several files (a split recording) shows the first source with '+1 more'
- Drag a channel by its handle, or use the up/down arrows, to move it. Numbering updates as you go
- Order is set per output file: reordering one take does not affect the others
- reset on the output file's row restores the default order
Custom TC Range produces a single output file, so its channel order is set once and applies to that file.
How to Use: Custom TC Range
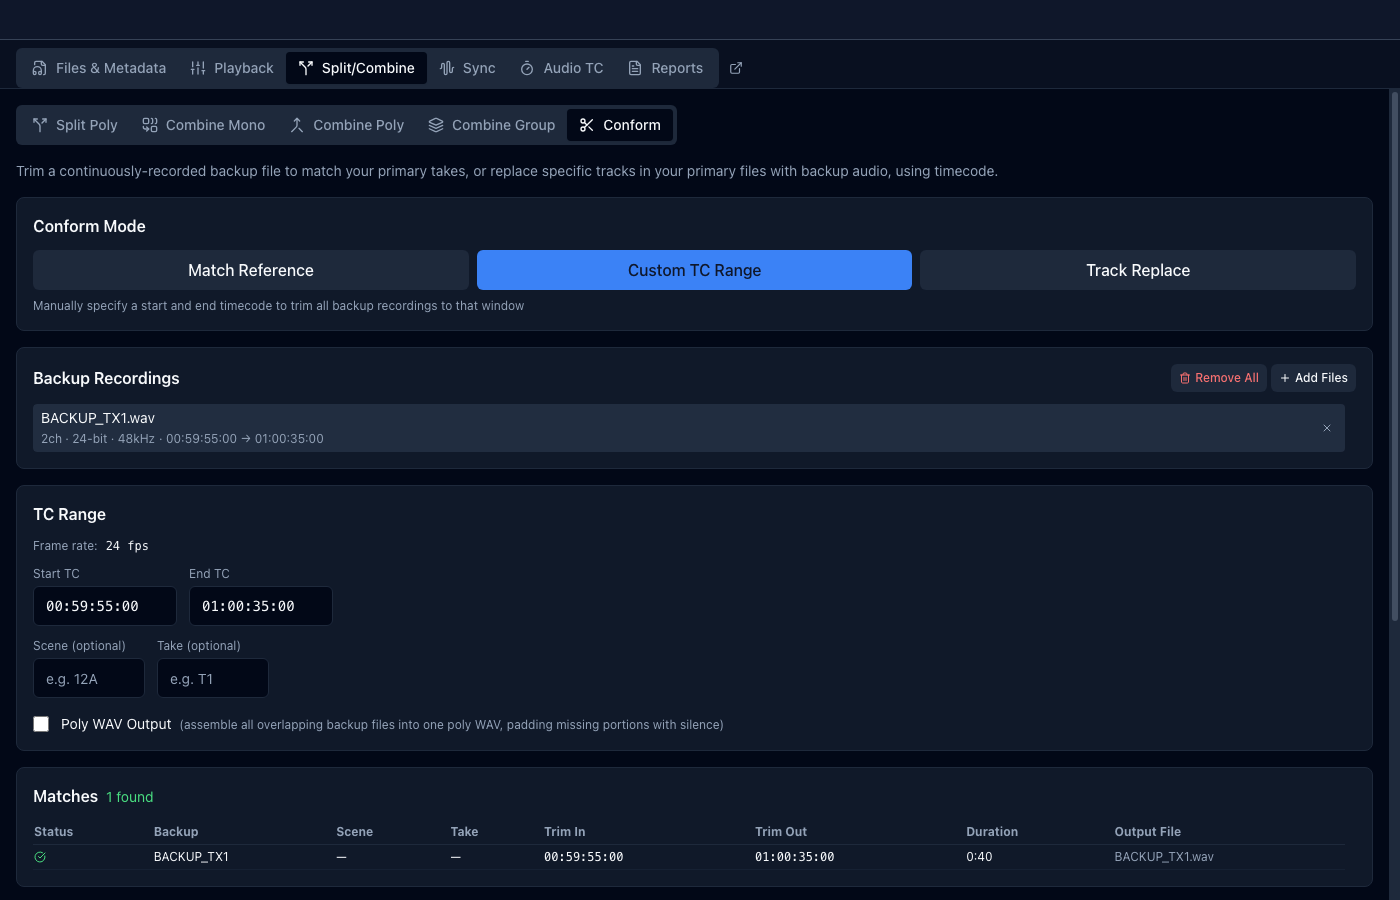
Use this when no primary takes exist for the moment you need to recover.
- Open the Split/Combine panel → Conform tab
- Select Custom TC Range
- Add your secondary recording(s) using + Add Files or drag and drop
- The frame rate and drop-frame setting are detected automatically from the first secondary file
- Start TC and End TC (HH:MM:SS:FF) are prefilled with the full span of the loaded secondary files, the earliest start and the latest end, so the default window covers everything. Narrow it by typing your own, or set it by ear with the Audition strip described below; end must be later than start
- Optionally enter a Scene and Take label used for the output filename
- Review the match table. Each row represents one secondary file trimmed to the specified window
- Choose an output format and select an output directory
- Click Trim & Export
About the prefilled range: the window keeps following the loaded files (adding or removing a secondary widens or narrows it) until you set a timecode of your own, by typing it or by moving a locator, after which your values stay put through any further file changes. A Full range button appears in the TC Range header whenever the current values differ from the full span; click it to go back. Secondary files without timecode are ignored when working out the span.
Setting the Range by Ear
Often you know the moment you need by sound, the slate or the first line, and not by number. The Audition strip in the TC Range section lets you find the window by listening instead of typing it.
Click Audition to open it. Each lane is one channel of the poly output, numbered and named exactly as the Poly Output Preview lists it, laid out on a single timecode ruler at its own start time, so you can see at a glance which recorders were rolling when. Clips are placed by their timecode and cannot be dragged; this is a view of where your material actually sits, not an editor.
Because a lane is an output channel and not a file, a transmitter recorded across several files, or two files carrying the same track name, appear as one lane holding several clips, labelled with how many files were joined. A polyphonic secondary fans out the other way, into one lane per track. That is exactly how the export groups them, so what you see here is what you will get.
Two recordings only share an output channel when they are really one recording. That means the same kind of source, not sounding at the same time. A take split across several files by a recorder's file-size limit rejoins, which is the point of grouping by track name at all; anything else keeps its own channel, and the extra one is named after the first with a number, so a bag track and a transmitter both labelled 'Boom' come out as 'Boom' and 'Boom_2'.
Two things count as the same kind of source:
- Mono files are matched to other mono files by track name
- A polyphonic file is matched only to another with the same number of channels carrying the same track names in the same order, which is what a recorder splitting one take produces. A different channel count, a different track list, or the same tracks in a different order means a different recorder
A polyphonic file and a mono file are never blended, whatever their track names say, and neither are two sources that sound at the same time: one output channel holds one signal, and blending them would mean writing one over the other and losing it. The strip says so in an amber banner naming the channels it made, and they appear as separate lanes in both the strip and the Poly Output Preview. If you would rather two of them were joined, rename the track in one of the files, in the Metadata editor or on the recorder.
The window itself is drawn over the lanes as two amber locators, I and O, with everything outside them dimmed. What stays lit is what will be exported.
- Drag the I or O flag to move that end of the window. The locators snap to whole frames and cannot cross; pushing one into the other leaves a single frame between them
- Set In and Set Out place a locator at the playhead, which is the quicker way when you are listening rather than looking
- Click the ruler, or anywhere in the lanes, to move the playhead. It stays inside the window: clicking the dimmed part puts it on the nearer locator, because that material is not part of this range
- Space or K plays and pauses whenever the strip is open, except while you are typing in a field
- J and L work as they do on the Playback tab. While playing, each press of L steps the speed up (1×, 2×, 4×, 8×) and each press of J steps it down, pausing at 1×, with pitch preserved at every speed and the current speed shown beside the timecode. While stopped they skip back and forward 5 seconds. Pausing or stopping returns the speed to 1×
- I and O set the In and Out locators at the playhead, the same as Set In and Set Out
- Zoom in and out with the magnifier buttons, or with Ctrl (Cmd on Mac) and +, − or 0 for a full view. Holding Ctrl or Cmd and scrolling zooms under the pointer, and holding Shift and scrolling pans, the same gestures the Playback waveform and the Sync timeline use
- The waveform gain slider makes quiet recordings visible without changing what you hear. It affects the drawing only, never the audio or the exported file
The transport plays every lane together, mixed the way the export will sound, starting from the playhead.
Listening to one channel at a time
Each channel has its own mute, solo and volume beside its name, with a level meter, the same controls the Sync tab gives its lanes. Use them to pick a voice out of a crowded window: solo the boom to find the slate, or mute a transmitter that is rustling over the line you are trying to hear.
- Mute silences that channel
- Solo leaves only the soloed channels audible. Ctrl-click (Cmd-click on Mac) solos one channel alone, clearing the others in a single move. Channels you cannot hear are dimmed in the list so it is clear why
- Volume trims that channel between −24 and +12 dB. Double-click the slider to return it to 0 dB
- The meter beside each channel shows its level as it plays, taken from the same peaks the waveform is drawn from, so a channel that looks loud reads loud
All of it is monitoring only. Mute, solo and volume change what you hear while choosing the range and have no effect whatever on the exported file, which always contains every channel at its original level.
Each lane plays the channel it stands for, so you hear every channel the conformed output will contain, and the waveform drawn beside it is that same channel. Where one lane is fed by several files, they are heard in turn as the playhead reaches each. This is a monitoring mix for finding a moment, not a balance, and none of it affects the exported file.
Reordering channels in the Poly Output Preview reorders these lanes to match.
The loop button, on by default, plays the window over and over so you can judge both ends. There is a brief gap at the moment it wraps, because looping seeks the audio stream; this affects only the preview, never the exported file.
Moving a locator counts as setting the range by hand, exactly as typing a timecode does, so the window stops following the loaded files from then on. Full range puts it back.
Note: Wave Copilot plays audio in one place at a time. Starting the Audition strip stops the Playback tab and the Sync tab, and starting either of those stops the strip. Nothing ever plays over anything else.
Secondary recordings without timecode do not appear in the strip, because there is no way to know where they belong on a timecode ruler. Give them timecode first with Audio TC or Sync by Audio, and they will join it.
Poly WAV Output (Custom TC Range)
Enable the Poly WAV Output checkbox in Custom TC Range mode to assemble all secondary files that overlap the specified TC window into a single polyphonic WAV, rather than exporting individual trimmed files.
Use this when your secondary sources are spread across multiple mono or poly files and you want a single combined poly WAV covering a specific timecode window, for example a multi-mic recording from a body-pack transmitter and a boom mic that both need to be in one file.
How it works:
- Every secondary channel (from mono or poly secondary files) that overlaps the specified TC window becomes one channel in the output poly WAV
- Channels are grouped by track name (from iXML metadata). If two secondary files share the same track name (for example a recording that was split mid-session), their audio is stitched into one channel automatically
- Where a secondary does not cover the full TC window (starts late or ends early), the missing portion is filled with silence
- Output channel order follows the Secondary Recordings list order and can be changed in the Poly Output Preview (see Channel Order above)
- The output duration equals exactly 'End TC − Start TC'; the bEXT timecode reference is set to the specified Start TC
- Output file is named 'Scene_Take_poly_backup.wav' (e.g., '12A_T1_poly_backup.wav'); if no scene/take is entered, the file is named 'TCRange_poly_backup.wav'
How to use:
- Open the Split/Combine panel → Conform tab, with Custom TC Range selected
- Add your secondary file(s) using + Add Files (select files or a folder) or drag and drop
- Enter a Start TC and End TC
- Optionally enter a Scene and Take label
- Check Poly WAV Output. This setting is saved automatically and restored the next time you open the app
- Choose an output format (the format defaults to the first secondary file's own rate/bit depth; use Custom to override) and select an output directory
- Click Combine & Export
Note: The "Keep original" format option is not available in Poly WAV Output mode. The format defaults to the first secondary file's sample rate and bit depth, or use "Custom" to specify manually.
How to Use: Track Replace
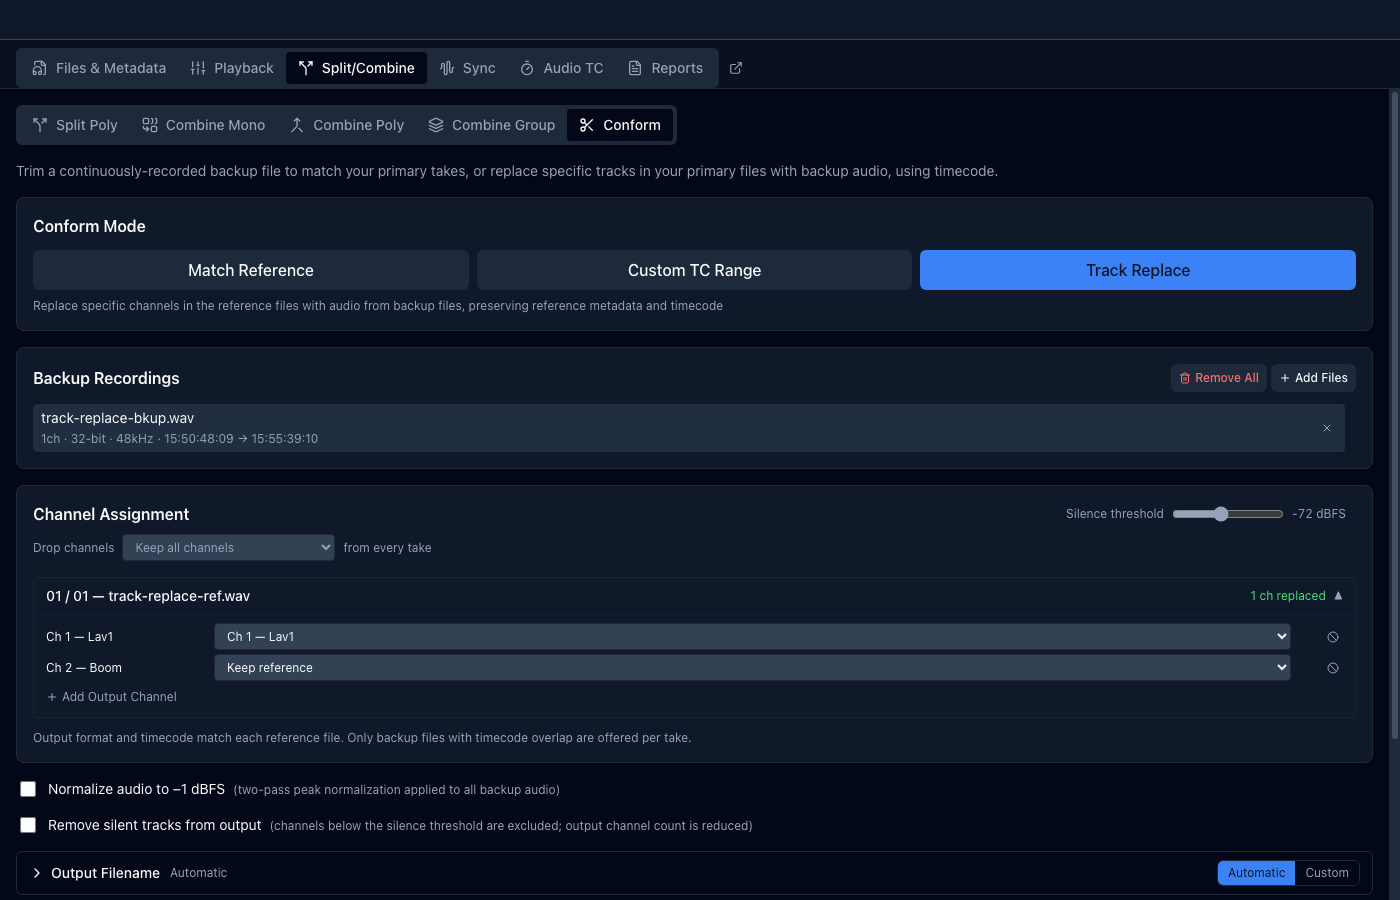
- Load your primary polyphonic recorder files into the Wave Copilot session list
- Open the Split/Combine panel → Conform tab
- Select Track Replace
- Add your secondary recording(s) using + Add Files (select files or a folder) or drag and drop
- Each primary take appears as a collapsible section. For each take, every output channel is listed with a source dropdown
- Assign sources for each channel (see Channel Assignment below)
- Click Apply to all takes to give every other take the same assignment, then check any take flagged with an amber 'ch unmatched' badge
- Select an output directory
- Click Replace Tracks & Export
Note: Mono files and multi-mono groups are excluded from Track Replace mode. Only polyphonic (multi-channel) primary files appear as reference takes.
Track Replace has no output format section. Each output file always takes the sample rate and bit depth of its own reference file, and always has exactly the reference file's duration. A 32-bit float secondary replacing a channel in a 24-bit take is converted to 24-bit on the way in.
Only the takes you have set up are written. A take with nothing set on it would come out as a byte-for-byte copy of the file you already have, so it is left alone: no output file, and no place in the progress count. That covers takes no secondary overlaps, which cannot be assigned at all, as well as takes you simply have not got to yet. Such a take is marked 'not exported' in its header, and a line above the take list reads, for example, '3 of 12 takes will be written'. The export button counts the same files, so 'Replace Tracks & Export (3 files)' is what you will get.
A take counts as set up when a channel is replaced, a channel is dropped, or a track is renamed. Any one of those is enough. Normalize audio is not, on its own: it changes files that are being written rather than giving an untouched take a reason to be written, and Track Replace already refuses to export when nothing at all has been set up.
Channel Assignment (Track Replace)
Each primary take has its own independent channel assignment panel.
Source options per channel:
- Reference (keep original): audio is taken directly from the primary file channel (no replacement)
- Secondary file · Channel N: audio is pulled from a specific channel of a secondary recording
Each secondary option names its file, for example 'TX1_001 · Ch 1', or 'TX1_001 · Ch 1 — Boom' where that channel has a track name. The file is part of the option itself rather than only the group heading, because a closed dropdown shows only the selected option's own text. With two transmitters loaded, a bare 'Ch 1' on two rows would not tell you which one feeds which; and after a rollover, Apply to all takes deliberately points each take at the file that covers it, so the same channel legitimately reads from a different file take to take.
Track names in the output:
A replaced channel keeps the name the primary take gave it. Swap the take's 'Lav1' for a transmitter's clean copy and the output channel is still 'Lav1', whatever the secondary called that channel, because the track's identity has not changed, only where its audio came from. The editor receives the track list they were expecting.
The secondary's name is used only where the primary has none to keep: a channel the primary left unnamed, or a channel you added with Add Output Channel, which has no primary channel behind it. If neither side names the channel, it is written as 'Ch 3' for the third output channel, and so on. Dropping channels does not shift the names, since each output channel carries the name of the primary channel it came from, not of the slot it ends up in.
Each channel row is labelled with the name its output track will carry, so you never have to work it out. A row fed from a secondary but named by the primary keeps reading 'Ch 4 — Lav1'. A row the secondary names reads that name instead: an added channel pointed at a transmitter's 'TXA' reads 'Ch 5 — TXA (extra)', and changing which secondary channel feeds it changes the label with it. Hover any row and the tooltip says which output track it becomes and where that name came from.
Renaming an output track:
Click a channel's name to type your own. The name you type wins over both the primary take's name and the secondary's, and it belongs to the output channel rather than to whatever feeds it, so pointing the row at a different secondary afterwards leaves your name in place. Press Enter or click away to keep it, Escape to abandon the edit.
Empty the box to go back to the automatic name, which is offered as the box's placeholder so you can see what you are going back to. Typing the automatic name in by hand does the same thing, rather than freezing today's name into the assignment.
A renamed channel is shown in blue. Renames travel with Copy, Paste and Apply to all takes, since the same rig feeds every take and a correction on one take is a correction on all of them. Reset on a take clears its renames along with the rest of its assignment, and Undo takes back one rename at a time like any other change.
Renaming is reason enough to export. A take where nothing is replaced and nothing is dropped, but a track has been renamed, still enables Replace Tracks & Export, because the new name has to be written into a file before it reaches the edit.
Auto-matching by track name:
When secondary files are loaded, Wave Copilot compares the track names stored in the primary file's metadata with the track names in each secondary file. If a match is found (case-insensitive), the secondary channel is pre-selected.
Matching needs a name on both sides. Most transmitters and small recorders write no track names at all, so nothing is matched automatically and every channel starts on 'Reference (keep original)'. When Wave Copilot can see that none of your secondary files carry track names, it says so at the top of the Channel Assignment panel, so you are not left wondering why nothing happened. In that case, set one take up by hand and copy it to the rest.
Copying one take's assignment to the others:
The same rig usually feeds every take of the day, so the assignment you build on one take is the answer for all of them. Expand a take, set its channels the way you want, then click Apply to all takes at the bottom of that take.
Wave Copilot does not blindly copy the file you picked. It remembers which secondary device fed each channel and then finds that device again for every other take, choosing from the secondary files that actually overlap that take. A transmitter that rolls over mid-shoot and writes TX1_001.wav, then TX1_002.wav, is recognised as one device: takes early in the day are fed from the first file and later takes from the second, with no extra work from you. When several files of one device overlap a single take, the one covering most of the take is used.
A summary line under the panel header reports what happened, for example 'Applied to 11 takes · 2 need attention'.
Takes that could not be matched:
A channel is only assigned where that device genuinely reaches the take. If no copy of the device covers a take, those channels stay on 'Reference (keep original)' rather than being guessed at from a different device, and the take's header shows an amber '2 ch unmatched' badge so you can find it and finish it by hand. The badge clears as soon as you change one of that take's dropdowns.
Copy and Paste, for takes you pick yourself:
To apply an assignment to some takes but not others, click Copy at the bottom of the take you set up. Copy changes nothing on its own.
Each take has a single button with three states:
- Copy, before anything has been copied. Click it on the take you set up.
- Stop copy, on the take the copy came from. That take is also outlined in green, so the button that ends the copy is on the take that started it.
- Paste, on every other take. It applies the copied assignment to that take alone, resolving devices exactly as Apply to all takes does.
Pasting does not use the copy up. The green outline stays and the Paste buttons remain, so one copy can fill as many takes as you like.
Apply to all takes copies nothing. It is a finished action: every take already has the assignment, so there is nothing left to paste and no take is outlined afterwards.
Stop copy ends a copy: every button reads Copy again, and takes added later stop being assigned from it. Use it before copying a different take. The X beside the line in the panel header does the same thing. Neither is an undo, so assignments already applied stay as they are.
A copy is a snapshot of one take, so editing that take ends the copy by itself. Change one of its dropdowns, drop or restore one of its channels, add or remove an output channel on it, or reset it, and the green outline clears along with the Paste buttons. Editing any other take leaves the copy alone, so one copy still fills as many takes as you like. A bulk action that reaches every take, such as the Drop channels preset or Reset silent tracks, ends a copy too.
Undo and Redo count as changes for this. Stepping back past the edit that shaped the copied take would leave the copy describing something that take no longer is, so it ends there as well. Undo that only puts a different take back, such as taking back a paste, leaves the copy armed.
Reset, for one take:
Reset, at the bottom of each take, puts that take back where it started: every channel matched by track name or left on 'Reference (keep original)', nothing dropped, and no added output channels. It affects only that take. An Undo reset take button appears in the panel header afterwards.
Takes added later:
A copied assignment stays active for the rest of the session: primary files you add to the session afterwards arrive already assigned instead of landing empty. Where a take's own track names do match a secondary, that match is used in preference to the copied assignment.
This follows Copy only. After Apply to all takes, nothing is remembered, so a take you add later lands unassigned apart from the ordinary track-name match. Use Copy when you want later takes covered as well.
A line in the panel header names the take the assignment came from. Ending the copy, with Stop copy on that take or the X beside that line, only removes the green outline, turns the Paste buttons back into Copy, and stops new takes being assigned from it.
Added output channels:
An output channel you added with Add Output Channel is copied along with the rest of the assignment. It is recreated on a take only where the device feeding it actually reaches that take, since an added channel has no reference channel to fall back on.
Undoing:
Every change to the channel assignments is recorded, up to 25 steps back. Undo and Redo sit at the top left of the Channel Assignment panel. Each click of Undo steps back one more change; Redo puts one back, and making a new change drops the redo.
Both buttons are always there and always in the same place. When there is nothing to undo or redo, the button is greyed out rather than hidden, so neither ever moves under the pointer.
Ctrl/Cmd + Z undoes and Shift + Ctrl/Cmd + Z redoes, while Track Replace is the panel on screen. The shortcut stands aside when a text field has focus, so typing in a filename or a timecode keeps its own undo.
Hover either button to see the change it will act on, for example 'Take back: reset take · 3 steps available'. The names are distinct on purpose: resetting one take reads 'reset take' while Reset silent tracks reads 'reset silent tracks', so the tooltip always says which one it means.
Copy, Stop copy and the Undo history itself are not recorded, since none of them change an assignment.
TC-filtered dropdowns:
The secondary file channels available in each dropdown are filtered to only show secondary files whose timecode overlaps the reference take's timecode window. A secondary file recorded during a different part of the day will not appear for takes it did not cover.
Silent channel warning:
When secondary files are loaded in Track Replace mode, Wave Copilot scans each file and measures the peak level of every channel. If a channel's peak is below the silence threshold, a ⚠ icon appears next to its dropdown. Hover the icon to see the measured peak level. This typically indicates the microphone was not connected to that input during recording. You can still assign the channel. The warning is advisory only.
Silence threshold:
A Silence threshold slider in the Channel Assignment header controls the dBFS level below which a channel is considered silent. The range is −90 to −48 dBFS and the default is −72 dBFS. Drag the slider left to only flag very quiet channels, or right to flag more channels as silent. The setting is saved between sessions.
When one or more assigned secondary channels are below the threshold, a Reset silent tracks to Keep Reference button appears. Click it to automatically switch all flagged channels back to Reference (keep original) in one step, which is useful for quickly cleaning up any accidental assignments to dead inputs.
Remove silent tracks from output:
Enable the Remove silent tracks from output checkbox (below the Normalize audio checkbox) to automatically exclude all silent secondary channels from the exported file entirely. When enabled, silent channels are dropped from the output rather than replaced with reference audio, reducing the output channel count accordingly. For example, a 6-channel assignment where 2 secondary channels are below the silence threshold produces a 4-channel output file. When disabled (default), all assigned channels are written to the output as configured. This setting is saved between sessions.
Dropping channels from the output:
Any channel can be left out of the exported file, not only the silent ones. This is what lets you strip a ruined mix pair in the same pass that rebuilds the isos, instead of running Split Poly afterwards to do it.
Click the drop button at the end of a channel row, the circle with a line through it, to leave that channel out. The row stays where it is, struck through and greyed, and its dropdown is disabled; the button becomes a restore arrow, which brings the channel back. Nothing is renumbered while you work, so the row always tells you which channel of the original file it came from. When a take has channels dropped, its header reads the old and new counts, for example '6 ch → 4 ch'. The last surviving channel of a take cannot be dropped.
Two shortcuts in the Channel Assignment header set the dropped channels for every take at once:
- Drop channels … from every take is a preset list: keep all channels, drop channel 1 for a mono mix, drop channels 1 and 2 for a stereo mix, drop the last channel, or drop the last two. A preset is the whole answer for each take, so choosing one also restores anything you had dropped by hand that the preset does not name. It is remembered between sessions and applied to takes as they are loaded. A preset that would empty a take is ignored for that take, so 'drop channels 1-2' does nothing to a two-channel file. Change a row by hand afterwards and the list reads Custom selection, unless what you are left with happens to match another preset
- Drop N detected mix channels appears when any reference take has a channel whose track name reads as a mix: Mix, MixL, MixR, and the spacing and casing variants of those, such as 'Mix L', 'MIX-R' and 'mix_1'. The count is across every take. Clicking it adds those channels to whatever you have already dropped, so it never restores a channel you removed deliberately, and the button disappears once there is nothing left to find
The detector is deliberately narrow. A channel named simply L, R, LR or ST, or Master or Mixdown, is not treated as a mix, because those turn up as genuine iso names often enough that a false positive would silently strip a track you wanted. Drop those by hand, or with a preset.
Dropping channels alone is a complete job. Where nothing is being replaced, Replace Tracks & Export still runs and writes your poly back out without the channels you dropped, which is the shortest route to 'export this file without channels 3 and 4'.
Whatever survives is compacted into the output with no gap: the iXML track list is rewritten with the surviving names, its channel and interleave indexes are renumbered from 1, and the file's format chunk carries the reduced channel count. Timecode, scene, take and tape are unaffected.
Adding output channels:
Each take has an Add Output Channel button to append an extra channel to that take's output, which helps when you want to include an additional secondary track not present in the original primary file.
Channels with no valid secondary channel assigned output silence. A warning is printed to the console log if a secondary file ID is no longer present or has no timecode overlap.
Reference Source: Session Files or CSV File
The Reference Files panel takes its list of takes from one of two places, chosen with the toggle on its right:
- Session Files (default) uses the files already loaded in the session file list. The panel reports how many were found and how many of them carry timecode, since timecode is what the matching is done on
- CSV File reads the take list from a sound report instead, for when the takes themselves are not to hand. See CSV Reference File
Scene and Take are optional throughout. They are used to label the output files and to make the match table readable; matching itself is done purely on timecode overlap, so takes with no scene or take number still conform correctly.
Match Table (Match Reference Files & Custom TC Range)
| Icon | Meaning |
|---|---|
| ✓ | Full match: take is fully within the secondary recording |
| ⚠ | Warning: partial overlap, or sample rate differs between files |
Hover the warning icon to see details.
Trim In and Trim Out show the exact timecodes the secondary will be cut at for each row, and Duration the length that produces. They are derived from the reference take, so they are the clearest way to confirm a match landed where you expected before exporting.
Remove All clears the Secondary Recordings list in one step. Individual files are removed with the x on their own row.
Normalize Audio
All three conform modes include a Normalize audio to –1 dBFS checkbox. When enabled, each secondary channel is analysed with a FFmpeg 'volumedetect' pass before extraction, and a gain adjustment is applied so the peak level reaches –1 dBFS.
This is particularly useful for 32-bit float secondary recordings that were captured at low levels, but the option applies to any format. Format-specific normalization is not required. The same path is used regardless of bit depth or encoding.
Each conform mode saves its Normalize setting independently. Switching from Match Reference to Track Replace (for example) will restore the Normalize state you last used in that mode. Your per-mode preferences are preserved between sessions.
Spike Reduction. Under the Normalize checkbox, Spike Reduction optionally tames very short, unwanted transients (for example clicks and claps) before normalizing. It is useful when the average dialogue level is low but there is an occasional loud short transient, as in transmitter 32-bit float recordings: without it, one spike sets the peak and the dialogue is barely raised. Each secondary channel is checked for spikes first, any it finds are brought down to the level of the loudest non-spike peak, so they stay audible but no longer decide the gain, and the normalize gain is then worked out from what is left. Avoid it on bursts of loud audio such as applause, continuous shouting, thunder and explosions. It is only available while Normalize is on, and it is the same setting in all three modes.
Output Format Options (Match Reference Files & Custom TC Range)
- Keep original: same bit depth and sample rate as the secondary file (e.g., 32-bit float 48 kHz). Not available in Poly WAV Output mode
- Match reference: converts to the primary recorder's format (e.g., 24-bit 48 kHz), performed in a single pass
- Custom: manually choose sample rate and bit depth
Output Filename Templates (All Conform Modes)
Each conform mode has its own Output Filename section for custom naming schemes (see Custom Output Filenames). Match Reference, Custom TC Range, and Track Replace each remember an independent template. The preview always reflects what will be exported: with Poly WAV Output enabled it previews the poly job names, otherwise the per-take trim names. The Secondary Name chip resolves to the secondary recording each output (or each channel, for poly output) comes from, and Sample Rate / Bit Depth follow the Output Format selection above.
Notes
- Secondary files can be mono or polyphonic. Channel and track names are preserved from the secondary in every mode except Track Replace, where each output channel keeps the primary take's own track name
- With Same as Source, conformed takes are saved to a 'Conformed' folder beside each reference take, not beside the secondary recording, so they land with the rest of the day's takes. Custom TC Range has no reference take, so its trimmed files are saved beside the secondary they are cut from, and the option is not offered at all when its Poly WAV Output is enabled. See 'Where Your Files Are Saved'
- Files larger than 4 GB (RF64 format) are fully supported
- Trimmed files can be loaded back into the session for use in sound reports and will display the correct start timecode
- Match reference files mode: primary files require timecode metadata (bEXT or iXML); scene/take labels are optional. Output files are named 'Scene_Take_SecondaryFileName.wav' (e.g., '12A_T1_ZOOM0001.wav'); scene/take are omitted if absent from the primary file's metadata
- Custom TC range mode: no primary files required. Frame rate and drop-frame are read from the secondary file's metadata. Output files are named 'Scene_Take_SecondaryFileName.wav'; if no scene/take is entered, the file is named after the secondary file. If multiple secondary files are loaded with different frame rates, the first file's frame rate is used for TC input validation. When Poly WAV Output is enabled, a single poly WAV is produced spanning the full TC window, with silence padding for any secondary that only partially overlaps; the file is named 'Scene_Take_poly_backup.wav'
- Track Replace mode: primary files must be polyphonic WAV files with timecode metadata. Only takes with a channel replaced, dropped or renamed are written; the rest are left alone. Output files are named after the primary file. Track names in iXML metadata are updated to reflect the final channel layout of each output file, and a replaced channel keeps the primary take's name for that track rather than taking the secondary's. Any channel's name can be typed over by clicking it in the Channel Assignment panel
- Poly WAV Output mode (both Match Reference and Custom TC Range): secondary files can be mono or polyphonic. Each secondary channel that overlaps the reference TC range becomes one output channel. Split recordings sharing a track name are stitched automatically. Silence is inserted wherever secondary audio does not cover the full window. Channel order follows the Secondary Recordings list order and can be rearranged per output file in the Poly Output Preview. In Match Reference mode, Merge with reference adds each take's own channels to its poly file, always as separate channels even where a track name matches a secondary's
Where Your Files Are Saved
Every operation that writes new files asks for an Output Directory. Beside that field is a Same as Source option, which saves each file next to the audio it came from instead of into one folder you browse to.
This never modifies your originals. Wave Copilot always exports copies, so the source files you recorded stay exactly as they were. The only exception is metadata editing, which by design writes back into the files themselves.
What Same as Source Does
When the option is on, each output is written into a subfolder created next to its own source file. Nothing is ever written loose among your originals.
The subfolder matters most on a batch that spans several folders. If you load takes from two different roll folders and run one job, each output stays under its own parent instead of everything being flattened into a single destination:
/Day01/Roll_A/Boom.wav          (your original, untouched)
/Day01/Roll_A/Split/Boom_1.wav  (the export)
/Day02/Roll_B/Boom.wav          (your original, untouched)
/Day02/Roll_B/Split/Boom_1.wav  (the export)
Two files with the same name in different folders therefore stay separate, and neither can overwrite the other.
Which File the Output Is Saved Beside
Most operations produce one output per input file, so the answer is simply 'next to that file'. Others combine several files into one, and those have to pick a single folder. The panel tells you which one, and this table lists them all.
| Operation | Subfolder created | Saved beside |
|---|---|---|
| Convert Format | The format folder, e.g. '48000Hz_24bit' | Each file you are converting |
| Export Mix | 'Mix_24bit', and 'Poly_With_Mix' when embedding | Each file you are mixing |
| Split Poly | 'Split' | Each poly you are splitting |
| Combine Mono (batch) | 'Combined' | Each multi-mono group's own files |
| Combine Poly | 'Combined' | Each primary file |
| Combine Group | 'Combined' | Each group's metadata source file |
| Conform, Match Reference | 'Conformed' | Each reference take |
| Conform, Track Replace | 'Conformed' | Each reference take |
| Conform, Custom TC Range (trimmed files) | 'Conformed' | Each secondary recording |
| Sync by Audio, poly export | 'Synced_Poly' | The anchor file |
| Audio TC, mute LTC burst | 'LTC_Muted' | Each file being muted |
Three of these are worth explaining, because they are not where you might first assume.
Conform saves beside the reference take, not the secondary recording. The conformed takes are the day's takes, so they belong with the rest of them. Secondary recordings often live on a separate drive or in their own folder, and filing new takes there would separate them from the material they match. The Custom TC Range mode is the exception only because it has no reference take: you type a timecode range instead, so those files are saved beside the secondary they are cut from.
Combine Group saves beside the group's metadata source. Each group has a member you nominate as the metadata source, and the combined poly takes its scene, take, timecode and notes from that file. It is the file the output belongs to, so it is the one the output is saved beside. Changing which member supplies the metadata therefore also changes where the file is saved, while merely rearranging the group does not.
Sync by Audio saves beside the anchor file. A sync export assembles many files into one poly, so there is no single source folder. It uses the reference lane, which is the file everything else was aligned to and the file the poly takes its metadata from. Reordering lanes to change the channel order in the poly does not move the output.
When Same as Source Is Not Offered
Some operations assemble many files into a single output, which leaves no source folder to save beside. Where there is a designated anchor the option still works, as with a sync export, which follows the anchor file, or a Match Reference poly, which follows its own reference take. Where there is no such file, the option is withdrawn and the output directory field is cleared so you can choose where the assembled file should go:
- Audio TC, with Assemble everything into one poly WAV ticked
- Conform, Custom TC Range, with Poly WAV Output enabled. This builds one poly from every secondary recording, and the only candidate to save beside would be whichever secondary sits first in the Secondary Recordings list. That order is your channel order, so rearranging channels would move your files
Custom TC Range still offers Same as Source when Poly WAV Output is off, because it then produces one trimmed file per secondary and each has its own folder to sit beside.
Combine Mono offers Same as Source in batch mode only. Manual mode asks for a complete output file path instead of a directory, so you are already choosing exactly where that one file goes.
Copying files from the file list has no Same as Source option either, since copying a file next to itself would achieve nothing.
Remembering Your Choice
The setting is remembered separately for each operation and restored the next time you open the app. Turning it on for Convert Format does not turn it on for Split Poly. Switching it back off restores the folder you had previously browsed to.
Custom Output Filenames
Every operation that writes new files (Rename, Convert Format, Export Mix, Split Poly, Combine Mono, Combine Poly, Combine Group, and all three Conform modes) includes an Output Filename section where you can define your own naming scheme instead of the automatic one.
Automatic vs. Custom
- Automatic (default): files are named exactly as in previous versions (e.g. 'SceneT01.wav' for Rename, '{name}_mix.wav' for Export Mix, 'Scene_Take_SecondaryName.wav' for Conform). Nothing changes unless you opt in.
- Custom: build the filename from metadata attribute chips and free text. The first time you switch to Custom, the template is pre-filled to reproduce the automatic name, so you can start from a familiar base.
Building a Template
- Expand the Output Filename section and select Custom
- Click attribute chips (Scene, Take, Start TC, …) to append them to the Result row; click Free Text to insert your own text (prefixes, suffixes, version tags)
- Drag chips in the Result row to reorder them; click a chip's × to remove it
- Choose a Separator (underscore, dash, dot, space, or none) inserted between every part
- Check the live Preview, which shows the resulting names for the actual files about to be processed
Your template is saved automatically per operation and restored every time you open the app. Configure it once and it applies until you change it. Each operation has its own independent template, including a separate one for each Conform mode.
Available Attributes
Every operation offers a shared metadata core (Project, Scene, Take, Tape, Date, Start TC, End TC, Sample Rate, Bit Depth) plus operation-specific chips. Free Text is always available. Full matrix:
| Chip | Rename | Convert | Export Mix | Split Poly | Combine Mono | Combine Poly | Combine Group | Conform: Match Ref | Conform: TC Range | Conform: Track Replace |
|---|---|---|---|---|---|---|---|---|---|---|
| Name (source file) | ✓ | ✓ | ✓ | ✓ | ||||||
| Project | ✓ | ✓ | ✓ | ✓ | ✓ | ✓ | ✓ | ✓ | ✓¹ | ✓ |
| Scene | ✓ | ✓ | ✓ | ✓ | ✓ | ✓ | ✓ | ✓ | ✓ | ✓ |
| Take | ✓ | ✓ | ✓ | ✓ | ✓ | ✓ | ✓ | ✓ | ✓ | ✓ |
| Tape | ✓ | ✓ | ✓ | ✓ | ✓ | ✓ | ✓ | ✓ | ✓¹ | ✓ |
| Date (YYYY-MM-DD) | ✓ | ✓ | ✓ | ✓ | ✓ | ✓ | ✓ | ✓ | ✓¹ | ✓ |
| Start TC | ✓ | ✓ | ✓ | ✓ | ✓ | ✓ | ✓ | ✓ | ✓ | ✓ |
| End TC | ✓ | ✓ | ✓ | ✓ | ✓ | ✓ | ✓ | ✓ | ✓ | ✓ |
| Originator (recorder) | ✓ | ✓ | ✓ | |||||||
| Sample Rate² | ✓ | ✓ | ✓ | ✓ | ✓ | ✓ | ✓ | ✓ | ✓ | ✓ |
| Bit Depth² | ✓ | ✓ | ✓³ | ✓ | ✓ | ✓ | ✓ | ✓ | ✓ | ✓ |
| Channels (count) | ✓ | ✓ | ✓ | ✓ | ✓ | ✓ | ||||
| Circled | ✓ | ✓ | ✓ | |||||||
| Track Name | ✓ | |||||||||
| Channel Number | ✓ | ✓ | ||||||||
| Group Name | ✓ | ✓ | ||||||||
| Primary Name | ✓ | ✓ | ✓ | |||||||
| Secondary Name | ✓ | |||||||||
| Secondary Name | ✓ | ✓ | ||||||||
| Automix Mode (GS/IG) | ✓ | |||||||||
| Mix Format (stereo/mono) | ✓ | |||||||||
| Format (WAV/MP3/AAC) | ✓ | ✓ | ||||||||
| Free Text | ✓ | ✓ | ✓ | ✓ | ✓ | ✓ | ✓ | ✓ | ✓ | ✓ |
¹ Custom TC Range has no reference file, so Project, Tape, and Date are read from the secondary recording's metadata.
² Sample Rate and Bit Depth describe the output file, not necessarily the source: Convert and Export Mix report the format selected in the dialog, Combine Poly and Combine Group follow their own Match primary/first file / Match secondary / Custom selection, and Conform follows the Output Format options. "Keep original" and unconverted operations report the source format.
³ In Export Mix the chip is labelled Quality: it resolves to the bit depth for WAV output (e.g. '24bit', '32f') and to the selected bitrate for MP3/AAC output (e.g. '320kbps').
When Add the mix to the poly WAV is enabled, that merged file gets its own Output Filename section, inside the same panel as its other options, with the same chips as Export Mix except Format, which is dropped because the merged file is always a WAV. Sample Rate and Bit Depth there describe the source poly, since the embedded mix always matches it.
Behaviour Details
- Missing metadata is skipped: if a file has no Scene, the Scene chip and its separator are simply omitted; no doubled separators
- Fallback to automatic: if a template resolves to nothing (or only free text remains because every metadata chip was empty), the automatic name is used instead, so files are never named after leftover static text
- Duplicates: when several outputs in one batch resolve to the same name, every one of them is numbered, starting at '_1' ('name_1', 'name_2', 'name_3', …). The first file is numbered too, which is what lets a set of mono outputs load back as a multi-mono family, for example a Split Poly template of just 'Name' on an 8-channel file produces 'S001T01_1.wav' … 'S001T01_8.wav'. Names that occur only once in the batch are left exactly as the template resolved them, with no number appended. If a custom-named file already exists in the output folder, the new file is suffixed rather than overwriting it
- Sanitization: characters that are invalid in filenames ('/ \ : * ? " < > |') are removed and spaces become underscores
- Multiple values expand with your separator: a Split Poly output carrying two channels lists both track names/numbers; a Conform poly output built from several secondary recorders lists the file each channel starts in
Sync by Audio
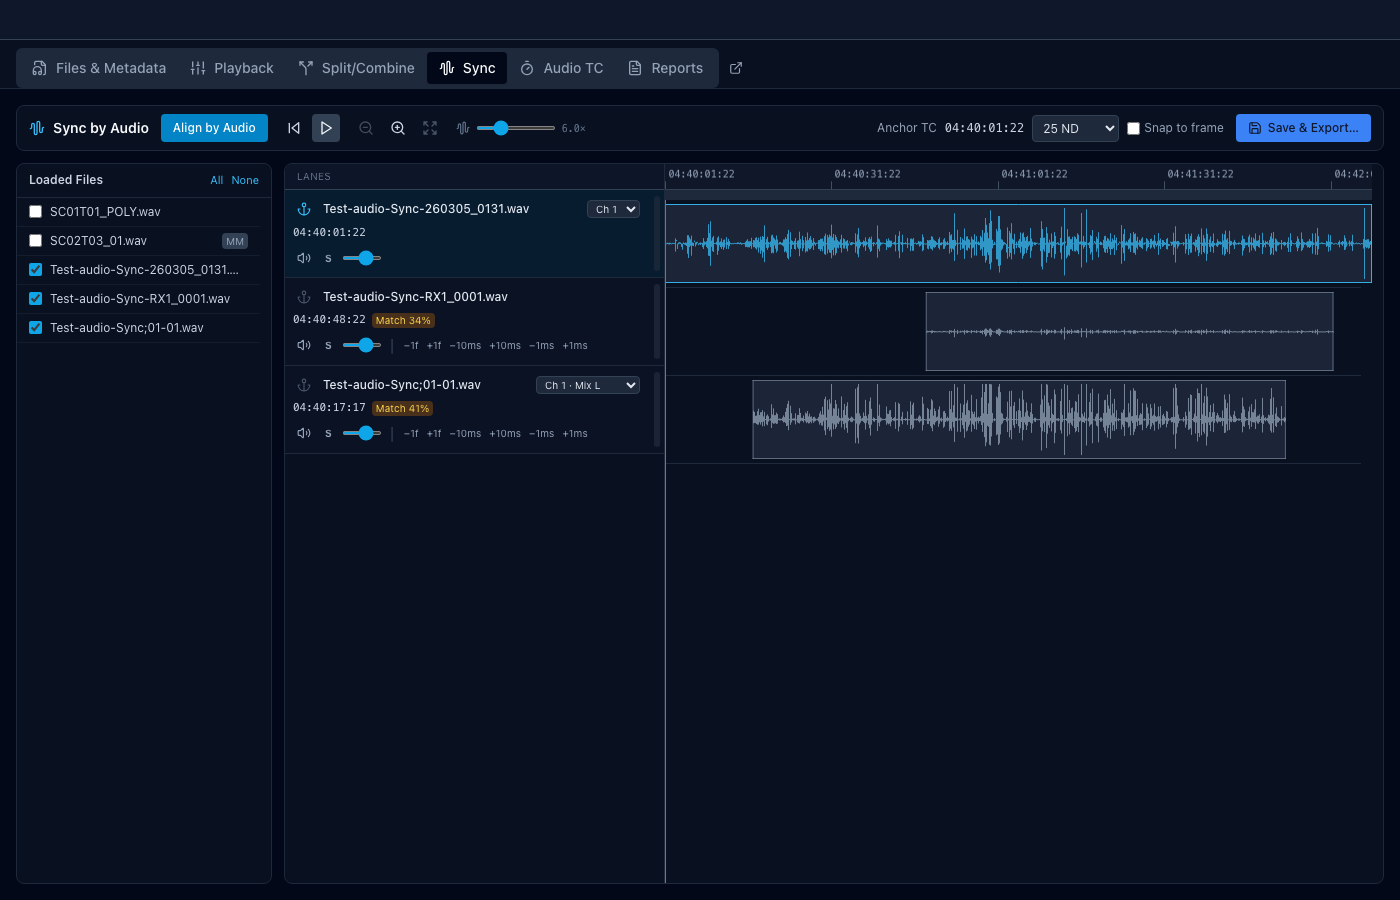
Align recordings by their audio content instead of relying on embedded timecode, then write the result to every file's metadata, assemble the aligned session into a single poly WAV, or both. This is built for two common situations: syncing a secondary recorder that carries no timecode of its own to a main recorder that does, and aligning recordings that were never given timecode at all.
Your original recordings' audio is never modified. Sync by Audio computes offsets and, when you save, writes timecode metadata. The optional poly export writes a new file of its own and leaves every source exactly as it was.
How to Use
- Open the Sync tab. The Loaded Files panel on the left lists every file currently loaded in the app (poly, mono, or multi-mono groups each count as one selectable item). You can add more without leaving the tab: drag WAV files onto the panel, or use the button above it to browse. Files added this way are checked as they arrive, so they join the alignment straight away. The control on each row takes that file back out of the session.
- Check the files you want to sync, at least two of them. Each checked file (or multi-mono group) appears as its own lane with a waveform.
- If a file has more than one channel, pick which one to match on from the dropdown next to its name (see Choosing the Channel below). The default, channel 1, is right most of the time.
- Click Align by Audio. Every non-reference lane is analyzed against the reference lane using audio cross-correlation, and each lane's waveform block moves to its computed offset. A match-confidence percentage is shown next to each lane.
- Press Play (or 'Space') to listen to every lane together and confirm the sync sounds right. Use Mute, Solo, and the volume slider per lane to isolate what you're listening to.
- Fine-tune if needed: drag a lane's waveform block directly, or use the ±1 frame / ±10 ms / ±1 ms nudge buttons next to each lane.
- Set the Anchor TC and frame rate if the reference file has no timecode of its own (see Timecode and Frame Rate below).
- Click Save & Export…, choose whether to write timecode, export a poly WAV, or both, and review before writing.
The Reference Lane
One lane is always the reference, the anchor everything else is aligned to, shown with a blue waveform and an anchor icon. By default, the first file with existing timecode becomes the reference. Click the anchor icon on any other lane to make it the reference instead; every other lane's offset is re-expressed relative to the new reference automatically.
Alignment and Confidence
Alignment uses cross-correlation of each file's audio content, not a simple waveform match, so it works even when files were recorded at different levels or through different microphones. The confidence percentage shown per lane reflects how distinct the correlation peak is, not how much of the audio matches:
- A single sharp, distinctive sound (a slate clap, a door slam) tends to produce a high, sharp confidence score.
- Continuous, similar-sounding audio (room tone, ambient wind, long dialogue with little variation) naturally produces a lower score even when the alignment is correct, because many nearby offsets correlate almost as well.
- Confidence below roughly 25% is flagged as a low-confidence match. Treat this as a prompt to verify by ear and nudge manually if needed, not as a sign the sync definitely failed.
Always confirm alignment with Play before saving, regardless of the confidence score.
A low score is often a channel problem rather than an alignment problem. Alignment matches one channel per lane, and by default that is channel 1. If channel 1 on that recorder happens to be a lav that stayed closed, there is little for the matcher to work with even though the boom on another channel of the same file lines up perfectly. Before nudging by hand, try pointing the lane at a livelier channel and running Align by Audio again.
Choosing the Channel
Each lane with something to choose from has a dropdown next to its file name:
- Poly files list their channels, named from the file's own track metadata where it has them, so you see 'Ch 3 · Boom' rather than a bare number. The default is channel 1.
- Multi-mono groups list their member files instead, since each member is already a single channel. The default, Mix (all N), sums every member. Pick a single file to match on just that one.
- Standalone mono files have nothing to choose, so no dropdown appears.
The choice applies to all three places the lane's audio is used: what it is matched on, what its waveform block draws, and what you hear when you audition it. So what you see, what you hear and what you align on are always the same signal. Changing it clears that lane's match confidence and returns it to pending, since the previous result was correlated against a different signal; the lane's current offset is kept, so nothing jumps on screen, and a manual nudge stays manual. Changing it mid-preview restarts the audition on the new channel.
The selection lasts for the session and is not saved between app launches.
Manual Adjustment
- Drag a lane's waveform block left or right to nudge its offset freely. The reference lane cannot be dragged.
- Nudge buttons next to each non-reference lane move it by exactly ±1 frame (at the session frame rate), ±10 ms, or ±1 ms.
- Revert (the circular arrow icon) appears once a lane has been moved manually, and restores the last automatically-computed offset.
- If a lane's existing embedded timecode disagrees with the audio-based alignment by more than one frame, this is flagged as a warning in the Save confirmation dialog. Audio alignment always takes priority, since that is what Sync by Audio is measuring.
Waveform Display
- Waveform boost (the slider next to the waveform icon in the toolbar) increases the visual amplitude of quiet recordings so they're visible alongside louder ones, from unity up to 20×, and can also be lowered below unity down to 0.25× to see how far a hot recording goes over 0 dBFS. Double-click the slider to reset it to this tab's own starting boost. This affects the display only, never playback level or the saved audio.
- Zoom works the same as the Playback tab's waveform zoom: 'Ctrl/Cmd + =' / 'Ctrl/Cmd + -' to zoom in/out (centred on the playhead), 'Ctrl/Cmd + 0' to reset to the full overview, or use the toolbar buttons. Scroll/trackpad gestures also match: Shift+scroll (or a horizontal swipe) pans, Ctrl/Cmd+scroll zooms.
- Each lane's waveform block reflects the file's actual start and end position, so nudging or aligning a file visibly moves its block. The borders are only drawn where the file's true start/end is currently in view.
Audition Playback
Play mixes every selected lane together into a single synchronized preview so you can judge the alignment by ear, independent of the main Playback tab and the detached Playback window (only one can play at a time: opening the Sync tab stops the other, and leaving the Sync tab stops the Sync preview). Per-lane controls while previewing:
| Control | Action |
|---|---|
| Mute | Silences that lane |
| Solo (S) | Isolates that lane |
| 'Ctrl/Cmd' + click Solo | Exclusive solo, solos only this lane and unsolos others |
| Volume slider | Adjusts that lane's level in the preview mix |
| Double-click volume slider | Reset gain to unity (0 dB) |
| Level meter | Shows real-time signal from that lane during playback |
Checking or unchecking a file, or re-running Align by Audio, while the preview is playing seamlessly restarts the mix with the updated lane set or offsets. You don't need to stop playback first.
Timecode and Frame Rate
- If the reference file already has embedded timecode, its start time is used as the anchor automatically, and its frame rate is adopted for the session whenever the file's metadata carries one.
- If the reference file has no timecode, an Anchor TC field appears. Type a starting timecode for the reference lane and choose a frame rate from the dropdown. A sensible starting value is suggested automatically from the file's recording time-of-day when available.
- Snap to Frame rounds every lane's computed start time to the nearest frame boundary before saving. Off (the default), saved timecode is sample-accurate to the audio alignment, which may land a fraction of a frame from a clean boundary; on, every saved timecode lands exactly on a frame, matching how video editing software reads embedded timecode, at the cost of up to half a frame of position error relative to the true audio alignment.
- Clock drift: if two recorders' clocks run at very slightly different speeds, a long file can drift out of sync over its length even when it starts perfectly aligned. Sync by Audio detects this (comparing alignment near the start and end of the overlap) and shows a drift warning, but does not time-stretch audio to compensate. The saved timecode is exact at the start of the file.
Saving and Exporting
Save & Export… is the single way out of a session. It opens one dialog with two independent choices: write the aligned timecode into your original recordings, export the aligned session as a poly WAV, or do both in one pass. Neither depends on the other, and the button names whichever you have chosen: Write Timecode, Export Poly, or Write TC & Export Poly.
Writing timecode
Ticking Write the aligned timecode to the original files lists every file's current and new timecode before anything is written. Files whose computed timecode doesn't change are shown as unchanged and skipped. Review any warnings (low confidence, clock drift, a timecode conflict, or a value wrapping past midnight) before confirming.
What gets written, per file:
- Start timecode (bEXT TimeReference and iXML samples-since-midnight) and the matching End timecode for display
- Frame rate and drop-frame flag, so the file's timecode is self-describing and usable by every other timecode-aware feature in the app (Conform, Combine Group auto-matching, sound reports, and so on)
A multi-mono group is written as a single lane. Moving or saving it applies the same timecode to every member file in the group.
Exporting an aligned poly WAV
Ticking Export an aligned poly WAV reveals the rest of the options and assembles the whole session into one multi-channel WAV. Each recording sits at the position you aligned it to, with silence where a file has not started yet, so the file opens in an NLE already in sync. Source audio is never modified by the assembly.
- Channel order follows the sync file list. Drag a row by its handle in the dialog to change where its channels land in the poly. This changes the exported layout only. It never moves a lane, or its audio, in time.
- Include the anchor file can be turned off when the anchor is only there to give the others something to line up against.
- Output Format either matches the widest source (highest sample rate, deepest bit depth, float if any source is float) so assembling never degrades one, or takes an explicit sample rate and bit depth.
- Normalize audio to –1 dBFS applies two-pass peak normalization, as in Conform and Audio TC. Spike Reduction under it tames short clicks and claps first (see Normalize Audio in the Conform chapter).
- Multi-mono groups spread into their member files, so their channels land exactly as a poly file's would. Channel names come from each file's track names, with the file name added where two files use the same name.
- Poly File Name defaults to the anchor file's name with '_synced' appended. Type your own to override it. '.wav' is added for you.
- Output Directory takes a folder you browse to, or, with Same as Source, saves the poly to a 'Synced_Poly' folder beside the anchor file. Reordering lanes changes the channel order only and never moves the output. See 'Where Your Files Are Saved'.
- Output Directory is where the poly is written: browse to a folder or type a path. The export button stays disabled until one is set, and nothing is ever written into the source folders.
These options, including whether each of the two boxes is ticked, are remembered between sessions.
When both boxes are ticked, timecode is written first, so a problem during assembly never costs you that write. Writing timecode is not a prerequisite for the export, though. The poly is laid out from the alignment itself, not from the files' stored timecode, so a session showing No TC everywhere exports correctly with the timecode box left unticked. The poly's scene, take, tape and originator come from the anchor file (or, when the anchor is excluded, from the earliest file in the poly), and its frame rate is the one selected in the toolbar. Its start timecode is the earliest position on the assembled timeline, which is what the audio actually begins at.
The estimated channel count, length, format and file size are shown before the write. The timeline spans from the earliest lane to the latest, so lanes far apart in time produce a long, mostly silent file. A gap over ten minutes, or an estimate over 4 GB, is flagged in amber. If the aligned timeline crosses midnight, that is flagged too: the poly's own start timecode wraps into the next day, as timecode must, while the channels stay correctly spaced relative to each other.
When the export finishes, Wave Copilot reports what it wrote and asks whether to Add to List. Choosing Don't Add leaves the poly on disk untouched, so an export never joins the takes you are still syncing unless you say so. Adding it puts it in the file list without selecting it as a lane.
Audio TC
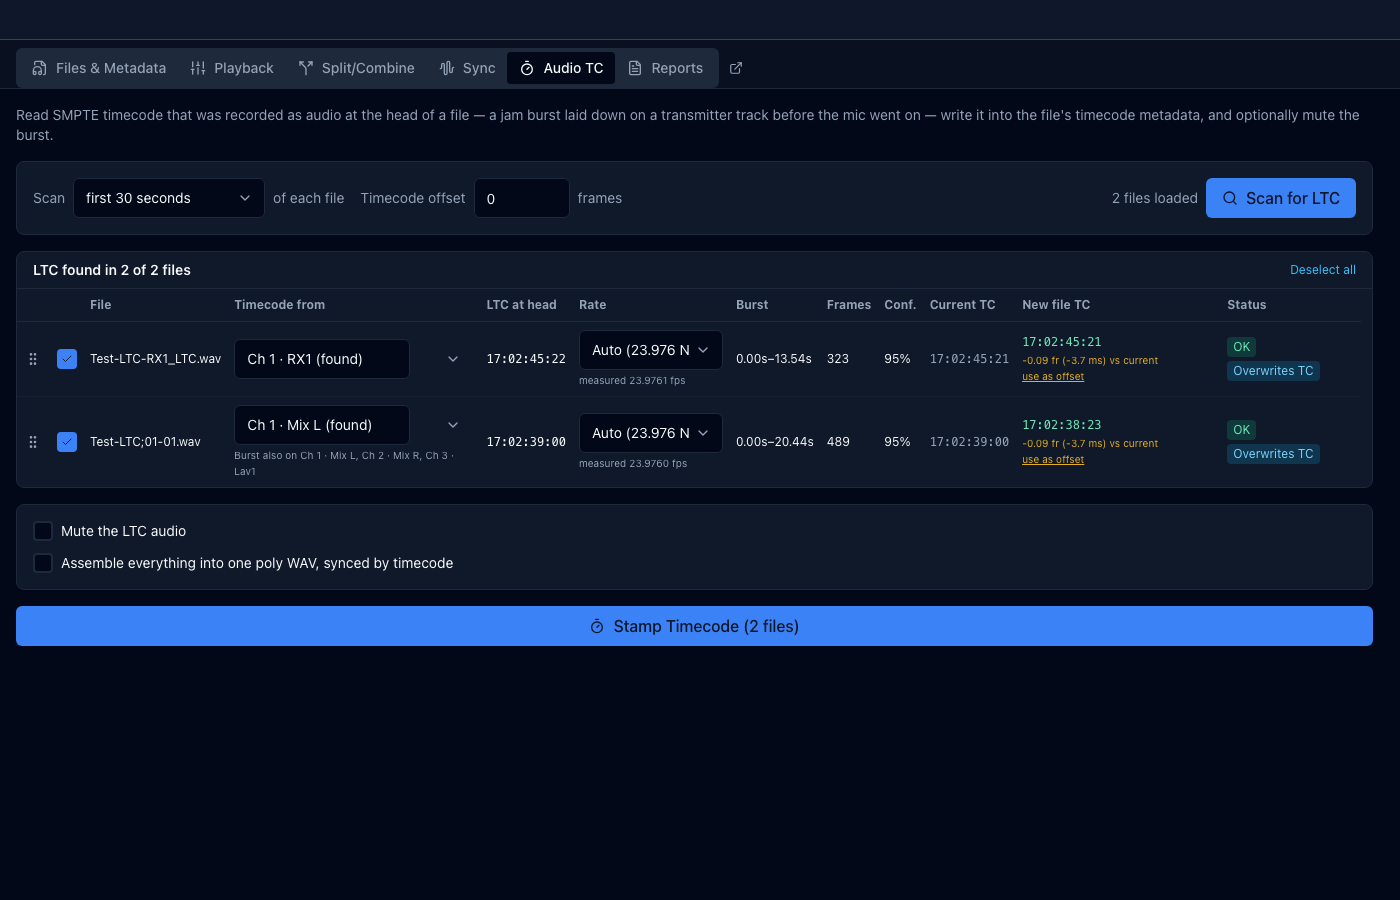
Read SMPTE timecode that was recorded as audio at the head of a file, write it into the file's timecode metadata, and optionally mute the burst.
This is for the rig without a timecode-capable transmitter. Jam a timecode generator into the transmitter or recorder track, record a few seconds of it, then plug the mic in and shoot. The camera and the sound file now share a clock, but the sound file's timecode only exists as an audible burst at its head. Audio TC turns that burst into real BWF timecode, after which the file behaves like any recorder file: Conform, Combine Group, Sync by Audio and Sound Reports all work with it, and it lines up in an NLE.
How to use:
- Load your files. Every loaded file is scanned, so there is nothing to select first
- Switch to the Audio TC tab ('Ctrl/Cmd + T')
- Choose how much of each file to scan (30 seconds by default, which is enough for any normal jam burst). Leave Timecode offset at 0 unless you have established that your generator needs it
- Click Scan for LTC and review the results table
- Tick the files to write, optionally enable Mute the LTC audio, and click Stamp Timecode
The results table:
| Column | Meaning |
|---|---|
| Timecode from | Which channel's timecode is written to the file. It shows the channel Wave Copilot picked, marked (found), using the track's name from the file's metadata where it has one, for example 'Ch 5 · Mix L'. When the burst was found on more than one channel, all of them are listed underneath in channel order; every one is muted, whichever supplies the timecode. Choosing a different channel also forces a full scan of it, which can recover a burst too weak for the initial one-second probe |
| LTC at head | The first timecode read out of the burst |
| Rate | Frame rate and drop-frame, detected from the burst. The measured rate is shown underneath; override if needed |
| Burst | The region that will be muted. With the burst on several channels this shows the widest of them; each channel is muted over its own range |
| Frames | How many consecutive timecode frames were decoded |
| Conf. | How well the burst decoded. Rows below 50% are left unticked for you to check |
| Current TC | The file's existing timecode, if any. This is what will be replaced |
| New file TC | The exact timecode that will be written. If the file already carries timecode, the difference is shown underneath in frames and milliseconds. See When the decoded timecode disagrees with the file below |
Status flags:
- No LTC found: nothing decodable in the scanned region. If the burst starts later in the file, scan further in
- Rate ambiguous: the burst was too short to tell 29.97 from 30 (or 23.976 from 24); these differ by only 0.1%, so about 20 frames are needed. Set the rate manually
- Burst truncated: timecode was still running at the end of the scanned region, so the burst may continue past it. Scan further in before muting
- Reversed LTC: the burst was recorded backwards. Not decoded
- Channels disagree: the burst was found on several channels but they read different timecodes, more than a frame apart. Two copies of one jam feed should agree, so check which channel is really the timecode before writing
- Overwrites TC: the file already has timecode, which will be replaced
When the decoded timecode disagrees with the file:
If a file already has timecode, the difference against the decoded burst is shown under the new value, in frames and milliseconds. A disagreement is not necessarily an error, and the size of it tells you which:
- A few milliseconds: the delay of the path the burst travelled. A wireless transmitter and receiver add a couple of milliseconds before the signal reaches the recorder's input, so the burst lands fractionally later in the file than the generator sent it
- Exactly one frame: a convention difference. Generators and readers do not all agree on whether the code word transmitted during a frame belongs to that frame or the one before it. Set Timecode offset to '+1' or '-1' frame to line them up
- A whole second or more: the two clocks were jammed at different times, or the file's existing timecode came from somewhere else entirely. The burst is normally the one to trust, which is the point of the feature
Watch the millisecond figure rather than the two timecode strings. The existing timecode is rendered at the frame rate stored in the file, and the decoded one at the rate read from the burst; where those differ, the two strings can read identically while being a frame apart, or read a frame apart while being nearly identical.
Muting:
Muting silences only the channels the timecode was found on, over the burst region. Anything else recorded at the same time on other tracks is kept. A short fade is applied at any edge of the region that borders real audio.
The same jam feed frequently lands on more than one track: an ISO channel and the mix L/R, or both legs of a stereo pair. Every channel carrying it is found and silenced where it sits, each over its own range, since the copies rarely start and stop at exactly the same moment. A six-track file with the burst on channel 1 and on the mix pair comes back with channels 1, 5 and 6 cleaned and channels 2–4 untouched.
Muted copies are written to an output folder you choose. Your original recordings are never modified. If a burst is mis-read, or the region is not the one you expected, the original is still there. Tick Also write timecode to the original files if you want the sources stamped too; that writes metadata only and leaves their audio alone.
Assembling a synced poly WAV:
Assemble everything into one poly WAV, synced by timecode combines the whole selection into a single multi-channel file instead of separate ones. Every channel of every file becomes a channel of the poly, placed at its decoded timecode. A take that started five seconds after another begins five seconds into the poly, with silence before it. This is the same idea as Poly WAV Output in Conform's Match Reference mode, except the timeline comes from the decoded bursts rather than from a reference take.
Channel order is the order of the results table, and you can set it: drag a row by the handle on its left. Sorting the main file list also carries through. Reordering changes only which channel a file lands on. Where it sits in time comes from its timecode, so moving a row never moves the audio.
Channels are named from each file's track metadata. Where two files use the same track name, the file name is added so they stay distinct. Two rigs both labelling a channel 'MixL' produce 'MixL (take1)' and 'MixL (take2)' rather than being merged.
When this is on, the individual muted copies are not kept: the poly is the output, and it contains the muted audio if muting is on.
Output Format works as it does in Conform. Match the widest source takes the highest sample rate and the deepest bit depth found among the selected files, and float if any one of them is 32-bit float, so assembling never degrades a source; the narrower files are converted into that format on the way in. The resolved format is shown next to the option. Choose Custom to set the sample rate and bit depth yourself. Normalize audio to –1 dBFS applies the same two-pass peak normalization used elsewhere in the app, and Spike Reduction under it tames short clicks and claps first.
Above the button you will see what the poly is going to be: channel count, length, format and approximate size. Read this line. The poly spans from the earliest file to the latest, so a selection whose timecodes are hours apart produces hours of silence with a few seconds of audio in it. Two seven-second takes stamped eight hours apart assemble into a perfectly correct 33 GB file. Anything with a long silent gap is flagged in amber and asks for confirmation; if the takes are not from one continuous period, select a smaller group.
Adding the results to the file list:
Nothing is loaded into the main file list behind your back. When a run finishes it reports what it wrote and asks whether to add the new files; declining leaves them on disk exactly as written.
Notes:
- The written timecode is sample-accurate, not rounded to the nearest frame, so a file that started part-way through a frame keeps that offset
- Frame rate, drop-frame and the timecode itself are written to both the 'bext' chunk and iXML
- Extend mute to start of file (on by default) pulls the mute back to sample 0 when the burst starts within half a second of it
- A multi-mono group is treated as one take with as many channels as it has member files, exactly like a poly: every member is scanned, all of them appear in the channel dropdown named from their own track names, and the burst is found wherever it actually sits. All members are stamped with the same timecode. Muting silences only the members carrying the burst, but copies every member to the output folder, with the others copied through untouched, so what lands there is a complete group that loads back as one take
- Leave Mute the LTC audio off to write timecode only and touch no audio at all
- The muted copies can go into a folder you choose, or, with Same as Source, into an 'LTC_Muted' folder beside each file being muted. See 'Where Your Files Are Saved'. Assembling a poly always needs a folder you choose, since one file made from many has no source folder of its own
- Reverse-playback timecode and frame rates above 30 fps (48/50/59.94/60) are not supported. SMPTE timecode generators jam at 24, 25 or 30 fps and their NTSC pulldowns, which are the rates Audio TC reads
Sound Reports
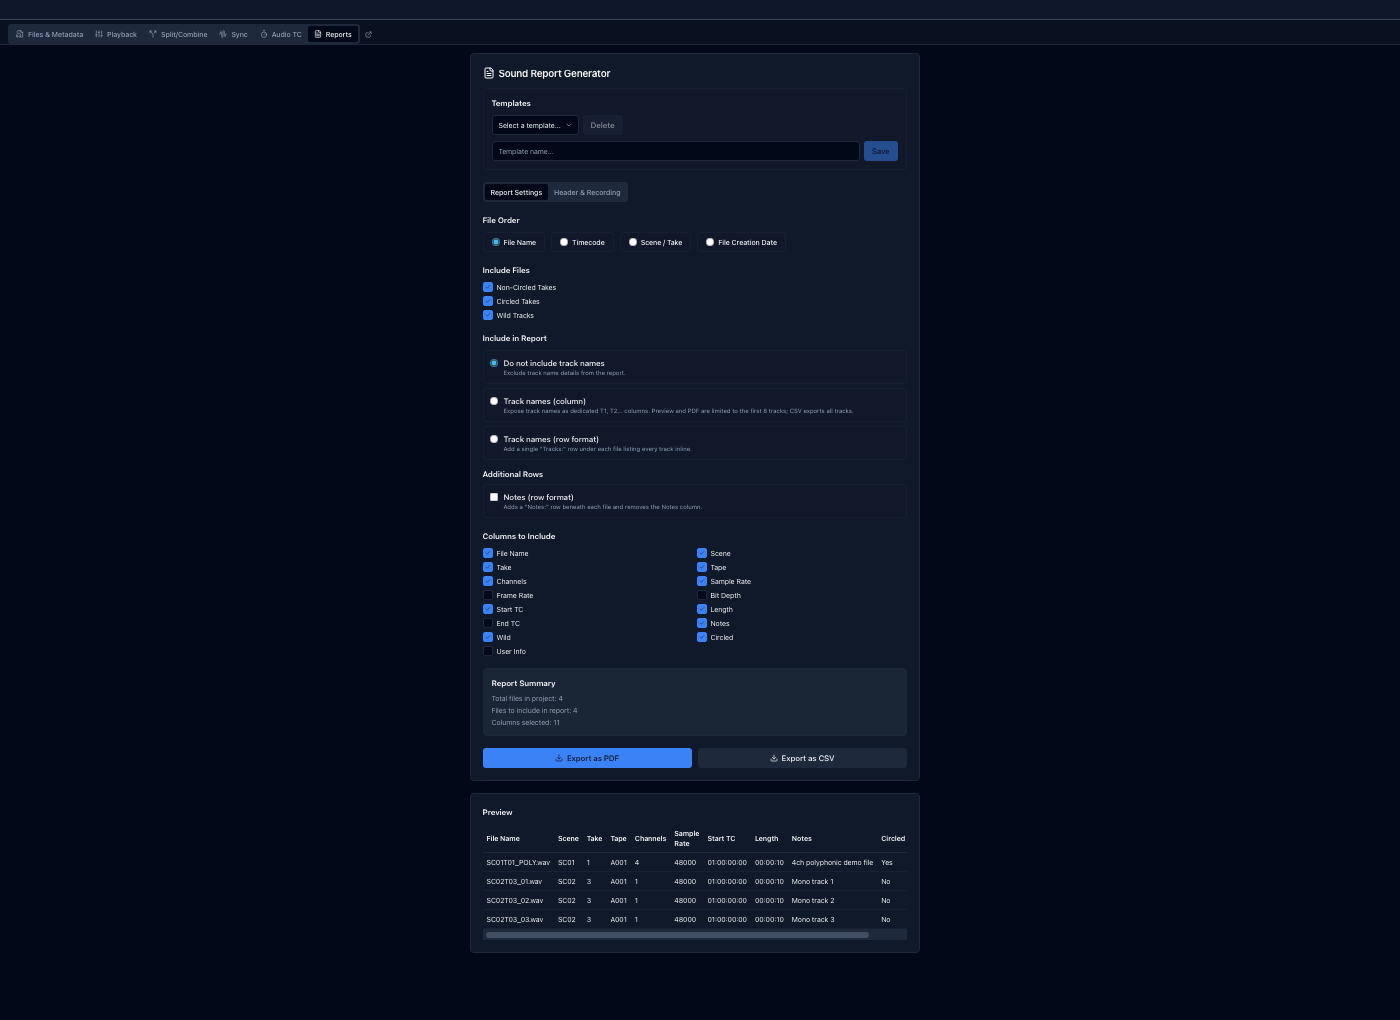
Generate professional sound reports for production documentation.
Creating a Report
- Load your audio files
- Go to the Reports tab
- Optionally load a saved Template to restore all settings at once
- Configure report options across the Report Settings and Header & Recording tabs
- Export as PDF or CSV
Templates
Templates save and restore the complete report configuration: all settings, columns, file order, header info, and recording info in one click.
- Load: Select a template from the dropdown. All settings are applied immediately.
- Save: Enter a name in the name field and click Save. If a template with that name already exists it is overwritten.
- Delete: Select a template from the dropdown, then click Delete.
The Templates section is always visible above the tabs so you can save at any point, whether you are on Report Settings or Header & Recording.
Report Settings Tab
File Order:
Controls the sort order of files in the exported report:
- File Name - Alphabetical order by file name
- Timecode - Ascending start timecode (HH:MM:SS:FF)
- Scene / Take - Alphabetical by Scene, then by Take (numeric-aware: Take 2 before Take 10)
- File Creation Date - Ascending filesystem creation date/time
Include Files:
- Non-Circled Takes - Include regular takes
- Circled Takes - Include selected/circled takes
- Wild Tracks - Include non-sync audio
Column Selection: Check the columns you want to include in the report:
- Scene, Take, File Name, Track Names
- Timecode, Duration, Sample Rate
- Notes, and more
Track Names Display:
- None - Don't show track names
- Column - Track names as dedicated T1, T2… columns. The preview and PDF export are limited to the first 8 tracks; CSV export includes all tracks.
- Row - A single "Tracks:" row beneath each file listing every track inline
Additional Rows:
- Notes (row format) - Adds a "Notes:" row beneath each file; removes the Notes column
Header & Recording Tab
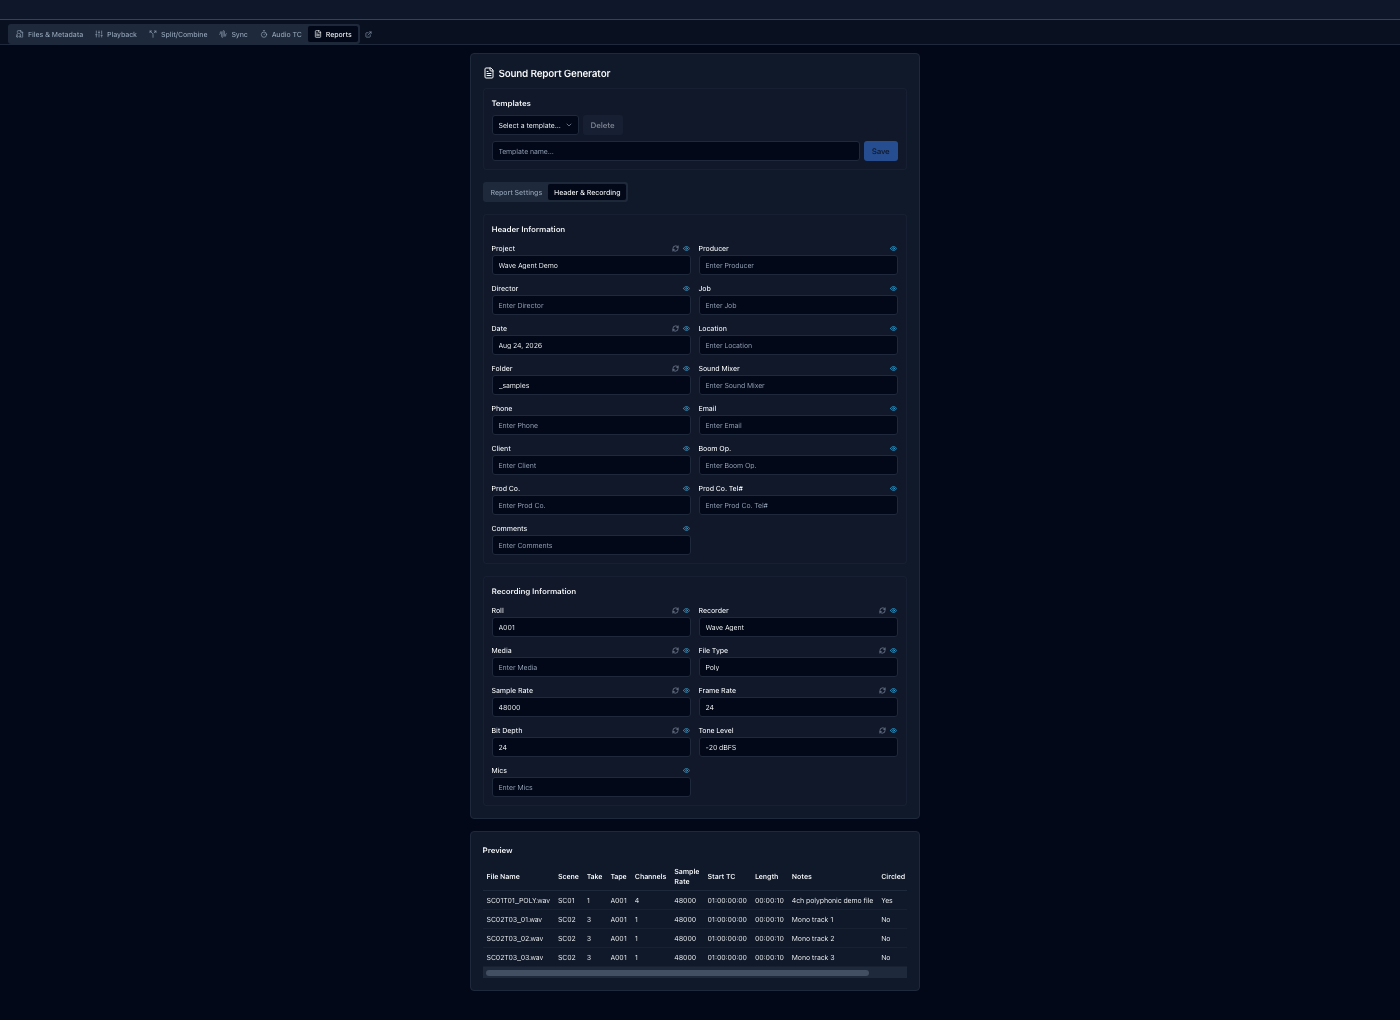
Enter project and session details that appear in the report header.
Each field has two icon controls in its label row:
- ↺ (Live): Only shown on fields that can be auto-derived (e.g. Date, Folder, Roll, Sample Rate). When active (blue), the field tracks your files: it re-derives when the file selection changes, when a template is loaded, and the moment you switch the icon on. Useful so the Date always reflects today and technical fields always match the current session. When grey, the field keeps whatever value it has and a template load restores the saved value.
- 👁 (Include): Controls whether the field appears in the exported PDF/CSV. Blue = included; grey = excluded from output even if the field has a value.
These settings are saved as part of a template, and the Header Information settings are also remembered between sessions.
Typing into a live field switches its ↺ icon off automatically. Your text is treated as a manual override and won't be overwritten when the file selection changes. Click ↺ again to hand the field back to the metadata. Clearing the file list leaves live fields showing their last values rather than blanking them.
Header Information fields: Project, Producer, Director, Job, Date, Location, Folder, Sound Mixer, Phone, Email, Client, Boom Op., Prod Co., Prod Co. Tel#, Comments. Of these, only Project (from file metadata), Folder (the parent folder name of the first file), and Date (today's date) can be derived; the rest are typed in and remembered between sessions.
Recording Information fields: Roll, Recorder, Media, File Type, Sample Rate, Frame Rate, Bit Depth, Tone Level, Mics. All except Tone Level (which defaults to -20 dBFS) and Mics auto-populate from the first file's metadata when files are loaded.
Logo
The Logo section at the top of the Header & Recording tab puts your own mark on the exported report.
Click Choose Image to browse for a file, or drag an image straight onto the preview square. PNG, JPEG and WEBP are accepted. Remove clears it again.
There is one logo, and it is shared by every report and every template. Loading a new image replaces the old one everywhere rather than adding a second. What each template decides is only whether to use it. The eye icon beside the Logo heading works exactly like the eye on the fields below it: blue means the logo is placed on the report, grey means it is left off. That setting is saved with the template, so a template for your own reports can carry the logo while one you send to a client does not. The eye stays greyed out until an image is loaded, since there is nothing to include before that.
In the exported PDF the logo sits at the top left of every page. It is scaled to fit a fixed slot and always keeps its proportions, so nothing is ever stretched or squashed whatever shape the original is.
The best size to supply. The slot is landscape, a little under 4 units wide for every 1 tall. An image of about 600 x 160 pixels fills it exactly. Larger is fine and is reduced for you, so there is no need to prepare anything precisely, but the shape matters more than the pixel count: a wide, landscape logo prints largest. A square or upright logo is limited by the height of the header band instead, and so prints noticeably smaller. Wave Copilot says so under the preview when the image you have loaded is tall enough for its width that this will happen.
A few things worth knowing:
- The logo is placed on the PDF only. CSV is a plain text format and cannot carry an image.
- It appears on every page, not just the first, so later pages reserve room for it and fit a few rows fewer. On a long report that can add a page. Switch the logo off with the eye if you would rather have the rows.
- Transparency is kept, so a logo with a transparent background sits cleanly on the white page. Bear in mind that a white logo on a transparent background is invisible on white paper. The preview square in the app is white for exactly this reason, so what you see there is what the export gives you.
- Large images are automatically reduced when loaded. Print quality is unaffected, and it keeps the saved logo small.
- The logo is remembered between sessions.
Export Formats
PDF Export:
- Professional formatted document
- Includes header and recording information (non-excluded, non-empty fields only)
- Table with selected columns
- Suitable for printing or digital distribution
The top of each page carries your logo, where you have set one, and the title. The foot of every page carries the housekeeping: when the report was generated on the left, how many files it covers in the centre, and the page number on the right.
An exported PDF report looks like this. The page is Letter landscape, with a logo at the top left, the header and recording information laid out in two columns above the table of takes, and the generated date, file count and page number along the foot:
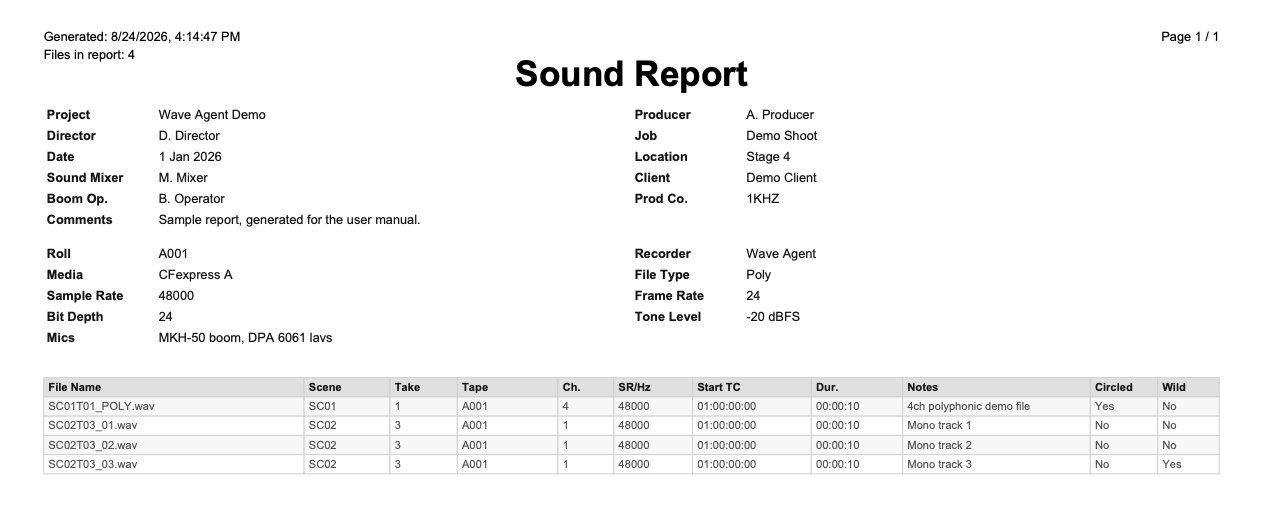
CSV Export:
- Comma-separated values file
- Opens in Excel, Google Sheets, etc.
- Useful for further data processing
- When using Column track name mode, all tracks are exported regardless of count (no 8-track limit)
Preview
The live preview table at the bottom of the page shows up to 5 files using the current settings.
Format Conversion
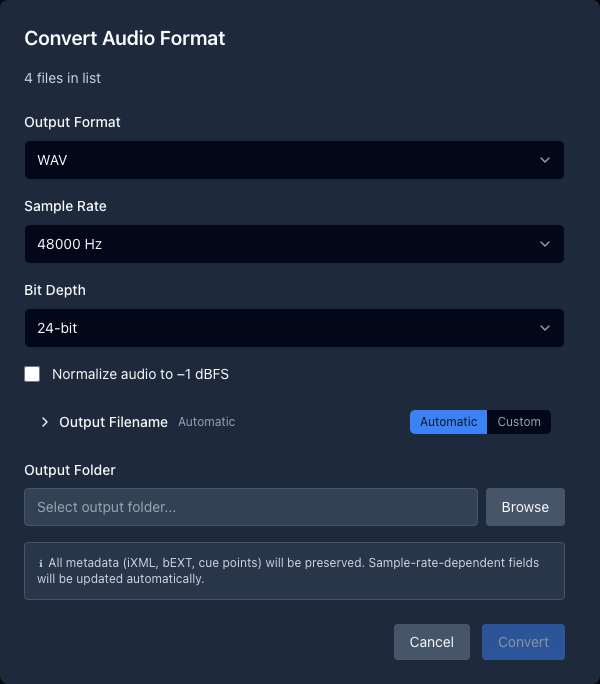
Convert WAV files to different formats, sample rates, and bit depths. MP3 and AAC (M4A) output includes the start timecode in the filename and embedded metadata.
Output filenames follow the source name by default (with the start-timecode suffix for MP3/AAC); the dialog's Output Filename section lets you define your own scheme instead. See Custom Output Filenames. When a custom scheme is active, it fully replaces the automatic name including the timecode suffix (add the Start TC chip if you want to keep it).
Opening the Converter
- Select files in the file list
- Right-click and choose Convert Format...
- Or go to File > Convert Format... ('Ctrl/Cmd + K')
Conversion Options
Output Format:
- WAV (default): lossless, preserves all metadata (iXML, bEXT, cue points)
- MP3: lossy compression; start timecode appended to filename and written as ID3 TXXX tags
- AAC (M4A): lossy compression; start timecode appended to filename and written as format tags
MP3 Bitrate (when MP3 is selected):
- 128 kbps
- 192 kbps
- 256 kbps
- 320 kbps (default)
AAC Bitrate (when AAC (M4A) is selected):
- 128 kbps
- 192 kbps
- 256 kbps (default)
Channel Handling:
Choose how a multi-channel source is folded down, or whether it is folded down at all:
- Keep original channels (WAV only, default for WAV): every source channel is written through unchanged. MP3 and AAC cannot hold more than two channels, so this choice is not offered for them; picking a lossy format falls back to Downmix all channels to stereo.
- Downmix all channels to stereo (default for MP3 and AAC): FFmpeg mixes all tracks together using its standard matrix. Every channel contributes to the stereo output.
- First two channels only, to stereo (Ch 1 = L, Ch 2 = R): only channels 1 and 2 are kept, as a stereo pair; every other track is discarded. Useful when the first two channels are already a stereo mix, or a specific track pair you want to isolate, and the rest are iso mics you do not want folded in.
- Downmix all channels to mono: every channel is summed with equal weight into a single mono channel.
- First two channels only, to mono (Ch 1 = L, Ch 2 = R): only channels 1 and 2 are folded together into a single mono channel; every other track is discarded.
The two stereo choices only matter for a source with more than 2 channels; a mono or stereo source passes through unchanged either way. The two mono choices fold any stereo or poly source down to 1 channel; a source that is already mono is left as it is.
Sample Rate (44.1 kHz and 48 kHz available for MP3 and AAC; full range for WAV):
- 44.1 kHz (CD quality)
- 48 kHz (Video standard, default for lossy formats)
- 88.2 kHz (WAV only)
- 96 kHz (WAV only)
- 176.4 kHz (WAV only)
- 192 kHz (WAV only)
Bit Depth (WAV only):
- 16-bit (CD quality)
- 24-bit (Professional standard)
- 32-bit (Integer)
- 32-bit Float (Maximum headroom)
Dither (when reducing bit depth, WAV only):
- None
- Rectangular (RPDF)
- Triangular (TPDF)
- Lipshitz Noise Shaping
Dither is applied only where the target word length is shorter than the source's, so leaving it set does nothing on a 16-bit to 24-bit conversion or on MP3 and AAC output.
Resampling Quality (shown when sample rate conversion is needed):
- Linear (fastest)
- Cubic (good balance)
- Sinc (high quality)
Conversion Process
- Choose output format (WAV, MP3, or AAC (M4A))
- Configure format-specific options (bitrate, channel handling, or bit depth)
- Select output directory
- Click Convert
- Progress is displayed for each file
- Review results when complete, then choose Add to List to load the new files into the main file list or Don't Add to leave them on disk
Output files are organised in a subfolder named after the target format:
- WAV: '48000Hz_24bit/'
- MP3: 'MP3_320kbps/'
- AAC (M4A): 'AAC_256kbps/'
Audio Level Options
The dialog has one level control, the Normalize audio to −1 dBFS checkbox. Clipping is handled separately and without being asked for, described below.
Normalize audio to −1 dBFS
Every channel is measured in a single pass and the gain applied during the conversion itself, so no split, adjust and recombine is needed. Works at any channel count, large multi-channel RF64 files included.
- WAV output: each channel is measured and brought to −1 dBFS independently of the others. Note what this means for a poly: a quiet channel is raised more than a loud one, so the balance between channels changes. That is the point of normalizing, but it is not what you want on a file whose channel balance is already a mix.
- MP3 / AAC output: one gain is applied to the whole file rather than per channel, sized so the loudest channel lands at −2 dBFS. The relative balance between channels is preserved, which matters because these formats fold down to stereo. The extra decibel is headroom for the inter-sample peaks lossy encoding introduces.
Spike Reduction
Below the Normalize checkbox, Spike Reduction optionally tames very short, unwanted transients (for example clicks and claps) before normalizing. It is useful when the average dialogue level is low but there is an occasional loud short transient, such as in transmitter 32-bit float recordings. Spikes are brought down first, to the level of the loudest dialogue peak, and the normalize gain is then worked out from that, so the dialogue comes up instead of being held down by one click. The spike is still there afterwards, as loud as your loudest dialogue. Avoid it on bursts of loud audio such as applause, continuous shouting, thunder and explosions. It is greyed out until Normalize is on. A file with no spike in it is converted exactly as it would be without the option.
When the conversion would clip
There is no option to switch on for this. When you click Convert, Wave Copilot checks for clipping on its own if all three of the following are true:
- Normalize audio is off, since normalizing already decides the output level
- The output format is WAV. Lossy encoders are left to manage their own headroom
- A source is 32-bit float, or you are reducing bit depth
If any file would clip at the target bit depth, conversion stops and a Clipping Detected dialog names that bit depth and offers a choice:
- Yes, Normalize measures the true peak and lowers the whole file by just enough to bring it to −1 dBFS. It only ever reduces: material already below the target is left alone, and nothing is boosted. One gain for the file, so the balance between channels is untouched
- No, Continue Anyway converts as configured and lets the peaks clip
Because the check is skipped whenever Normalize audio is on, and skipped for MP3 and AAC, you will only ever see this prompt on a WAV conversion you did not ask to normalize.
Other Features
- Timecode in filename: For MP3 and AAC, the start timecode (matching the Start TC column in the file list) is appended to the filename in 'HH-MM-SS-FF' format, e.g. 'filename_11-02-55-00.mp3'
- Timecode in metadata: Same start timecode is embedded in the file's metadata tags (see sections below)
- Metadata preservation: iXML, bEXT, and cue points are fully preserved for WAV output
- Batch conversion: Process multiple files at once
- Parallel processing: All files convert concurrently regardless of output format
MP3 Timecode Preservation
When converting to MP3, the start timecode (as shown in the Start TC column) is written as ID3v2 TXXX (user-defined text) tags. Additional bEXT fields are included when present in the source file.
| ID3 Tag | Content |
|---|---|
| 'TXXX:BWF_TIMECODE' | Start timecode as 'HH:MM:SS:FF' |
| 'TXXX:BWF_SAMPLE_RATE' | Source sample rate |
| 'TXXX:BWF_ORIGINATOR' | Recorder name (if present) |
| 'TXXX:BWF_ORIGINATOR_REFERENCE' | Originator reference (if present) |
| 'TXXX:BWF_DESCRIPTION' | Scene/take description (if present) |
Read tags with: 'ffprobe -v quiet -print_format json -show_format file.mp3'
MP3 does not support bEXT, iXML, or cue point chunks natively. Use WAV output when full metadata round-trip is required.
AAC (M4A) Timecode Preservation
When converting to AAC (M4A), the start timecode (as shown in the Start TC column) is written as key-value metadata atoms in the M4A container, readable via 'ffprobe'.
| Tag Key | Content |
|---|---|
| 'BWF_TIMECODE' | Start timecode as 'HH:MM:SS:FF' |
| 'BWF_SAMPLE_RATE' | Source sample rate |
| 'BWF_ORIGINATOR' | Recorder name (if present) |
| 'BWF_ORIGINATOR_REFERENCE' | Originator reference (if present) |
| 'BWF_DESCRIPTION' | Scene/take description (if present) |
Read tags with: 'ffprobe -v quiet -print_format json -show_format file.m4a'
Note: DaVinci Resolve cannot read timecode from audio-only M4A files. Use WAV if timecode sync in an NLE is required.
Export Mix
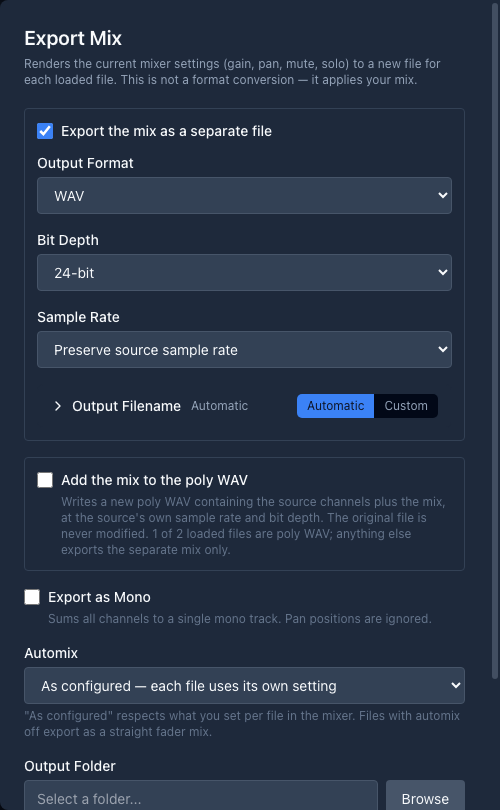
Export a rendered mix of each loaded file with your current mixer settings applied: per-channel gain, pan, mute, and solo. Output can be stereo (default) or mono. This is not a format conversion: Export Mix captures your creative mix decisions and writes them into a new audio file.
Export Mix vs. Convert Format:
| Export Mix | Convert Format | |
|---|---|---|
| Applies mixer settings | Yes | No |
| Output channels | Stereo (2-channel) or Mono (1-channel) | Preserves source channel count (WAV) or downmixes (MP3/AAC) |
| Use case | Deliver a mix to an editor | Archive or transcode a file as-is |
| Output track names | MIX L / MIX R (stereo) or MIX (mono) | Preserved from source |
Opening Export Mix
Go to File > Export Mix... ('Ctrl/Cmd + D')
The dialog opens showing all currently loaded files and the mixer state that will be applied to each one.
Output files are named '{name}_mix.wav' by default, with a '_GS' or '_IG' suffix when automix is applied. The dialog's Output Filename section lets you define your own scheme instead. See Custom Output Filenames. A custom scheme replaces the automatic suffixes entirely; use the Automix Mode chip to keep the GS/IG tag, and note the Quality chip resolves to the bit depth for WAV or the bitrate for MP3/AAC.
How Mixer Settings Are Applied
Each file uses its own saved mixer state:
- Gain: per-channel level adjustment (−48 dB to +12 dB) is applied to all output modes
- Pan: positions each channel in the stereo field using equal-power panning. Not applied in mono mode. Pan is ignored when exporting mono since there is only one output channel
- Mute: muted channels contribute nothing to the output
- Solo: if any channel is soloed, only soloed channels are rendered; all others are silenced
- Mid/Side: a paired rig is decoded to left and right, with the mid fader as the pair's level and the side fader as its width. In mono, the side channel contributes nothing, since folding a decoded pair to mono leaves the mid on its own
- Automix: if enabled for the file (or forced via the batch Automix option), dynamic per-channel gain is applied on top of the fader settings during the offline render
If you haven't changed the mixer for a file, it exports with unity gain (0 dB), centre pan, and all channels active, giving a flat downmix of all source channels.
Tip: Set the mixer how you want it while listening to the file, then open Export Mix. The saved state for each file is used, so you can configure multiple files before exporting them all at once.
Export Mix Options
The dialog is arranged around the things a run can produce. Export the mix as a separate file comes first, with everything that describes that file grouped beneath it: format, bit depth or bitrate, sample rate, and its output filename. Add the mix to the poly WAV follows, with its own placement and filename options. When a Mid/Side pair is set up on the console, Mid/Side decoded poly WAV appears as well. Below them all sit Export as Mono and Automix, which shape the mix itself and therefore apply to whichever outputs you asked for.
Untick the separate file and its whole group of format settings disappears, since nothing is left for them to describe.
Every output is free to untick, including all of them at once. A decoded Mid/Side poly counts as an output in its own right, so you can untick both mix outputs and export only that. A run that would write nothing is caught at the Export Mix button, which is greyed out with a note saying what to choose, rather than by preventing the tick. The same applies when the only output you asked for needs a poly WAV and none of the loaded files is one.
Export the mix as a separate file:
On by default. Untick it, with the poly option on, when the poly carrying the mix is the only deliverable you want. A file the mix cannot be added to, such as a mono file or a multi-mono group, still gets its separate mix.
Output Format:
- WAV (default): lossless, preserves all metadata (iXML, bEXT, cue points)
- MP3: lossy compression; start timecode appended to filename and written as ID3 TXXX tags
- AAC (M4A): lossy compression; start timecode appended to filename and written as format tags
Bit Depth (WAV only):
- 16-bit
- 24-bit (default)
- 32-bit (Integer)
- 32-bit Float
The mix is summed at 32-bit float and written down to the bit depth you choose, so 16-bit and 24-bit exports are dithered on the way out. Export Mix has no dither or resampling menus of its own: it always uses triangular (TPDF) dither and the highest resampling quality.
Sample Rate (WAV):
- Preserve source (default)
- 44.1 kHz / 48 kHz / 88.2 kHz / 96 kHz / 176.4 kHz / 192 kHz
Sample Rate (MP3 and AAC):
- 44.1 kHz
- 48 kHz (default)
MP3 Bitrate (when MP3 is selected):
- 128 kbps / 192 kbps / 256 kbps / 320 kbps (default)
AAC Bitrate (when AAC (M4A) is selected):
- 128 kbps / 192 kbps / 256 kbps (default)
Mono:
- When checked, all channels are summed to a single mono track. Gain, mute, solo, and phase invert are applied; pan is ignored.
- When unchecked (default), the output is stereo.
Add the mix to the poly WAV:
Writes the mix back into the poly file it came from, so one pass gives you both the mix and a poly WAV that carries it. This is the same merge as Combine Poly, with the mix you just rendered as the secondary file, and it saves you from exporting a mix and then combining it by hand.
- Mix Channel Placement: Before Poly Channels puts the mix channels first, After Poly Channels appends them at the end. Your choice is saved and restored the next time you open the app. Whether you also get the mix on its own is set by Export the mix as a separate file at the top of the dialog. Leave it ticked for both files; untick it when the poly is the only deliverable you want, and the mix is discarded once it has been merged in.
The embedded mix always matches the source file's own sample rate and bit depth, so the original channels are copied through with no conversion. The Bit Depth and Sample Rate options above therefore apply only to the separate mix file. If you export to MP3 or AAC, you still get that lossy mix on its own, and the mix added to the poly is PCM at the source's format.
The source file on disk is never modified. The merged files are written to their own 'Poly_With_Mix/' subfolder, named '
They get a folder of their own rather than sharing the mix's because the two rarely have the same format: the mix follows the options above while each merged poly follows its own source, so a batch can produce 24-bit and 32-bit float polys side by side and no single 'Mix_
Note: This is available for poly WAV files only, since the mix has to be added to an existing multi-channel file. Mono files and multi-mono groups export their separate mix as usual and are listed as a warning in the result. A file is also skipped if adding the mix would push it past the 64-channel limit.
Automix Option:
Controls whether Automix is applied during the export render, and whether it is applied uniformly or per file:
| Setting | Behaviour |
|---|---|
| As configured | Each file is exported using the Automix setting you configured for it in the mixer. Files with Automix off export as a straight fader mix. |
| Gain Sharing for all files | Forces Gain Sharing on every file in the batch, regardless of individual settings. |
| Intelligent Gate for all files | Forces Intelligent Gate on every file in the batch, regardless of individual settings. |
The default is As configured. If you have not set Automix on any file, this is equivalent to a straight fader mix for all files.
Note: When Automix is applied during export, the rendering engine processes the entire file offline in a streaming pass, much faster than real time. The output faithfully reflects the same dynamic gain decisions you hear during playback.
Trim the mix if it would clip:
On by default. The summed mix is measured before it is written, and if it would go past full scale the whole mix is lowered by just enough to fit. Every channel moves together, so the balance you set is unchanged. A mix that already fits is left exactly as it is, byte for byte, so this can only ever act on a file that would otherwise have been written clipped.
Any file that had to be lowered is listed at the end of the export, with the figure, so a trim is never something that just quietly happened to a delivery.
The console has no meter for the summed mix, and a batch export is not something you sit and listen to, so without this a clipped mix would usually only turn up after delivery. Leave it on unless you have a reason not to. If you would rather keep the mix untouched and deal with the level yourself, untick it and set the bit depth to 32-bit float, which has no ceiling to clip against.
Mid/Side decoded poly WAV:
These two options only appear when a Mid/Side pair is set up on the console. They are independent of each other and of the mix, and both write at the source's own sample rate and bit depth without modifying the original.
- Add decoded pairs after the isos: copies every source channel through untouched and appends decoded left and right for each pair. One file therefore carries both the raw mid and side isos and the decoded stereo. A four channel file with one pair becomes six channels. The output is named '
_withMS.wav'. - Replace the M/S isos in place: writes the same channel count, with each pair's mid slot becoming decoded left and its side slot decoded right. Every other channel is copied through untouched. Nothing raw is left in the file, which suits a delivery poly. The output is named '
_MSdecode.wav'.
The decoded channels carry the console's fader, width, phase and mute or solo, so they match what you were monitoring. Automix is not applied to them, because its gain moves over time and cannot be baked into a fixed copy. Pairing takes a rig out of the automix anyway, so this only matters if you deliberately put one back in, and the export tells you when it does.
Decoded channels are named after both halves of the pair, because that is what they contain: the left channel is mid plus side and the right is mid minus side, so both microphones are in both channels. A rig recorded as 'Mid' and 'Side' therefore delivers as 'Mid+Side L' and 'Mid+Side R'. A pair with no track names falls back to 'MS1 L' and 'MS1 R'. The names are written to both the bEXT description and the iXML track list, and the names of all the other channels are preserved.
Because decoding is unity, a pair can sum to as much as 6 dB above the two microphones. Any pair that would go past full scale is lowered by just enough to fit, with a single gain applied across both halves so the stereo image does not move, and only that pair is touched. Every other channel in the file stays bit for bit identical to the source. The trim is reported at the end of the export.
Output Folder:
Choose where exported files are saved. A subfolder is created automatically:
- WAV: 'Mix_24bit/' (or 'Mix_16bit/', 'Mix_32bit/' etc.)
- MP3: 'Mix_MP3_320kbps/'
- AAC: 'Mix_AAC_256kbps/'
When Mono is enabled the suffix '_Mono' is appended to the subfolder name, e.g. 'Mix_24bit_Mono/', 'Mix_MP3_320kbps_Mono/'.
With Add the mix to the poly WAV enabled you get a second subfolder holding the merged polys, so an MP3 export of a 24-bit session gives you 'Mix_MP3_320kbps/SoundReport_001_mix.mp3' alongside 'Poly_With_Mix/SoundReport_001_withmix.wav':
- Poly with the mix: 'Poly_With_Mix/' (or 'Poly_With_Mix_Mono/')
Each subfolder is only created when something is actually written into it, so unticking the separate mix file leaves you with 'PolyWith_Mix/' alone rather than an empty 'Mix
Output File Naming
Output files are named '
| Automix applied | Example filename |
|---|---|
| None | 'SoundReport_001_mix.wav' |
| Gain Sharing | 'SoundReport_001_mix_GS.wav' |
| Intelligent Gate | 'SoundReport_001_mix_IG.wav' |
This makes it easy to distinguish exported files at a glance and avoid overwriting a straight mix with an automixed version of the same file.
When Add the mix to the poly WAV is enabled, the merged file is named '
Metadata Preservation
All iXML and bEXT metadata is copied from the source file to the export:
- Start timecode, scene, take, recorder, and originator fields are preserved
- Sample-rate-dependent timecode fields are recalculated if you change the sample rate
- Track names in iXML and in the bEXT description reflect the output mode: stereo exports set track names to MIX L and MIX R; mono exports set a single track name to MIX. The original per-channel track names from the source file are not carried over
- When the mix is added to the poly WAV, the merged file keeps every original track name and adds MIX L and MIX R for the new channels, renumbered to their position in the file
Edge Cases
| Situation | Behaviour |
|---|---|
| All channels muted | Export completes; output file is silent. A warning is shown in the result. |
| Single mono source channel | Stereo mode: rendered to stereo using equal-power panning. Mono mode: output is a single mono track. |
| No mixer changes made for a file | Unity gain (0 dB), centre pan, all channels active |
| Mono mode enabled | Pan settings are ignored; all channels are summed with their gain into a single output channel. |
Workflows and Recipes
The chapters above describe Wave Copilot one tab at a time. This one works the other way round: it starts from a job you actually have to deliver and names the tabs to use, in the order to use them. Every recipe here is built out of features already described above, and links back to them rather than repeating them.
Several of these answers chain two or three passes together. Where that is the case, the recipe says why the shorter route does not work, so you can tell when a step is genuinely needed and when you can skip it.
Which tool builds my poly WAV
Five different tools in Wave Copilot can write a polyphonic WAV. Picking the right one is most of the battle.
| Your situation | Use | Because |
|---|---|---|
| Separate mono files, one per track, already the same length | Combine Mono | Batch mode groups them by filename and runs a whole session in one click |
| Exactly two poly files, typically a main recording plus a separate mix | Combine Poly | Pairs them by timecode automatically and lets you place the mix first or last |
| Any mixture of mono, stereo and poly files that belong together | Combine Group | The only tool that interleaves channels freely across files of different widths |
| Sources that must be trimmed to a take, or to a timecode window | Conform, Poly WAV Output | The only tool that trims. Everything else spans the full length of its sources |
| Sources whose timecode is wrong, missing, or not to be trusted | Sync by Audio | Positions files by their audio content, then exports the aligned session |
| Files carrying timecode only as an audible burst at the head | Audio TC | Decodes the burst first, then assembles by the timecode it just recovered |
What sets the length of the output
Output length is decided for you, and the rule is not the same in every tool. This is worth knowing before you start, because it is the difference between a delivery that matches your reference take and one that runs to the length of your longest transmitter file.
| Operation | Length of the output |
|---|---|
| Conform, Match Reference, individual | The reference take's timecode window, cut short where the secondary does not cover all of it |
| Conform, Match Reference, Poly WAV | The reference take's timecode window exactly, with silence filling any gap |
| Conform, Custom TC Range | Exactly 'End TC' minus 'Start TC', with silence filling any gap |
| Conform, Track Replace | Exactly the reference file's duration |
| Combine Poly | The longer of the two files, the shorter padded with silence |
| Combine Group | The longest file in the group, the others padded with silence |
| Sync by Audio, poly export | Earliest lane start to latest lane end across the aligned timeline |
| Audio TC, assembled poly | Earliest file start to latest file end on the timecode timeline |
The short version: only Conform trims. If you need the output to end where your reference take ends, the recipe has to go through Conform, whatever else it does.
Replace iso tracks when the transmitter timecode is slightly off
Timecode on a transmitter or secondary recorder often lands a few samples away from the recorder's, because the two devices write audio differently or because you put a delay on the recorder input. Track Replace positions secondary audio purely by timecode, so it inherits that error.
There is no single control that aligns and replaces in one pass. The way to combine them is to correct the timecode first, in Sync by Audio, and then let Track Replace do what it already does well.
- Load the primary takes and the transmitter files into the file list
- Open the Sync tab and check the primary take and the transmitter files you want to correct
- Make the primary take the reference lane, by clicking its anchor icon if it is not already
- Point each transmitter lane at a channel with something distinctive on it, using the channel dropdown, then click Align by Audio
- Press Play and confirm the sync by ear. Nudge with the ±1 ms buttons if you need to
- Leave Snap to frame switched off
- Click Save & Export…, tick Write the aligned timecode to the original files, and leave Export an aligned poly WAV unticked. The button reads Write Timecode
- Switch to Split/Combine → Conform → Track Replace, add the transmitter files as secondary files, and export as usual
Why Snap to frame stays off. Conform does its matching and trimming in samples, not frames, reading the sample count stored in the file's timecode. Left off, Sync writes a sample-accurate position and Track Replace reproduces your alignment exactly. Switched on, every position is rounded to the nearest frame boundary first, which can reintroduce up to half a frame of the very error you were removing. Turn it on only when something downstream insists on frame-aligned timecode.
Note: This rewrites the timecode metadata of your transmitter files. Their audio is never touched, and neither is anything else about them, but if you need the original timecode preserved, work on copies. Copy to… in the file list makes them for you.
Watch for clock drift. If the transmitter's clock runs slightly fast or slow, a long recording can start in sync and end out of it. Sync by Audio detects this and warns you, but it does not time-stretch to correct it. The timecode it writes is exact at the point it aligned. On a long recording, align and replace take by take rather than once for the whole roll.
Sync and replace several takes from one long transmitter recording
Five takes on the recorder, one continuous file off the transmitter's card. The usual instinct is to cut the card file into five pieces first. Most of the time you do not have to.
Track Replace already reads a continuous recording. It works out where each take sits inside the secondary and seeks to that point on its own, take by take, which is the job the Conform tab was built for. Load the five takes, add the one long file as a secondary, and export all five. No splitting anywhere.
Splitting only becomes necessary because of Sync by Audio, which aligns whole files against whole files. One transmitter file gives you one offset. So the question to settle first is whether one offset serves all five takes.
If the offset is constant, which it usually is when it comes from an input delay on the recorder or from the two devices writing audio slightly differently, one pass fixes the whole card:
- Load the five takes and the long transmitter file
- In the Sync tab, check the transmitter file and one take, choosing a take with clear, distinctive content
- Make the take the reference lane, align, and confirm by ear. Leave Snap to frame off
- Save & Export…, tick only Write the aligned timecode to the original files
- Go to Conform → Track Replace, add the long transmitter file as a secondary, and export all five takes at once
Correlating a short take against a card file that runs for hours is a large search, so give the analysis time and check the confidence figure and your ears before trusting it. If it lands somewhere wrong, cut the file down first as below and align take by take.
If the offset changes across the day, because the two clocks run at slightly different speeds, then each take needs its own alignment and therefore its own segment. Cutting those segments is one pass, not five:
- Load the five takes into the file list
- Open Conform → Match Reference and add the long transmitter file as a secondary. It matches every take by timecode overlap at once, so five takes give five rows
- Click Trim & Export. You now have five segments, one per take
- Load the segments and align each one against its take in the Sync tab, writing timecode each time. This part is one session per take, since a sync session has a single reference lane
- Return to Conform → Track Replace, add the five aligned segments as secondary files, and export
Note: Use Match Reference for this, not Custom TC Range. Custom TC Range trims to one window you type by hand, so five takes means running it five times. Match Reference reads the takes you already have loaded and cuts all of them in a single pass. Custom TC Range is for the takes the recorder never captured.
Skipping Track Replace altogether. If the channels you are replacing are the only bad ones, you can assemble the finished file in Sync instead. Strip the defective channels from the take with Split Poly, leaving a clean poly, then align that against the transmitter segment and tick Export an aligned poly WAV in the Save dialog. One pass, and the alignment and the assembly happen together.
Two things to watch with this route. The output is the clean channels plus the transmitter channels, so it has a different channel count and layout from the original rather than being a like-for-like replacement. And Sync's poly export spans from the earliest lane to the latest, so feed it a per-take segment. Give it the whole card file and you get an output as long as the card.
Avoiding the problem next time. Record a short burst of timecode, two seconds is plenty, at the head of each transmitter file and on the recorder before a long take. Audio TC decodes the burst and writes real timecode into the file, after which the transmitter file behaves like a recorder file: Track Replace finds its own way into it, and neither the splitting nor the audio alignment is needed at all. This is the cheapest of all these routes, and the only one that costs nothing in post.
Rebuild the isos and the mix when the mix track is unusable
The car-to-car problem: the transmitters have usable audio but the mix went to pieces when the cars separated. You want the isos replaced from the transmitters, and a fresh mix built from those new isos rather than the one you recorded.
This takes two passes: Conform rebuilds the isos, then Export Mix builds the new mix and puts it into the poly in the same run.
Pass 1, rebuild the isos. Which mode you want depends on how much you are replacing.
- Replacing every iso from the transmitters: use Match Reference with Poly WAV Output enabled. The output contains the transmitter channels only, so the unusable mix never enters the file in the first place, and each take is trimmed to the reference. Do not tick Merge with reference, since that is what would bring the old channels back in
- Replacing some isos and keeping others from the recorder: use Track Replace, set the channels you are keeping to Keep reference, and drop the ruined mix channels in the same pass. Drop N detected mix channels in the Channel Assignment header finds them by track name across every take; where your mix channels are not named for it, the Drop channels preset beside it takes channels 1 and 2 off every take instead. See Dropping channels from the output
Pass 2, build the new mix and put it back in the file. Load the iso-only file from pass 1, go to the Playback tab, and set it up: faders, pans, mutes, and Automix on if you want it to ride itself. Gain Sharing blends, Intelligent Gate switches more decisively. Then File > Export Mix… ('Ctrl/Cmd + D'), tick Add the mix to the poly WAV, and set Mix Channel Placement to Before Poly Channels for the usual mix-first delivery layout. Export.
You get back a poly containing the rebuilt isos with the new mix on the front, plus the standalone mix file if you left that box ticked. The mix inherits the file's timecode, scene and take, and its track names are 'MIX L' and 'MIX R'.
Note: Doing this for a whole day rather than one take is the same two passes. Pass 2 works in batch, so the only per-take work is the channel assignment in pass 1.
If you would rather keep the mix and the merge apart, for instance to audition several mixes before committing to one, untick the embed option and combine the mix you settle on by hand in Split/Combine → Combine Poly. That is the same merge this option performs.
Align several transmitters to a reference and trim to the reference
Trimming to the reference is what separates this from a plain merge. Combine Group and Sync's poly export both run to the length of the longest file, so a transmitter that rolled through the whole scene gives you an output far longer than the take.
The tool that trims is Conform.
- Load the timecode reference file into the file list. It is the reference take, so do not add it to Secondary Recordings as well
- If the transmitters' timecode is not trustworthy, correct it first with the align-then-replace recipe above, stopping after the Write Timecode step
- Open Split/Combine → Conform → Match Reference and add every transmitter file as a secondary
- Tick Poly WAV Output. Each transmitter channel that overlaps the take becomes one channel of a single poly per take, and the output is exactly the reference take's window: transmitters that started late or stopped early are padded with silence rather than shortening the file
- Tick Merge with reference as well if you want the reference file's own channels in the poly. They are placed at the front by default
- Expand each output row in the Poly Output Preview to set the channel order, then choose a format and an output directory
- Click Combine & Export
Note: Poly WAV Output is what makes this land on the reference length. Without it, Match Reference writes one trimmed file per secondary and cuts each one short wherever the secondary does not cover the whole take, which is not the same thing.
Deliver a poly when you only recorded transmitters
No reference file, no take list, just continuous transmitter recordings that need cutting down.
If the transmitter files carry timecode, use Split/Combine → Conform → Custom TC Range:
- Add every transmitter file as a secondary
- Start TC and End TC arrive prefilled with the full span of what you loaded. Type the window you actually want. Full range puts the original span back
- Enter a Scene and Take if you want them in the output filename
- Tick Poly WAV Output, set the channel order in the preview, choose a format and an output directory
- Click Combine & Export
The output is exactly the window you typed, silence-padded for any transmitter that only partly covers it, and its start timecode is set to your Start TC. Repeat for each take.
If the transmitter files carry no timecode at all, give them some first, then come back:
- A timecode burst recorded at the head of the file: use Audio TC to decode it and write it in. Its own Assemble everything into one poly WAV, synced by timecode option may finish the job on its own
- No burst either: use Sync by Audio. Align the files to each other, type an Anchor TC and pick a frame rate, and write the timecode. If you do not need the output trimmed to a window, tick Export an aligned poly WAV in the same dialog and you are done in one pass
Export a sync-by-audio session as a poly WAV
Alignment and export are the same dialog, so this is one pass.
- Open the Sync tab and check the files you want, at least two
- Pick the matching channel for each lane, then click Align by Audio
- Press Play and confirm by ear. Nudge any lane that needs it
- If the reference lane has no timecode, type an Anchor TC and choose a frame rate
- Click Save & Export… and tick Export an aligned poly WAV
- Drag the rows in Channel Order to set where each lane's channels land. This changes the layout only and never moves anything in time
- Untick Include the anchor file in the poly if the anchor was only there to give the others something to line up against
- Set Output Format, Poly File Name and Output Directory, then export
Tick Write the aligned timecode to the original files as well if you want both. Timecode is written first, so a problem during assembly never costs you that write.
The two are independent. The poly is laid out from the alignment itself, not from stored timecode, so a session showing No TC on every lane still exports correctly with the timecode box left unticked.
Note: The exported timeline runs from the earliest lane to the latest. Lanes far apart in time produce a long, mostly silent file, and the estimate line warns you in amber before you commit.
Assemble files that already share timecode into a poly WAV
When the timecode is good and no audio alignment is needed, skip the Sync tab entirely.
- Any mixture of files, whatever their channel counts: Split/Combine → Combine Group. Files are grouped automatically by matching start timecode, sample rate, frame rate and length. Reorder and rename the output channels on the group card, pick which file donates the scene, take and other metadata, then combine
- Exactly two poly files: Combine Poly is the more direct route, and pairs them across a whole session at once
- Files whose timecode you just recovered from an audio burst: Audio TC has Assemble everything into one poly WAV, synced by timecode built in, so decode and assemble in one visit
- You also need it trimmed to a take or a window: none of the above trims. Use Conform's Poly WAV Output instead
Files that do not auto-match land in Unmatched Files. Select two or more and click Create Group to merge them regardless, or use + Add unmatched file to fold one into an existing group. The warnings that appear are informational and never block the merge.
Merge a stereo file and a mono file into an LCR poly
Combine Group is the one tool that interleaves channels from files of different widths, which is exactly what LCR needs: left and right come from the stereo file, centre from the mono one, and the centre has to sit between them.
- Load the stereo file and the mono file
- Open Split/Combine → Combine Group. If they share timecode, sample rate and length they are already grouped. If not, select both in Unmatched Files and click Create Group
- Expand Output channels. It starts as the three channels in file order, so the mono is at one end
- Drag the mono channel by its grip handle so it sits between the stereo file's two channels
- Rename the three channels to 'L', 'C' and 'R' by editing them in place
- Choose which file donates the rest of the metadata with the radio button in Source files
- Set the output format and directory, then click Combine
The same approach handles any fixed layout you need to build by hand, such as LCRS or a 5.1 bed assembled from separate stems.
Note: This builds an LCR channel layout. It places three existing signals in three channels. It is not a downmix, and nothing is derived or summed. To fold channels down into a stereo or mono mix, use Export Mix.
Merge 32-bit float isos with a separate mix track, take by take
Recorders working at 32-bit float often cannot embed the stereo mix in the same poly and write it as a second file. Combine Poly exists for this, and runs a whole day in one pass.
- Load every iso poly for the day into the file list. These are the primaries
- Open Split/Combine → Combine Poly
- Add every mix file with + Add Files, or drag them onto the secondary list. Each mix is paired to its iso file by timecode, and matched pairs turn green
- Set Secondary Channel Placement: Before Primary puts the mix channels first, After Primary appends them
- Choose the output format. Match primary keeps the 32-bit float files as they are, with no conversion pass. Pick Custom and 24-bit if the delivery calls for it, which converts in the same pass
- Tick Normalize channels to –1 dBFS if the float recordings were captured low
- Choose an output directory and click Combine N Pairs
You get one poly per take, named '{primary_filename}_combined.wav' unless you set your own scheme in Output Filename. Track names from both files are preserved.
Two things to check before you run it. Anything showing a warning badge has no timecode or found no partner, and will not be combined. And if a take's mix is longer than its isos, or the other way round, the output takes the longer length and pads the shorter with silence.
Note: If your isos are separate mono files rather than one poly, use Combine Group instead. It takes the monos and the stereo mix in a single pass, and you set the channel order on the group card.
Export a poly WAV with channels 3 and 4 removed
One pass, in Split Poly. The tool is named for splitting, but a routing row holding several channels writes one multi-channel file, so it does subsetting too.
- Select the poly file in the file list
- Open Split/Combine → Split Poly
- In the routing matrix, clear every row
- On the first row, click the cells for the channels you want to keep, leaving 3 and 4 unselected. On a 6-channel file that is channels 1, 2, 5 and 6
- Leave every other row empty. Rows with nothing selected are skipped, so this produces a single output file rather than one per channel
- Set the output directory and click Split
The result is one 4-channel WAV. Track names, iXML and bext metadata come across, with the track list renumbered to match the new channel layout.
The automatic name lists the channels it kept, so a 6-channel 'A001.wav' minus channels 3 and 4 becomes 'A001_1_2_5_6.wav'. Set your own scheme in the Output Filename section if that is not what you want to hand over.
Note: Channels keep their original relative order, so this cannot also reorder them. See the next recipe if you need both.
For a whole day of takes, use Track Replace instead. Split Poly works on one file at a time, so a day of takes means a run each. Conform → Track Replace lists every loaded poly at once, and the Drop channels preset in the Channel Assignment header sets the same dropped channels on all of them in one click; individual rows can be adjusted per take afterwards. Export writes the lot. Nothing has to be replaced for this to work: dropping channels on its own is a complete job. The trade is that Track Replace only accepts polyphonic files that carry timecode, where Split Poly will take any poly at all. See Dropping channels from the output.
Change the track order of a poly WAV
Wave Copilot can set channel order while building a file, in Combine Group, in Conform's Poly Output Preview, in Sync's export dialog and in the Audio TC results table. It cannot reorder the channels of a poly file in place, and Combine Group needs at least two files so it cannot be used on a single poly.
Two passes, then. Split it apart, and put it back together in the order you want.
- Select the poly file and open Split/Combine → Split Poly
- Leave the default routing, one channel per output file, and split to a working folder
- Load the resulting mono files into the file list
- Switch to the Combine Mono sub-tab and choose Manual mode
- In the routing matrix, each row is an output track and each column is one of the mono files. Click the cell that puts the file you want on track 1, then track 2, and so on, in the order you want them
- Leave a row empty to drop that track from the output entirely
- Set the output file path and click Combine
Alternatively, load the mono files and use Combine Group, where you drag the output channels into order and rename them in place. It is the more comfortable interface of the two, since it shows you the finished layout as a list.
Deliver a Mid/Side rig decoded, keeping the raw isos
You recorded a Mid/Side pair alongside the rest of the mics, and the picture department wants ordinary stereo.
- Load the take and open the Console on the Playback tab
- Click MS on the strip carrying the mid microphone. It pairs with the channel beside it. If your tracks are named, click the wand icon at the top right instead and it pairs every rig in the file at once
- Play the take and set the width with the side strip's fader. Fully down is mono, 0 dB is the recording as made, up is wider. The mid fader sets the level of the pair
- If several takes share the same rig, click the lock icon. The pairing and the width carry to each take you step through, since channels are matched by position
- Open File > Export Mix...
- Under Mid/Side decoded poly WAV, tick Add decoded pairs after the isos
- Click Export Mix
You get a poly carrying every original channel untouched, with decoded left and right appended and named after the mid channel. Tick Replace the M/S isos in place instead if the delivery should have no raw mid or side left in it, or tick both to produce one of each.
The decode is unity, so a pair can sum louder than either microphone. Any pair that would go past full scale is lowered by just enough to fit and the amount is reported when the export finishes. That report is also where you choose Add to List to load the new files into the main file list, or Don't Add to leave them on disk. See Mid/Side decoded poly WAV.
Situations that come up
My transmitter files have no timecode at all. If you recorded a timecode burst at the head, Audio TC decodes it and writes real BWF timecode. If you did not, Sync by Audio aligns the files by their audio and writes timecode from an Anchor TC you type. After either, the files behave like recorder files everywhere else in the app.
The transmitter split into several files mid-take. Conform's Poly WAV Output groups secondary channels by track name, so two files sharing a track name are stitched into one channel automatically, with silence filling any gap between them. Nothing to configure, but it does depend on the track names matching.
One transmitter was dead all day. In Track Replace, silent channels are flagged with a warning icon and the Silence threshold slider sets the level below which a channel counts as silent, from −90 to −48 dBFS. Reset silent tracks to Keep Reference switches them all back in one click, or tick Remove silent tracks from output to drop them from the exported files entirely and reduce the channel count. That covers channels that are silent; to leave out a channel that has perfectly good audio on it, such as a mix you are about to rebuild, drop it by hand or by preset instead. See Dropping channels from the output.
The 32-bit float secondary was recorded very low. Every Conform mode, both Combine Poly and Combine Group, and Sync's poly export all offer Normalize audio to –1 dBFS. The file is analysed first and a gain adjustment applied so the peak lands at −1 dBFS. It works on any format, not just float. If the level is held down by the occasional loud click or clap rather than by the recording as a whole, also tick Spike Reduction under it.
The transmitter ran at a different sample rate from the recorder. Conform's match table flags it with a warning icon and converts on export, so choose Match reference as the output format to land on the recorder's rate. Combine Poly and Combine Group convert automatically too. The one exception is Track Replace, which has no format control and always matches the reference file.
I need the scene, take and tape to survive the merge. In Combine Group, the radio button next to each file in Source files chooses which file donates the metadata, and it also drives the Scene and Take chips in the Output Filename section. In every Conform mode the metadata comes from the reference file, with track names taken from the secondary files. In Combine Poly it comes from the primary.
Where do the track names come from. Split Poly, Combine Mono and Combine Poly carry names through from the source files. Combine Group defaults to each source's own name and lets you edit any of them. Conform takes names from the secondary files and rewrites the iXML track list to match the final layout. Export Mix replaces them with 'MIX L' and 'MIX R', or 'MIX' in mono, since the original per-channel names no longer describe the file.
The editor wants an MP3 or AAC, but needs the timecode. Export Mix writes both, and preserves the start timecode: MP3 as ID3 TXXX tags, AAC as format tags, and both with the timecode appended to the filename. Format Conversion does the same for a straight transcode with no mixer settings applied.
How do I check the sync before committing to an export. In the Sync tab, Play mixes every lane together with per-lane mute, solo and volume, so you can judge the alignment by ear before saving anything. Everywhere else, export first and then load the result back into the file list and play it. Conform outputs carry correct timecode, so they can go straight into a sound report as well.
My files are over 4 GB. Supported throughout. Any output that crosses 4 GB is written as RF64 automatically, and large source files stream rather than loading into memory.
How many channels can one file have. 64, which is the app's playback limit. Combine Group caps groups at 64 and warns you about anything it had to leave out.
Licensing & Activation
Wave Copilot requires a license for continued use after the trial period.
Trial Mode
- Duration: 14 days from first launch
- Features: Full functionality during trial
- Trial Banner: Shows remaining days at top of window
- Expiration: Trial modal appears when trial ends
Activating a License
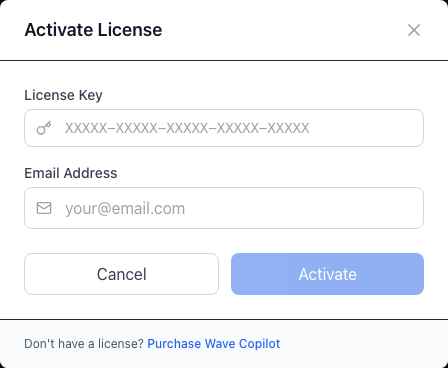
- Purchase a license from the Wave Copilot website
- You'll receive a license key via email (format: XXXXX-XXXXX-XXXXX-XXXXX-XXXXX)
- In Wave Copilot, go to Help > License Information
- Click Activate License
- Enter your license key and email address
- Click Activate
License Details
- Hardware Locked: License is tied to your computer
- Activation Limit: A standard licence covers 2 computers for one person's own use; shared or lab workstations need one licence each. Site licences covering a room or a facility are available for schools and post houses, contact 1KHZ
- Online Validation: The licence revalidates online every 7 days (requires internet)
- Offline Grace Period: Works offline for up to 14 days since the last successful validation
- Full terms: The licence agreement is at 1khz.ca/en/eula, also linked from Help > About, or Wave Copilot > About on macOS. Use the language switcher on that page for French
Viewing License Status
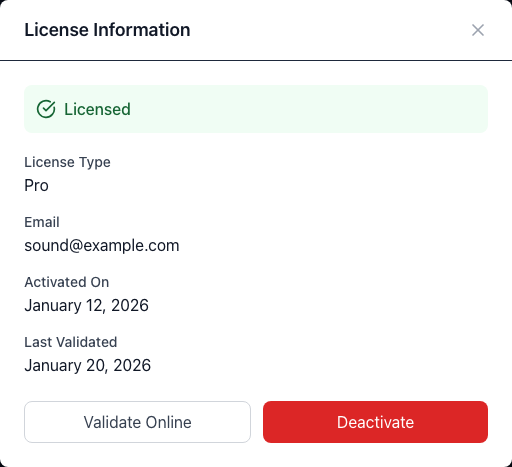
Go to Help > License Information to see:
- License status (Active/Trial/Expired)
- Registered email
- Machine ID
- Expiration date (if applicable)
- Last validation date
Deactivating a License
To move your license to a different computer:
- Go to Help > License Information
- Click Deactivate
- Confirm deactivation
- Activate on your new computer
Deactivating needs an internet connection, because the seat has to be released on the licence server as well as on your computer. If the server cannot be reached, Wave Copilot leaves the licence in place and tells you so, rather than releasing it here while the server still counts the machine. If you no longer have the computer at all, release its seat from the website instead, as described below.
Managing Activations Online
You can also manage your license activations directly from the 1KHZ website. This is particularly useful if you see the error "This license has reached the maximum number of activations. Please deactivate on another machine first." and you no longer have access to the previously activated machine.
- Log in to your account at 1khz.ca
- Go to My Account > My Licenses
- Your license is listed with all currently activated computers
- Click Deactivate next to any machine you want to remove
This frees up an activation slot so you can activate on a new computer.
Keyboard Shortcuts
Global Shortcuts
| Shortcut | Action |
|---|---|
| 'Ctrl/Cmd + O' | Add files |
| 'Ctrl/Cmd + Q' | Exit application |
| 'Del' | Remove selected files |
| 'F1' | Open user guide |
Navigation
| Shortcut | Action |
|---|---|
| 'Ctrl/Cmd + F' | Go to Files & Metadata |
| 'Ctrl/Cmd + M' | Go to Playback |
| 'Ctrl/Cmd + I' | Go to Split/Combine |
| 'Ctrl/Cmd + Y' | Go to Sync |
| 'Ctrl/Cmd + T' | Go to Audio TC |
| 'Ctrl/Cmd + R' | Go to Reports |
File Operations
| Shortcut | Action |
|---|---|
| 'Ctrl/Cmd + E' | Copy files to... |
| 'F2' | Rename file |
| 'Ctrl/Cmd + K' | Open Convert Format |
| 'Ctrl/Cmd + D' | Open Export Mix |
Conform, Track Replace
Only while Track Replace is the panel on screen, and not while a text field has focus, so typing in a filename or a timecode keeps its own undo.
| Shortcut | Action |
|---|---|
| 'Ctrl/Cmd + Z' | Undo the last assignment change |
| 'Shift + Ctrl/Cmd + Z' | Redo the change that was taken back |
Waveform Zoom
Also applies on the Sync tab, zooming/panning that tab's timeline instead.
| Shortcut | Action |
|---|---|
| 'Ctrl/Cmd + -' | Zoom out 1.5× (centred on playhead) |
| 'Ctrl/Cmd + =' | Zoom in 1.5× (centred on playhead) |
| 'Ctrl/Cmd + 0' | Reset zoom to 1× (full overview) |
Playback
| Shortcut | Action |
|---|---|
| 'Space' | Play from current position when stopped. When Return to Start is off: pauses in place when playing. When on: stops and returns to play-in point |
| 'L' | Seek +5 s when stopped; while playing, each press doubles speed (1×, 2×, 4×, 8×) |
| 'K' | Play from current position when stopped; pause in place when playing (resets shuttle speed to 1×) |
| 'J' | Seek −5 s when stopped; while playing, each press halves speed (8×→4×→2×→1×), pausing at 1× |
| 'Home' | Seek to beginning |
| 'End' | Seek to end |
| 'F3' | Stop (triggers Return to Start if enabled) |
| '←' / '→' | Load previous / next file (Playback tab) |
| 'Q' | Add cue at current position |
| 'N' | Navigate to next cue |
| 'B' | Navigate to previous cue |
These apply on the Playback tab. On the Sync tab, 'Space' instead plays/pauses the audition mix of the selected lanes, and it does the same in the Conform tab's Audition strip whenever that is open. The Audition strip also answers to 'K', 'J' and 'L' (shuttle and 5 s skip, as above) and to 'I' / 'O' for the In and Out locators.
Mixer
| Shortcut | Action |
|---|---|
| Double-click pan slider | Reset pan to center |
| Double-click gain fader | Reset gain to 0 dB (unity) |
| 'Ctrl/Cmd' + click Solo (S) | Exclusive solo, solos only this channel and unsolos all others |
Troubleshooting
Common Issues
Files won't load
- Ensure files are valid WAV format
- Check that files are not corrupted
- Verify file permissions allow reading
No audio playback
- Check your system audio output settings
- Verify the mixer channels aren't all muted
- Try a different audio file to isolate the issue
Metadata not saving
- Ensure you have write permissions for the file
- Check that the file is not open in another application
- Verify the disk has available space
License activation fails
- Check your internet connection
- Verify the license key is entered correctly
- Ensure the email matches your purchase
- Contact support if problems persist
Application crashes
- Check for available updates
- Try restarting the application
- Clear application data and restart
- Report the issue with crash details
Performance Tips
- Large files: Files over 1.5 GB use streaming playback
- Many files: Load only the files you need for better performance
- Batch operations: Process files in smaller batches if experiencing slowdowns
Logs and Diagnostics
Application logs can help diagnose issues:
- Windows: '%APPDATA%\Wave Copilot\logs'
- macOS: '~/Library/Logs/Wave Copilot/'
Support
Getting Help
- User Guide: Press 'F1' or go to Help > User Guide
- Check for Updates: Help > Check for Updates
Reporting Issues
If you encounter a bug or have a feature request:
- Go to 1khz.ca and use the contact details there, or email info@1khz.ca
- Describe the problem, including:
- What happened, and what you expected instead
- Steps to reproduce it
- Your operating system
- Wave Copilot version
- Any error messages
Contact
- Developer: 1KHZ Inc
- Website: https://1khz.ca
- Email: Support contact available on website
Appendix
Supported Audio Formats
| Format | Read | Write |
|---|---|---|
| WAV (PCM) | Yes | Yes |
| Broadcast WAV (BWF) | Yes | Yes |
| MP3 | Yes | No |
| AAC / M4A | Yes | No |
| AIFF | Yes | No |
MP3, AAC, M4A and AIFF are decoded internally and play like a WAV throughout the app, but nothing can be written back into them; see Non-WAV Audio Files.
Supported Metadata
bEXT Chunk:
- Description
- Originator
- Originator Reference
- Origination Date/Time
- Time Reference
- Version
- UMID
- Coding History
iXML Chunk:
- Project
- Scene
- Take
- Tape
- Notes
- Circled Flag
- Wild Track Flag
- Track Names
- Track Functions
- File Set Information
- Sync Points (Cues)
Drop-Frame Notation
Drop-frame timecode is written with a semicolon before the frames, as in '18:35:06;11', and non-drop with a colon throughout. Wave Copilot uses that convention everywhere it shows or accepts timecode, including the file list and the Metadata Editor, so you can tell at a glance which one a file carries.
When you type a timecode into a drop-frame file, the semicolon appears on its own once you have entered six digits; you can also type either separator yourself and it will be accepted.
Drop-frame skips frame numbers ';00' and ';01' at the start of every minute except every tenth, which is how 29.97 fps keeps pace with the clock. Only 29.97 has a drop-frame form.
Timecode Frame Rates
| Frame Rate | Common Use |
|---|---|
| 23.976 fps | Film (NTSC) |
| 24 fps | Film |
| 25 fps | PAL Video |
| 29.97 fps | NTSC Video (drop-frame available) |
| 30 fps | NTSC Video (drop-frame available) |
Wave Copilot - Professional Broadcast WAV File Management Copyright 2026 1KHZ Inc. All rights reserved.
Wave Copilot, Professional Broadcast WAV File Management.
Product page ·
Release notes ·
1khz.ca ·
info@1khz.ca
Copyright 2026 1KHZ Inc. All rights reserved.